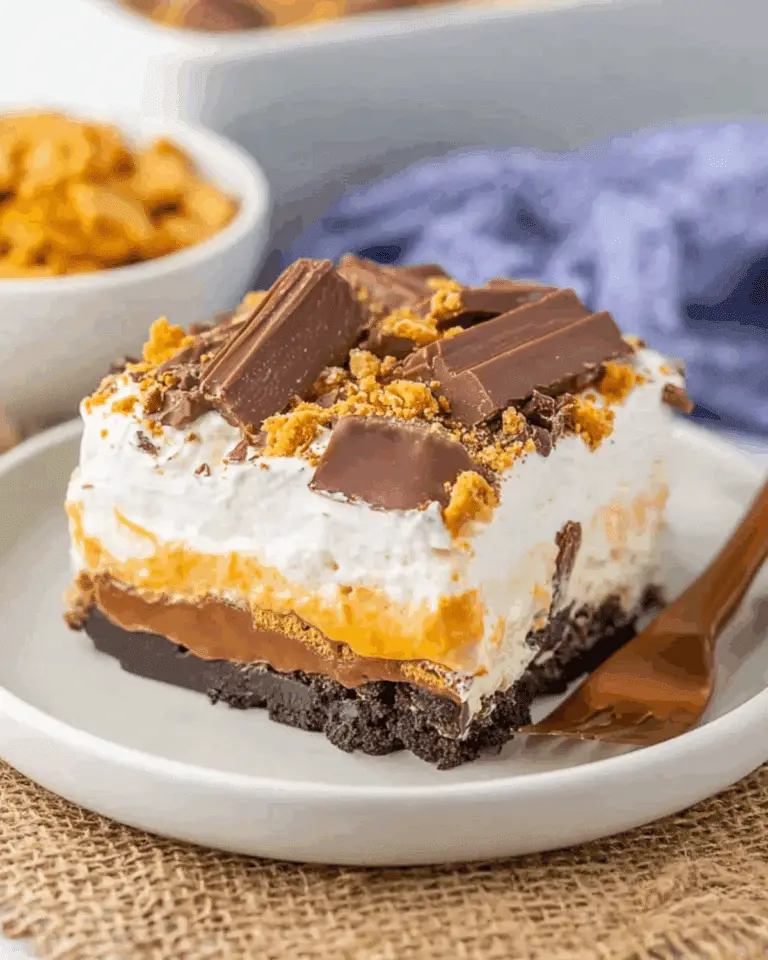
If you’re a peanut butter lover searching for the ultimate rich, creamy, chocolatey, and indulgent dessert, these Peanut Butter Dream Bars are exactly what you need. Featuring layers of creamy peanut butter filling, buttery graham cracker crust, smooth chocolate topping, and melt-in-your-mouth texture, this easy no-bake dessert is guaranteed to become a family favorite. Because they require minimal effort and no oven time, Peanut Butter Dream Bars are perfect for holidays, potlucks, parties, bake sales, family gatherings, birthdays, and quick dessert cravings.
What makes these Peanut Butter Dream Bars so irresistible is the perfect balance between creamy peanut butter and rich chocolate flavor. The buttery crust creates delicious crunchy texture while the peanut butter filling stays soft, rich, fluffy, smooth, and creamy. Meanwhile, the silky chocolate topping adds decadent sweetness that perfectly complements the salty peanut butter flavor. As a result, every bite tastes creamy, chocolatey, rich, sweet, salty, and completely satisfying.
Another reason these Peanut Butter Dream Bars are so popular is their simplicity. Since everything comes together quickly using pantry staples, this dessert is beginner-friendly while still tasting bakery-quality. Plus, they can easily be prepared ahead of time, making them perfect for entertaining or holiday dessert trays.
Peanut Butter Dream Bars are also incredibly versatile. You can customize them with crunchy toppings, different chocolate varieties, candy mix-ins, cookie crusts, caramel drizzle, marshmallows, or festive decorations depending on the occasion. Whether you want a classic chocolate peanut butter dessert or an over-the-top party treat, these bars can easily become your new favorite dessert recipe.
Whether you’re making dessert for birthdays, holidays, celebrations, potlucks, or everyday sweet cravings, these Peanut Butter Dream Bars are guaranteed to impress everyone who tries them.
JUMP TO
Table of Contents
Why You’ll Love These Peanut Butter Dream Bars
Easy No-Bake Dessert
Because these bars require no baking, they’re perfect for quick and simple dessert preparation.
Rich Peanut Butter Flavor
Every layer is packed with creamy peanut butter goodness.
Perfect Chocolate and Peanut Butter Combination
Chocolate and peanut butter create one of the most irresistible dessert combinations.
Great Make-Ahead Dessert
These bars taste even better after chilling, making them ideal for preparing ahead of time.
Perfect for Parties and Holidays
Peanut Butter Dream Bars are easy to slice and serve for gatherings.
Soft and Creamy Texture
The filling stays smooth, rich, fluffy, creamy, and melt-in-your-mouth delicious.
Beginner-Friendly Recipe
This recipe uses simple ingredients and easy preparation steps.
Family Favorite Dessert
Kids and adults both love the creamy peanut butter flavor and rich chocolate topping.
Perfect Freezer Dessert
These bars freeze beautifully for future desserts and sweet cravings.
Easily Customizable
You can customize the recipe with toppings, crusts, chocolate flavors, and mix-ins.
Great for Holiday Dessert Trays
These bars look beautiful on cookie trays and dessert platters.
Rich Bakery-Style Flavor
Even though they’re simple to make, these bars taste bakery-quality.
Perfect for Peanut Butter Lovers
Every bite delivers bold creamy peanut butter flavor.
Ingredients for the Best Peanut Butter Dream Bars
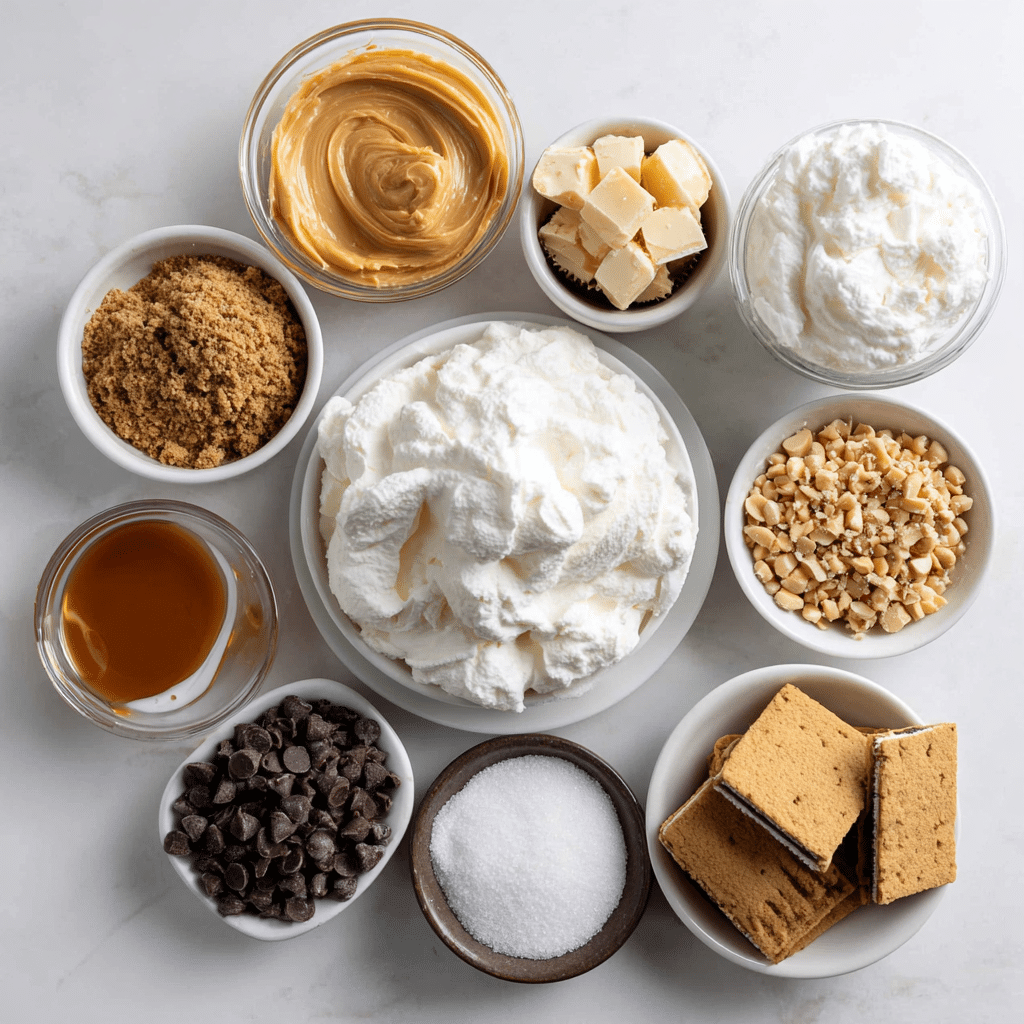
Graham Cracker Crumbs
Graham cracker crumbs create a buttery and slightly crunchy crust that balances the creamy filling.
Melted Butter
Butter binds the crust together while adding rich flavor and texture.
Creamy Peanut Butter
Creamy peanut butter creates the rich signature flavor of the bars.
Cream Cheese
Cream cheese creates creamy texture while balancing the sweetness beautifully.
Powdered Sugar
Powdered sugar sweetens the filling while helping maintain silky texture.
Whipped Topping
Whipped topping creates fluffy and airy texture in the peanut butter layer.
Chocolate Chips
Chocolate chips create the rich smooth chocolate topping layer.
Heavy Cream or Butter
Heavy cream or butter helps melt the chocolate smoothly.
Vanilla Extract
Vanilla enhances sweetness and balances flavor throughout the dessert.
Optional Toppings
Mini peanut butter cups, chopped peanuts, chocolate drizzle, sea salt, crushed cookies, caramel sauce, chocolate chips, pretzels, toffee bits, crushed candy bars, or marshmallows all work wonderfully.
Step-by-Step Guide to Making Peanut Butter Dream Bars
Step 1: Prepare the Crust
Mix graham cracker crumbs with melted butter until evenly coated.
Step 2: Press into the Pan
Press the crust mixture firmly into a parchment-lined baking dish.
Step 3: Chill the Crust
Refrigerate the crust while preparing the filling.
Step 4: Beat the Cream Cheese
In a large mixing bowl, beat softened cream cheese until smooth and creamy.
Step 5: Add Peanut Butter and Sugar
Mix in peanut butter, powdered sugar, and vanilla extract until fully combined.
Step 6: Fold in Whipped Topping
Gently fold whipped topping into the peanut butter mixture until light and fluffy.
Step 7: Spread the Filling
Spread the peanut butter filling evenly over the chilled crust.
Step 8: Prepare the Chocolate Topping
Melt chocolate chips with butter or heavy cream until smooth and glossy.
Step 9: Add Chocolate Layer
Spread melted chocolate evenly over the peanut butter layer.
Step 10: Add Toppings
Sprinkle chopped peanuts, mini peanut butter cups, sea salt, crushed cookies, or candy pieces over the chocolate if desired.
Step 11: Chill Until Firm
Refrigerate the bars until fully chilled and set.
Step 12: Slice and Serve
Cut into bars and serve chilled for the best texture and flavor.
Tips for Making the Perfect Peanut Butter Dream Bars
Use Softened Cream Cheese
Soft cream cheese creates smoother filling without lumps.
Chill Before Slicing
Proper chilling helps create cleaner slices and firmer texture.
Use Creamy Peanut Butter
Creamy peanut butter creates the smoothest texture and easiest mixing.
Line the Pan with Parchment Paper
Parchment paper makes removing and slicing easier.
Don’t Overheat Chocolate
Melt chocolate slowly to prevent burning or grainy texture.
Refrigerate Overnight for Best Flavor
Longer chilling improves both texture and flavor significantly.
Use Sharp Knife for Clean Cuts
Wipe the knife clean between slices for neat bakery-style bars.
Add Sea Salt for Balance
A little flaky sea salt balances the sweetness beautifully.
Use High-Quality Chocolate
Better chocolate creates richer and smoother topping flavor.
Press the Crust Firmly
A compact crust prevents crumbling when slicing.
Chill the Mixing Bowl
A chilled bowl helps whipped topping stay fluffy longer.
Store Properly
Keep bars refrigerated until ready to serve for best texture.
Freeze Before Slicing
Brief freezing helps create extra clean dessert bars.
Creative Variations of Peanut Butter Dream Bars
Reese’s Peanut Butter Dream Bars
Top with chopped peanut butter cups for extra peanut butter flavor.
Oreo Peanut Butter Bars
Add crushed Oreos to the crust or topping.
Salted Peanut Butter Bars
Sprinkle flaky sea salt over the chocolate layer.
Peanut Butter Pretzel Bars
Add crushed pretzels for sweet and salty crunch.
Caramel Peanut Butter Bars
Drizzle caramel sauce over the chocolate topping.
Dark Chocolate Peanut Butter Bars
Use dark chocolate for richer flavor.
Peanut Butter Cheesecake Bars
Add extra cream cheese for cheesecake-inspired texture.
Peanut Butter Banana Bars
Layer sliced bananas between the filling and topping.
Crunchy Peanut Butter Bars
Use crunchy peanut butter for extra texture.
Holiday Peanut Butter Bars
Decorate with seasonal sprinkles for holidays and celebrations.
Peanut Butter Marshmallow Bars
Add mini marshmallows for extra sweetness and texture.
Triple Chocolate Peanut Butter Bars
Use chocolate crust and chocolate drizzle for intense chocolate flavor.
Coconut Peanut Butter Bars
Add shredded coconut for tropical flavor twist.
S’mores Peanut Butter Bars
Add marshmallows and crushed graham crackers for s’mores flavor.
Nutella Peanut Butter Bars
Swirl Nutella into the peanut butter filling for extra richness.
Cookie Dough Peanut Butter Bars
Add edible cookie dough pieces for extra indulgence.
White Chocolate Peanut Butter Bars
Use melted white chocolate for sweeter creamy flavor.
Serving Ideas and Presentation Tips
Serve Chilled
These bars taste best cold and firm straight from the refrigerator.
Garnish with Chocolate Drizzle
Extra chocolate drizzle creates elegant bakery-style presentation.
Add Chopped Peanuts
Peanuts add crunch and visual appeal.
Pair with Coffee or Milk
Coffee or cold milk pair perfectly with rich peanut butter flavor.
Arrange on Dessert Platters
These bars look beautiful on party dessert trays.
Add Whipped Cream
Whipped cream creates extra creamy texture and elegant presentation.
Serve at Celebrations
Peanut Butter Dream Bars are ideal for birthdays, holidays, and potlucks.
Decorate with Peanut Butter Cups
Mini peanut butter cups make the bars look extra indulgent.
Add Caramel Drizzle
Caramel creates extra richness and beautiful presentation.
Serve Frozen Slightly
Partially frozen bars create ice cream-like texture.
Sprinkle with Sea Salt
Sea salt enhances the chocolate peanut butter flavor beautifully.
Common Mistakes to Avoid
Not Chilling Long Enough
Warm bars may fall apart when sliced.
Using Cold Cream Cheese
Cold cream cheese can create lumpy filling.
Overheating Chocolate
Burned chocolate affects flavor and texture.
Skipping Parchment Paper
Removing bars becomes more difficult without parchment paper.
Using Natural Peanut Butter
Natural peanut butter may separate and affect texture.
Slicing Before Fully Set
Fully chilled bars hold together much better.
Overloading with Toppings
Too many toppings can make slicing messy.
Using Thin Chocolate Layer
A generous chocolate layer creates better flavor balance.
Forgetting to Soften Cream Cheese
Softened cream cheese blends much more smoothly.
Not Pressing the Crust Firmly
Loose crust may crumble while slicing.
Frequently Asked Questions About Peanut Butter Dream Bars
Can I make Peanut Butter Dream Bars ahead of time?
Yes, they’re perfect for making one or two days ahead.
How long do Peanut Butter Dream Bars last?
They stay fresh for up to five days when refrigerated.
Can I freeze Peanut Butter Dream Bars?
Yes, they freeze very well for up to two months.
Can I use crunchy peanut butter?
Yes, crunchy peanut butter adds extra texture.
Conclusion
These Peanut Butter Dream Bars are the perfect combination of creamy peanut butter filling, buttery graham cracker crust, rich chocolate topping, and melt-in-your-mouth texture. Because they’re easy to make, no-bake, customizable, and perfect for any occasion, they’re one of the best homemade desserts for peanut butter lovers. With their rich flavor, smooth texture, beautiful presentation, and irresistible chocolate peanut butter combination, these Peanut Butter Dream Bars are guaranteed to become one of your most requested dessert recipes.
PrintPeanut Butter Dream Bars Easy No-Bake Dessert

Peanut Butter Dream Bars are creamy no-bake dessert bars made with peanut butter filling, buttery graham cracker crust, fluffy layers, and rich chocolate topping for the ultimate indulgent treat.
- Prep Time: 35 minutes
- Cook Time: 0 minutes
- Total Time: 4 hours 35 minutes
- Yield: 16 bars
Ingredients
- 2 cups graham cracker crumbs
- 1/2 cup melted butter
- 1 cup creamy peanut butter
- 8 oz cream cheese, softened
- 1 1/2 cups powdered sugar
- 1 tsp vanilla extract
- 2 cups whipped topping
- 1 1/2 cups chocolate chips
- 2 tbsp heavy cream or butter
- Mini peanut butter cups for garnish (optional)
- Chopped peanuts for topping (optional)
- Sea salt for garnish (optional)
- Caramel drizzle for topping (optional)
- Crushed cookies or pretzels for topping (optional)
Instructions
- Mix graham cracker crumbs and melted butter together.
- Press the mixture firmly into a parchment-lined baking dish.
- Refrigerate the crust while preparing the filling.
- Beat softened cream cheese until smooth and creamy.
- Add peanut butter, powdered sugar, and vanilla extract and mix well.
- Fold whipped topping gently into the peanut butter mixture.
- Spread the filling evenly over the crust.
- Melt chocolate chips with heavy cream or butter until smooth.
- Spread the chocolate topping over the peanut butter layer.
- Add chopped peanuts, crushed cookies, or mini peanut butter cups if desired.
- Refrigerate until fully chilled and firm.
- Slice into bars and serve chilled.
Notes
- Use softened cream cheese for smooth filling.
- Chill thoroughly before slicing.
- Use creamy peanut butter for best texture.
- Store refrigerated for up to 5 days.
- Freeze for up to 2 months.
- Wipe knife clean between cuts for neat slices.
- Add sea salt for sweet and salty flavor.
- Use dark chocolate for richer flavor.
- Line the pan with parchment paper for easier removal.
- Press the crust firmly for cleaner slices.
- Do not overheat the chocolate topping.
- Refrigerate overnight for best flavor and texture.
- Freeze briefly before slicing for extra clean cuts.
Nutrition
- Serving Size: 1 bar
- Calories: 430
- Sugar: 30g
- Sodium: 260mg
- Fat: 31g
- Saturated Fat: 12g
- Unsaturated Fat: 17g
- Trans Fat: 0g
- Carbohydrates: 36g
- Fiber: 2g
- Protein: 8g
- Cholesterol: 32mg