Looking for a showstopping yet easy Halloween dessert that’s spooky, sweet, and irresistibly cute? Mummy Fudge is your new go-to Halloween party recipe. With just six ingredients and zero baking required, this ghostly white chocolate treat is a hit with both kids and adults. Plus, it’s easy enough to whip up in under 15 minutes, making it perfect for last-minute party prep or edible Halloween gifts.
Don’t miss our Halloween Pretzel Rods recipe if you’re planning a themed dessert table—they pair perfectly with mummy fudge!
JUMP TO
Table of Contents
Why Mummy Fudge Is the Ultimate Halloween Party Dessert
A Fun Twist on Classic White Chocolate Fudge
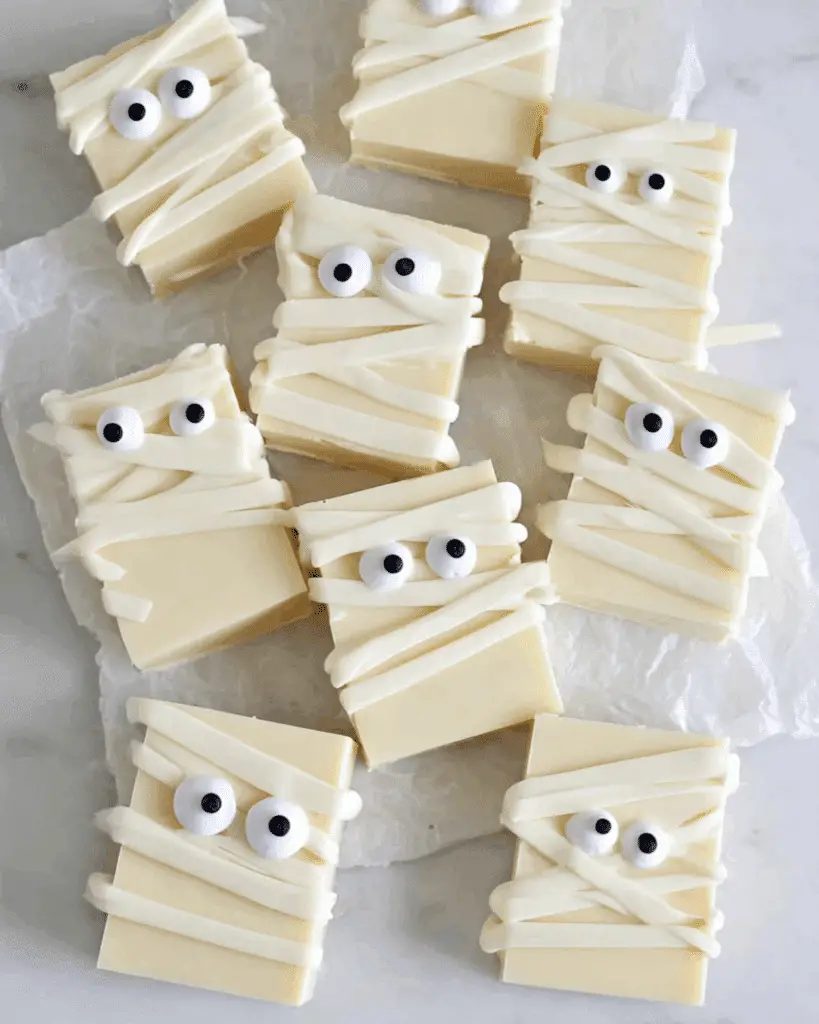
There’s something about white chocolate fudge that screams indulgence. But when it’s dressed up like a little mummy with candy eyes peeking out from white “bandages,” the fun factor goes through the roof. Unlike traditional fudge that often involves candy thermometers and careful timing, mummy fudge skips all the fuss and keeps things stress-free. No candy thermometer. No sugar stages. Just melt, mix, and decorate.
Perfect for Kids and Halloween Dessert Tables
Whether you’re hosting a haunted house party or just want to surprise your kids after school, these mummy squares are a guaranteed win. They’re small, mess-free, and adorable—ideal for classroom parties or Halloween snack boards. Even picky eaters will grab a square just for the candy eyes staring back at them.
You can also check out our Halloween Dirt Cups—another festive no-bake dessert that’s a favorite among kids.
Quick Prep, No Baking Required
This no-bake recipe saves time without skimping on flavor. All you need is a stovetop or microwave and a bit of chilling time. In fact, the entire process takes less than 15 minutes of active prep. After setting in the fridge, just slice, drizzle with melted almond bark, and top with candy eyeballs for the finishing touch.
Looking for inspiration? Try our No-Bake Oreo Dessert Cups for another fuss-free treat you can add to your party menu.
Ingredients You Need to Make Mummy Fudge
Pantry-Friendly Ingredients
One of the best things about mummy fudge is its simplicity. Here’s everything you’ll need to make a spooky batch:
| Ingredient | Purpose |
|---|---|
| White Baking Chips | The base of your fudge—smooth, creamy, and meltable |
| White Almond Bark | Used for both the fudge base and the mummy drizzle |
| Sweetened Condensed Milk | Gives the fudge that signature rich, smooth texture |
| Pure Vanilla Extract | Adds depth and warmth to the flavor |
| Salt | Balances out the sweetness |
| Candy Eyeballs | The iconic finishing touch to bring the mummies to life |
These ingredients are usually available at your local grocery store, but if not, candy eyes and almond bark are easily found online.
Best Substitutions and Allergy Swaps
Need to adjust the recipe for dietary needs or missing ingredients? Here are a few helpful swaps:
- No almond bark? Use vanilla candy melts or white chocolate chips with a bit of coconut oil.
- Dairy-free option: Use dairy-free white chocolate chips and condensed coconut milk.
- Gluten-free friendly: All core ingredients are naturally gluten-free, but always check labels to confirm.
Don’t miss our Gluten-Free Monster Brownies for another allergy-friendly Halloween option!
Step-by-Step Instructions for Mummy Fudge Recipe
Let’s break down the process into foolproof steps. Whether you’re a beginner or a Halloween pro, this method is so easy, you’ll want to make it every year.
Melting the Fudge Base
Start by lining a 9×9-inch pan with parchment paper. In a double boiler (or microwave-safe bowl), melt together:
- 2 cups white baking chips
- 8 oz of white almond bark
- 14 oz sweetened condensed milk
Heat on medium, stirring until everything is nearly melted. Remove from the heat and stir in 1 tsp vanilla extract and 1/8 tsp salt until the mixture is smooth.
Pouring, Setting, and Slicing the Fudge
Pour the warm fudge mixture into your prepared pan and smooth it out with a spatula. Let it set for 2 hours in the fridge or about 4 hours at room temperature.
Once firm, cut into 16 evenly sized squares. If the fudge sticks to your knife, run the blade under hot water and wipe dry before slicing.
Decorating: Adding Eyeballs and Mummy Drizzle
Now for the fun part—decorating your mummy faces! Melt the remaining 12 oz of almond bark in the microwave, 20 seconds at a time, stirring between each round until smooth.
Transfer to a small plastic bag, snip off the corner, and use it like a piping bag:
- Add two dots of melted almond bark to each fudge square and press on the candy eyes.
- Then, drizzle thin lines across each square to mimic mummy bandages.
Let everything harden completely before serving.
Discover great ideas like these in our full guide on Ghost Oreo Balls—another easy-to-make Halloween hit.
Expert Tips for the Best Halloween Fudge Ever
How to Keep the Fudge from Burning
One of the biggest fudge-making mistakes is overheating the chocolate mixture. Whether you’re using a double boiler or microwave, the key is gentle, gradual heat. Stir continuously and remove from the heat as soon as it’s mostly melted—the residual warmth will do the rest. If you’re using a microwave, heat in 20–30 second bursts and stir between each.
Also, never walk away while heating—chocolate burns fast, and once scorched, it’s ruined.
Cutting Clean, Perfect Squares
Want Instagram-worthy mummy fudge squares? Here’s the trick: let the fudge fully set, then use a sharp knife warmed under hot water. Wipe the blade clean between each cut for smooth, clean edges. This makes a big difference in presentation—especially if you’re packaging them for party favors.
Creative Mummy Face Ideas for Extra Fun
While two candy eyes do the job just fine, you can customize each piece for added charm. Try angling the eyes for a confused or sneaky mummy look. Add Halloween-themed sprinkles or use colored white chocolate for neon mummy bandages.
Don’t miss our spooky-sweet Brownie Batter Dessert that also lets you get creative with toppings.
Serving and Storing Mummy Fudge
Make-Ahead Party Planning
One of the best parts about mummy fudge? It’s a make-ahead dream. Prep a batch a few days before your party and store it in an airtight container. That gives you more time to focus on costumes, decorations, or other party prep.
If you’re building a Halloween dessert board, pair the fudge with Halloween Chocolate Pretzel Spider Webs and mini cupcakes for a no-bake themed setup.
How to Wrap for Halloween Gift Bags
These little mummies make adorable edible gifts. Place each square in a mini cupcake liner and wrap in clear cellophane. Add a Halloween-themed twist tie or sticker for extra flair. These make fantastic classroom treats or favors for trick-or-treaters.
They also pair great with drinks like Baileys Hot Chocolate for adult parties.
Storage Tips: Fridge, Counter, and Freezer
Here’s how to keep your mummy fudge fresh and fabulous:
| Storage Method | How Long It Lasts | Notes |
|---|---|---|
| Room Temp | 1–2 weeks | Store in airtight container in a cool, dry place |
| Fridge | 3–4 weeks | Ideal if your kitchen runs warm |
| Freezer | 2–3 months | Wrap pieces individually in plastic, then place in a zip bag |
To thaw frozen fudge, just set it on the counter for a couple of hours. It’ll be ready to eat with no texture loss.
Variations and Creative Twists on the Mummy Fudge Recipe
Use Milk or Dark Chocolate Instead
If white chocolate isn’t your thing, you can easily swap it out. Milk or dark chocolate gives a richer, less sweet flavor—and the mummy bandages still pop beautifully against the darker base.
Try combining different chocolates for a marbled effect that adds a spooky twist to every bite.
Add Crunchy Layers (Cookies, Pretzels, or Cereal)
Want to take your mummy fudge up a notch? Mix in crushed Oreos, pretzel bits, or crispy rice cereal before pouring the fudge into the pan. This gives it an extra crunch and adds depth to the creamy texture.
You can even create themed layers using colored sprinkles or cookie crumbs for a graveyard-style bottom.
Try Colorful Mummies with Food Dye Drizzle
For a fun surprise, tint the white almond bark drizzle with Halloween gel food coloring—think neon green, orange, or purple mummies. Just make sure to use oil-based food coloring if you’re adding it to melted candy, or the texture may seize.
Looking for more creative candy options? Don’t miss our Fireball Fudge Dessert Recipe for something bold and boozy.
Pairing Ideas: What to Serve with Mummy Fudge
Other Spooky Desserts to Complement the Theme
If you’re hosting a full-blown Halloween bash, mummy fudge should be just one part of your dessert lineup. Add fun themed desserts like:
- Halloween Pasta Salad with Mozzarella Eyeballs
- Witch hat cupcakes
- Dracula’s kiss cookies
These crowd-pleasers create a cohesive, Insta-worthy dessert spread.
Festive Halloween Drinks to Serve
Every sweet treat needs a festive drink to match. Pair mummy fudge with:
- Witch’s Brew punch (lime sherbet + lemon-lime soda)
- Pumpkin spice milkshakes
- Baileys Hot Chocolate for grown-up ghouls
Display Ideas for Halloween Dessert Tables
Presentation matters—especially on Halloween! Stack fudge squares in a spooky coffin-shaped box, or arrange them in a spiderweb pattern on a black tray. Add a few fake cobwebs or toy spiders for effect.
For even more ideas, check out our spooky-fun Mummy Dogs—they’re a savory snack that complements your sweets.
Frequently Asked Questions About Mummy Fudge
Can I use the microwave to make this fudge?
Yes, absolutely. The microwave method is quick and mess-free. Simply combine the white baking chips, 8 oz almond bark, and sweetened condensed milk in a microwave-safe bowl. Heat in 30-second intervals, stirring each time, until smooth. Then proceed with the remaining recipe steps as usual.
What’s the best way to attach the candy eyes?
Use a tiny dot of melted almond bark as glue. After cutting the fudge, apply the almond bark with a piping bag or plastic baggie to the fudge surface, press on the candy eyes, and let it set for a minute before decorating the mummy bandages.
Can I freeze mummy fudge for later?
Definitely. Mummy fudge freezes well for up to 3 months. Wrap each piece in parchment or plastic wrap, place them in a freezer-safe container, and freeze. To serve, thaw at room temperature for 1–2 hours.
Why did my fudge turn out grainy?
Grainy fudge usually means the chocolate got too hot or was overheated. Use low heat, stir often, and avoid boiling the mixture. Always remove it from heat just before it’s fully melted, allowing the residual warmth to finish the job.
Can I make this ahead of time for a Halloween party?
Yes, mummy fudge is a perfect make-ahead treat. Store it in the fridge in an airtight container for up to 4 weeks, or at room temperature for about 1–2 weeks, depending on your climate.
Conclusion: Make Mummy Fudge Your Go-To Halloween Dessert
There’s no denying it—Mummy Fudge checks every box for a winning Halloween treat. It’s eye-catching, delicious, easy to make, and perfect for parties, gifts, or just getting in the spooky spirit. Whether you’re crafting a monster-themed dessert table or just want a fun edible project with your kids, this recipe delivers every time.
Discover great ideas like our Halloween Puppy Chow Recipe to round out your treat lineup.
Give this recipe a try—and don’t be surprised when it disappears faster than a ghost at midnight.
PrintMummy Fudge

Mummy Fudge is an easy, no-bake Halloween dessert made with white chocolate, almond bark, and candy eyeballs. It’s perfect for parties, gifting, and spooky fun with just 6 ingredients.
- Prep Time: 15 minutes
- Cook Time: 0 minutes
- Total Time: 2 hours 15 minutes
- Yield: 16 servings
- Category: Dessert
- Method: No-Bake
- Cuisine: American
- Diet: Vegetarian
Ingredients
- 2 cups white baking chips
- 20 ounces white almond bark (divided)
- 14 ounces sweetened condensed milk
- 1 teaspoon vanilla extract
- 1/8 teaspoon salt
- 32 candy eyeballs
Instructions
- Line a 9×9 inch square pan with parchment paper and set aside.
- In a double boiler or microwave-safe bowl, melt white baking chips, 8 oz of almond bark, and sweetened condensed milk until smooth.
- Remove from heat and stir in vanilla extract and salt.
- Pour mixture into prepared pan, smooth the top, and let it set (2 hours in fridge or 4 hours at room temperature).
- Cut set fudge into 16 squares using a warm knife for clean edges.
- Melt remaining almond bark and transfer to a piping bag or plastic bag with tip snipped off.
- Pipe two small dots on each piece of fudge to attach candy eyes.
- Drizzle the rest of the almond bark across the pieces to create mummy bandages.
- Let everything set completely before serving or packaging.
Notes
- Use microwave in 30-second intervals if not using stovetop.
- Run knife under hot water for clean cutting.
- Use oil-based food coloring to color almond bark if desired.
- Fudge can be stored at room temperature, in the fridge, or frozen.
- Customize mummy faces with different eye placements or sprinkles.
Nutrition
- Serving Size: 1 piece
- Calories: 404 kcal
- Sugar: 52 g
- Sodium: 80 mg
- Fat: 20 g
- Saturated Fat: 16 g
- Unsaturated Fat: 3.3 g
- Trans Fat: 0 g
- Carbohydrates: 52 g
- Fiber: 0.04 g
- Protein: 3 g
- Cholesterol: 13 mg