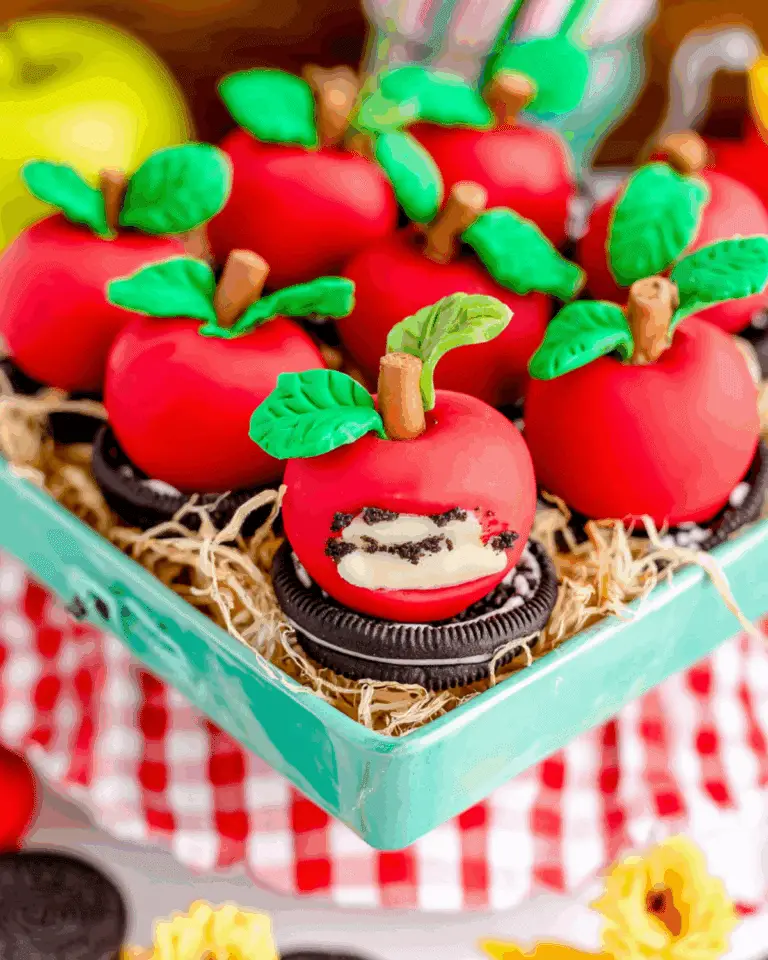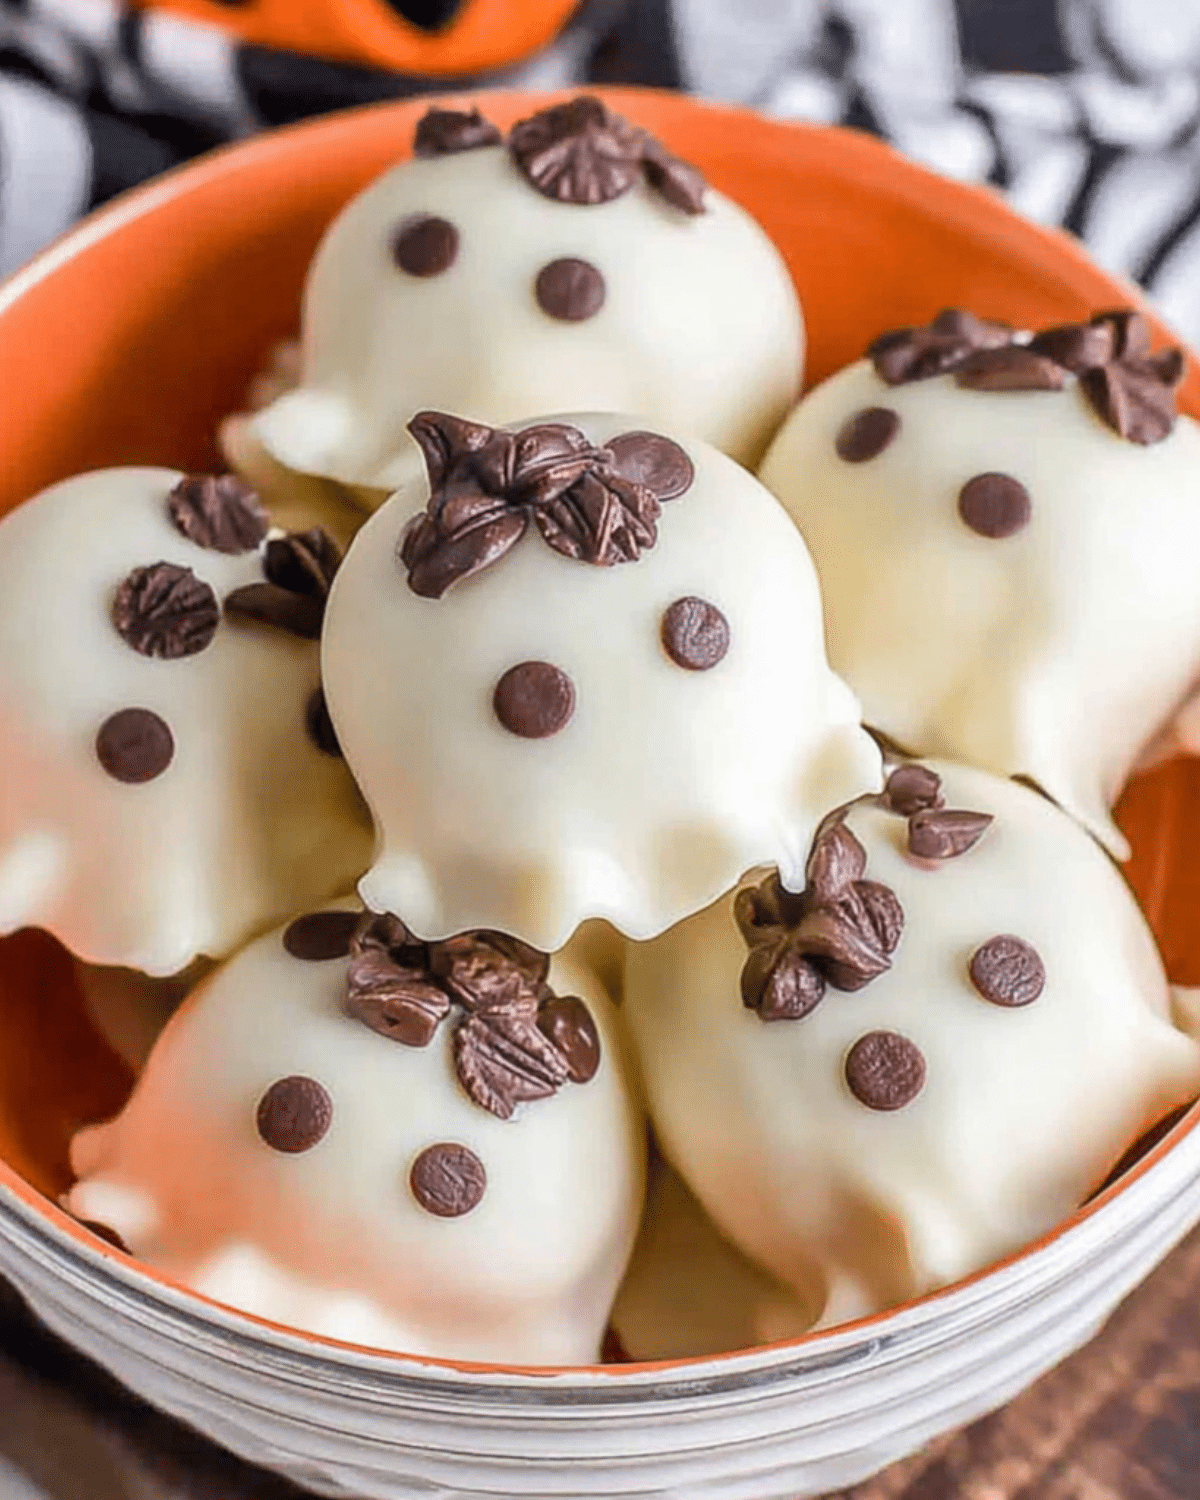
Halloween treats don’t get more delightful—or easier—than Ghost Oreo Balls. These bite-sized no-bake goodies turn America’s favorite cookie into spooky little ghosts with just a few ingredients. Perfect for parties, school events, or just a fun kitchen project with the kids, this Halloween recipe brings maximum impact with minimal effort. From crushing Oreos to decorating ghost faces, you’ll love how fun (and mess-free) these are to make.
Looking for inspiration? Try our Easy Halloween Snack Mix Recipe for a savory balance to this sweet treat.
JUMP TO
Table of Contents
Why Ghost Oreo Balls Are the Ultimate Halloween Dessert
Ghost Oreo Balls have quickly become one of the most viral Halloween desserts—and for good reason. Whether you’re a baking novice or an experienced home chef, this treat offers the perfect combo of easy prep, spooky cuteness, and irresistible flavor.
A Fun Twist on a Classic Oreo Truffle
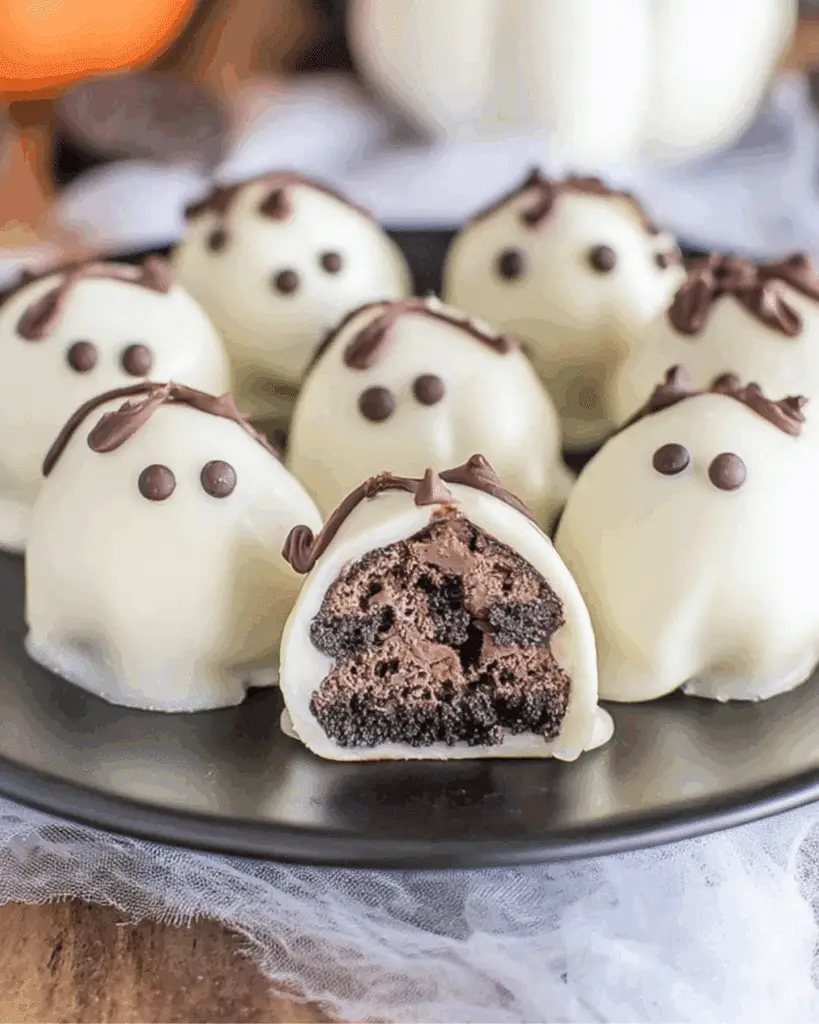
Oreo balls have long been a no-bake dessert staple. But shaping them into little ghosts adds an imaginative spin that kids and adults can’t resist. You still get that rich, chocolatey Oreo-cream cheese base—just now it’s dressed up for Halloween. Their ghostly look makes them stand out on any snack table and adds a playful touch to seasonal gatherings.
Kid-Friendly, No-Bake, and Irresistibly Cute
One of the best parts about making Ghost Oreo Balls is how kid-friendly the whole process is. There’s no hot oven, no sharp tools, and no need for complex skills. Just mix, roll, chill, dip, and decorate. Little ones can help at almost every step—from smashing Oreos to giving each ghost a silly or spooky face. Plus, the final product is small enough for little hands and just sweet enough to keep adults coming back for seconds.
Discover great ideas like our Halloween Pretzels Recipe for another fun project with the kids.
Minimal Ingredients, Maximum Spooky Charm
What makes this recipe so brilliant is how little it demands of your pantry. You’ll need just a handful of ingredients—Oreos, cream cheese, white chocolate coating, and a few basic decorations like chocolate chips or candy eyes. Despite the simplicity, the end result is show-stopping. The smooth, glossy coating gives each ghost a polished finish while the facial features bring out their personality.
Check out Spooky Fun Mummy Dogs Recipe for another hauntingly simple recipe with big visual payoff.
Ingredients and Tools You’ll Need
When it comes to making Ghost Oreo Balls, simplicity is key. With just a few easy-to-find ingredients and basic kitchen tools, you can whip up an adorable batch of these spooky no-bake treats in no time. Here’s what you need to know before you start rolling.
Simple Pantry Staples for a Hauntingly Good Bite
To create these creamy, chocolatey ghost bites, you’ll only need four primary ingredients. Here’s the breakdown:
| Ingredient | Purpose |
|---|---|
| Oreos (36 cookies) | Forms the base and structure of the truffle |
| Cream Cheese (8 oz, softened) | Binds the crushed Oreos into a dough |
| White Vanilla Melting Wafers (10 oz) | Gives the ghost its smooth, white “sheet” coating |
| Chocolate Chips or Decorating Gel | For drawing spooky or silly ghost faces |
| Optional: Candy Eyes | Adds personality and a fun twist to each ghost |
Want to make it even more festive? Use Halloween-themed Oreos with orange filling—it doesn’t affect the flavor, but it adds a little spooky fun to the inside when you bite in.
Discover great ideas like our Witch Hat Crescent Rolls Recipe for another festive finger food.
Recommended Tools to Make Shaping and Decorating Easier
While the ingredient list is short, having the right tools can make the process smoother and less messy. Here are the essentials:
- Food Processor or Zip-Top Bag + Rolling Pin – For crushing the Oreos into fine crumbs
- Mixing Bowl + Hand Mixer or Stand Mixer – To evenly combine the crumbs and cream cheese
- Cookie Scoop (1 TB) – Helps portion the mixture evenly and keeps your hands clean
- Parchment Paper or Silicone Mat – Prevents sticking and makes cleanup a breeze
- Toothpicks or Forks – Makes dipping the chilled balls easier and keeps them intact
- Microwave-Safe Bowl – For melting the coating wafers evenly
Looking for inspiration? Try our Pizza Skulls Delicious Recipe to stock up on more Halloween-themed kitchen fun.
Best Chocolate Coating Options for Smooth Results
White chocolate can be finicky to melt, so your choice here matters. The best options for coating your Oreo ghosts include:
- Ghirardelli White Vanilla Melting Wafers – Smooth texture and reliable melting quality
- Wilton Candy Melts – Widely available and made for dipping
- Vanilla Almond Bark or CandiQuik – Great for large batches or last-minute prep
Pro Tip: If the coating starts to thicken as you dip, microwave it for 10-15 seconds or stir in a teaspoon of coconut or vegetable oil to thin it out.
For another no-bake dessert idea, don’t miss our No-Bake Caramel Apple Pie Cheesecake Parfaits—creamy, dreamy, and ideal for fall.
Step-by-Step Guide to Making Ghost Oreo Balls
Ready to bring your spooky treats to life? Follow this easy, mess-free method to create the most adorable Ghost Oreo Balls that are as fun to make as they are to eat. You won’t need an oven, and the whole process takes under an hour from start to finish.
Crushing and Mixing the Perfect Truffle Base
First things first—prep your truffle filling.
- Step 1: Add 36 Oreo cookies to a food processor and pulse until they form a fine, sand-like crumb. No processor? No problem. Just toss the cookies into a large zip-top bag and crush them with a rolling pin.
- Step 2: In a large mixing bowl, combine the Oreo crumbs with 8 oz of softened cream cheese. Use a hand mixer or stand mixer to blend them until smooth. The mixture should hold together like a thick dough.
At this stage, the scent of chocolatey goodness is irresistible—try not to taste-test too much of the dough!
Shaping and Freezing for Mess-Free Dipping
Once your mixture is ready, it’s time to shape those spooky little bites.
- Step 3: Use a small cookie scoop (about 1 tablespoon) to portion out the dough onto a parchment-lined baking sheet. Roll each scoop between your palms to form smooth balls.
- Step 4: Place the tray into the freezer for at least 30 minutes. Chilling firms them up, which makes dipping easier and helps the coating stick evenly.
Pro Tip: If you’re making these for a party, you can freeze them overnight and dip them the next day to save time.
Dipping, Decorating, and Bringing Your Ghosts to Life
Now for the fun part—ghostifying your Oreo balls.
- Step 5: Melt your white vanilla melting wafers in a microwave-safe bowl. Start with 30 seconds, stir, then continue in 15-second bursts until fully smooth.
- Step 6: Take each chilled ball and insert a toothpick into the center. Dip it into the melted coating and gently tap off any excess. Place each dipped ball back on parchment paper to set.
Once they’ve hardened, it’s time to give your ghosts some character:
- Step 7: Melt a few chocolate chips and pipe them through a plastic bag with the tip snipped off to draw faces. Alternatively, use black decorating gel.
- Step 8: For extra personality, stick on candy eyes before the coating dries completely. Make each ghost smiley, scared, surprised—you name it!
Tip for Success: If the balls start to soften while dipping, pop them back in the freezer for 10 minutes. Cold centers help prevent sliding off toothpicks and make the coating process much smoother.
Ghost Oreo Ball Decorating Ideas & Tips
What sets Ghost Oreo Balls apart from basic truffles is their spooky-cute personality. Once dipped and hardened, the decorating phase is where the real magic happens. Whether you’re going for adorable, eerie, or hilarious, this is your chance to get creative.
Using Candy Eyes, Decorating Gel, or Melted Chocolate
There’s no one-size-fits-all when it comes to ghost faces. Here are the easiest ways to give your Oreo balls a hauntingly fun look:
- Candy Eyes: These are the easiest (and cutest!) addition. Just press them into the still-wet chocolate coating and they’ll stay put as it hardens.
- Black Decorating Gel: Available at most grocery stores during Halloween season, this is a simple way to draw expressive faces directly onto hardened coating.
- Melted Chocolate Chips: For a homemade option, melt a handful of chocolate chips and use a piping bag or zip-top bag with the corner snipped to draw eyes, mouths, or other ghostly features.
You can mix and match styles, too. Give one a goofy smile, another a surprised O-face, or a scary frown. Let the kids help and turn decorating into a Halloween craft session.
Don’t miss our Halloween Eyeball Brownies for another fun decorating project using candy eyes!
Give Each Ghost a Unique Expression
Want to take your spooky treats to the next level? Try this:
- Mix up the mouth shapes: Use gel to create surprised, scared, or even sleepy expressions.
- Go monochrome or multicolor: If you’re feeling bold, try colored melts (purple, green, or black) to create a gang of monster friends.
- Themed trays: Make a themed tray like “Ghosts in the Graveyard” using crushed Oreo crumbs as edible dirt and some tombstone cookie accents.
This level of variety makes your dessert table look like it came from a bakery, and it’s a guaranteed conversation starter at any Halloween party.
Check out our Spooky Fun Mummy Dogs for another snack that’s both cute and creepy.
How to Fix Common Decorating Mishaps
Even the best decorators hit a snag now and then. Here’s how to troubleshoot common ghost-decorating issues:
| Problem | Fix |
|---|---|
| Candy eyes won’t stick | Apply them while the coating is still wet, or add a dot of melted chocolate as glue |
| Gel smudges or runs | Make sure the coating is fully set before applying gel |
| Face details are too thick | Use a toothpick for finer details or snip a smaller hole in your piping bag |
| Dipping gets messy | Chill balls longer or use a fork to support them during coating |
Just like ghosts, no two Oreo Balls need to look exactly alike. Embrace the imperfections—they add charm and personality.
Looking for another themed treat? Try our Witch Hat Crescent Rolls for an easy, flaky snack with a fun Halloween shape.
Storing and Serving Ghost Oreo Balls
Once you’ve crafted the perfect batch of ghostly Oreo truffles, the last thing you want is for them to melt, smudge, or lose their charm. The good news? These spooky bites are just as easy to store and serve as they are to make. With a little planning, they’ll be party-ready when you are.
How Long They Last in the Fridge and Freezer
Because these truffles contain cream cheese, proper storage is essential to keep them fresh and safe.
- Refrigerator Storage: Place the finished Ghost Oreo Balls in an airtight container, separating layers with parchment paper. Store in the fridge for up to 7 days.
- Freezer Storage: Want to make them ahead? Freeze in a zip-top bag or airtight container for up to 1 month. Let them thaw in the fridge for a few hours before serving.
Freezing actually helps firm up the coating and makes them extra delicious. In fact, many people prefer eating them frozen, like Halloween truffle popsicles!
Don’t miss our No-Bake Caramel Apple Pie Cheesecake Parfaits—another freezer-friendly fall treat you can prep ahead.
Tips for Serving Them at Halloween Parties or School Treats
Whether you’re hosting a big bash or sending snacks to school, Ghost Oreo Balls are an ideal treat. Here’s how to make them stand out:
- Serve on a black tray or spooky platter for high contrast and eye-catching appeal.
- Add Halloween props like toy skeleton hands, plastic spiders, or dry ice fog for extra flair.
- Label each treat with funny names like “Boo Bites” or “Truffle Terrors” using mini chalkboard signs.
And remember: since they’re no-bake and bite-sized, they’re safe for small hands and easy to eat without forks or plates—just napkins and spooky vibes!
Check out our Pizza Skulls Recipe for another Halloween treat that’s both cute and crowd-pleasing.
Creative Packaging Ideas for Gifting
Want to spread the Halloween love? Ghost Oreo Balls make adorable (and edible) gifts. Try these packaging ideas:
- Clear Cellophane Bags: Wrap 3–5 ghosts per bag, tie with orange or black ribbon, and add a “You’ve Been Boo’d” tag.
- Mini Cupcake Boxes: Place ghosts in festive mini cupcake liners and tuck them into a box with a Halloween sticker seal.
- DIY Ghost Jars: Use mason jars filled with Oreo balls and a ghost face drawn on the outside with permanent marker.
These small gestures are perfect for neighbors, classmates, or coworkers—and they look like something you picked up from a boutique bakery.
Looking for inspiration? Try our Easy Halloween Snack Mix as a companion gift or party favor.
Ghost Oreo Ball Recipe Variations to Try
One of the best things about Ghost Oreo Balls is how endlessly adaptable they are. Whether you’re experimenting with different flavors, switching up the shape, or customizing them for other spooky characters, these variations will keep your Halloween dessert table fresh and exciting year after year.
Flavored Oreo Options and Cream Cheese Alternatives
The classic recipe uses original Oreos and plain cream cheese, but you can easily mix things up with flavored twists.
- Golden Oreos: Create vanilla-flavored ghosts for a lighter take.
- Mint Oreos: Add a green hue and fresh flavor for “Ghosts of the Graveyard.”
- Pumpkin Spice Oreos: Perfect for a fall-forward flavor with a warm, spicy kick.
- Flavored Cream Cheese: Try strawberry, chocolate, or cinnamon swirl cream cheese to amp up the uniqueness.
Don’t forget to label your flavors if serving a variety—guests will love the surprise!
Check out our Pumpkin Cheesecake Dip Recipe for another creamy, festive fall treat.
Turn Them Into Mummies, Pumpkins, or Monsters
Why stop at ghosts? Use the same base recipe to create an entire cast of Halloween characters:
- Mummies: Dip in white chocolate, then drizzle extra lines across like bandages. Add candy eyes peeking through.
- Mini Pumpkins: Use orange candy melts and a green M&M stem on top.
- Monsters: Use colored candy melts (green, purple, or blue), wild eyes, and fun expressions.
Let your creativity run wild—these characters are just as fun to make as they are to eat.
Don’t miss our Halloween Pretzels Recipe to pair with themed Oreo truffles on a spooktacular party tray.
Make a Spooky Oreo Ball Platter with Color Themes
Instead of a single ghost design, consider building a themed dessert board:
- Graveyard Tray: Use crushed Oreo crumbs as edible “dirt,” tombstone cookies, and scatter Oreo balls shaped like ghosts and pumpkins.
- Monster Mash Board: Add truffles of all shapes and colors with gummy worms, candy bones, and marshmallow “brains.”
- Elegant Black & White: Stick to classic ghost Oreo balls, black napkins, and silver platters for a minimalist Halloween vibe.
Serving variety adds visual interest and makes your dessert spread truly unforgettable.
Looking for a spooky upgrade? Try our Spooky Fun Mummy Dogs Recipe to round out your Halloween party menu.
FAQs About Ghost Oreo Balls
Can I make Ghost Oreo Balls ahead of time?
Yes! Ghost Oreo Balls are perfect for advance prep. Make and decorate them up to 5 days in advance and store them in the fridge in an airtight container. For even longer storage, freeze them for up to a month.
What if I don’t have melting wafers?
No problem. You can use white chocolate chips, almond bark, or candy melts instead. Just be sure to melt them slowly and stir often to avoid clumping. Add a tiny bit of coconut oil to help smooth the texture.
Can I make them allergy-friendly?
Absolutely. Use gluten-free Oreos, dairy-free cream cheese, and vegan white chocolate to adapt the recipe for most food allergies. Just double-check all labels to ensure there are no hidden allergens.
Do I need a food processor to crush the Oreos?
Not at all. You can place the cookies in a heavy-duty zip-top bag and crush them with a rolling pin. It takes a little elbow grease, but it gets the job done!
Can I use low-fat cream cheese?
Yes, but note that the texture may be slightly softer. Full-fat cream cheese provides a sturdier, creamier truffle, especially for dipping and decorating.
Conclusion: Spook Up Your Snack Table with These Easy Ghost Oreo Balls
If you’re looking for a Halloween treat that’s as fun to make as it is to eat, Ghost Oreo Balls check all the boxes. With their creamy centers, ghostly white shells, and adorable faces, these no-bake bites are guaranteed to haunt your dessert table in the best way.
They’re ideal for Halloween parties, school events, or spooky movie nights—and with so many creative variations, you’ll never run out of ideas. Whether you’re serving them cold, gifting them in cellophane bags, or adding them to a haunted dessert board, Ghost Oreo Balls are always a scream.
Looking for more Halloween inspiration? Don’t miss our Easy Halloween Snack Mix Recipe for the perfect salty-sweet pairing.
PrintGhost Oreo Balls

Ghost Oreo Balls are a no-bake Halloween treat made with just 4 ingredients. These bite-sized truffles are creamy, coated in white chocolate, and decorated to look like spooky-cute ghosts—perfect for parties, gifting, or a fun activity with kids.
- Prep Time: 30 minutes
- Cook Time: 0 minutes
- Total Time: 1 hour (includes chilling)
- Yield: 40 ghost balls
- Category: Dessert
- Method: No-Bake
- Cuisine: American
- Diet: Vegetarian
Ingredients
- 36 Oreo cookies (Halloween edition optional)
- 8 oz cream cheese, softened
- 10 oz white vanilla melting wafers (e.g., Ghirardelli)
- Chocolate chips, melted (for faces)
- Black decorating gel (optional)
- Candy eyeballs (optional)
Instructions
- Crush Oreo cookies in a food processor or zip-top bag until fine crumbs form.
- In a large bowl, combine the crumbs with softened cream cheese until fully mixed.
- Scoop out the mixture with a 1-tablespoon cookie scoop and roll into balls.
- Place the balls on a parchment-lined baking sheet and freeze for 30 minutes.
- Melt white vanilla wafers in the microwave, stirring every 15 seconds until smooth.
- Dip each chilled ball into the melted coating using a toothpick and place back on parchment paper.
- Let the coating harden completely before decorating.
- Use melted chocolate or decorating gel to draw ghost faces and add candy eyes if desired.
Notes
- Store in the fridge for up to 7 days in an airtight container.
- Freeze for up to 1 month in a sealed container.
- If coating thickens during dipping, microwave it again or stir in a bit of coconut oil.
- You can use other Oreo flavors like mint or pumpkin spice for variety.
- No food processor? Crush Oreos with a rolling pin.
Nutrition
- Serving Size: 1 ball
- Calories: 108
- Sugar: 9g
- Sodium: 74mg
- Fat: 6g
- Saturated Fat: 3g
- Unsaturated Fat: 2g
- Trans Fat: 0g
- Carbohydrates: 12g
- Fiber: 1g
- Protein: 1g
- Cholesterol: 8mg