Looking for a snack that’s healthy, fun, and guaranteed to spark smiles? Strawberry ladybugs are your go-to solution. With just four ingredients and less than 20 minutes of prep, you can whip up a creative treat that’s as delightful to look at as it is to eat. These fruity little ladybugs are the perfect snack for kids’ lunchboxes, birthday parties, or summer picnics.
Kids eat with their eyes first, and this recipe turns nature’s candy into adorable food art that even picky eaters won’t turn down. Plus, they’re naturally sweet, no-bake, and packed with vitamin C and antioxidants.
Looking for inspiration? Try our frozen yogurt bites recipe for another fun and healthy snack idea kids will love.
JUMP TO
Table of Contents
Why Strawberry Ladybugs Are the Perfect Fun-Filled Snack
Turning healthy fruit into kid-approved art
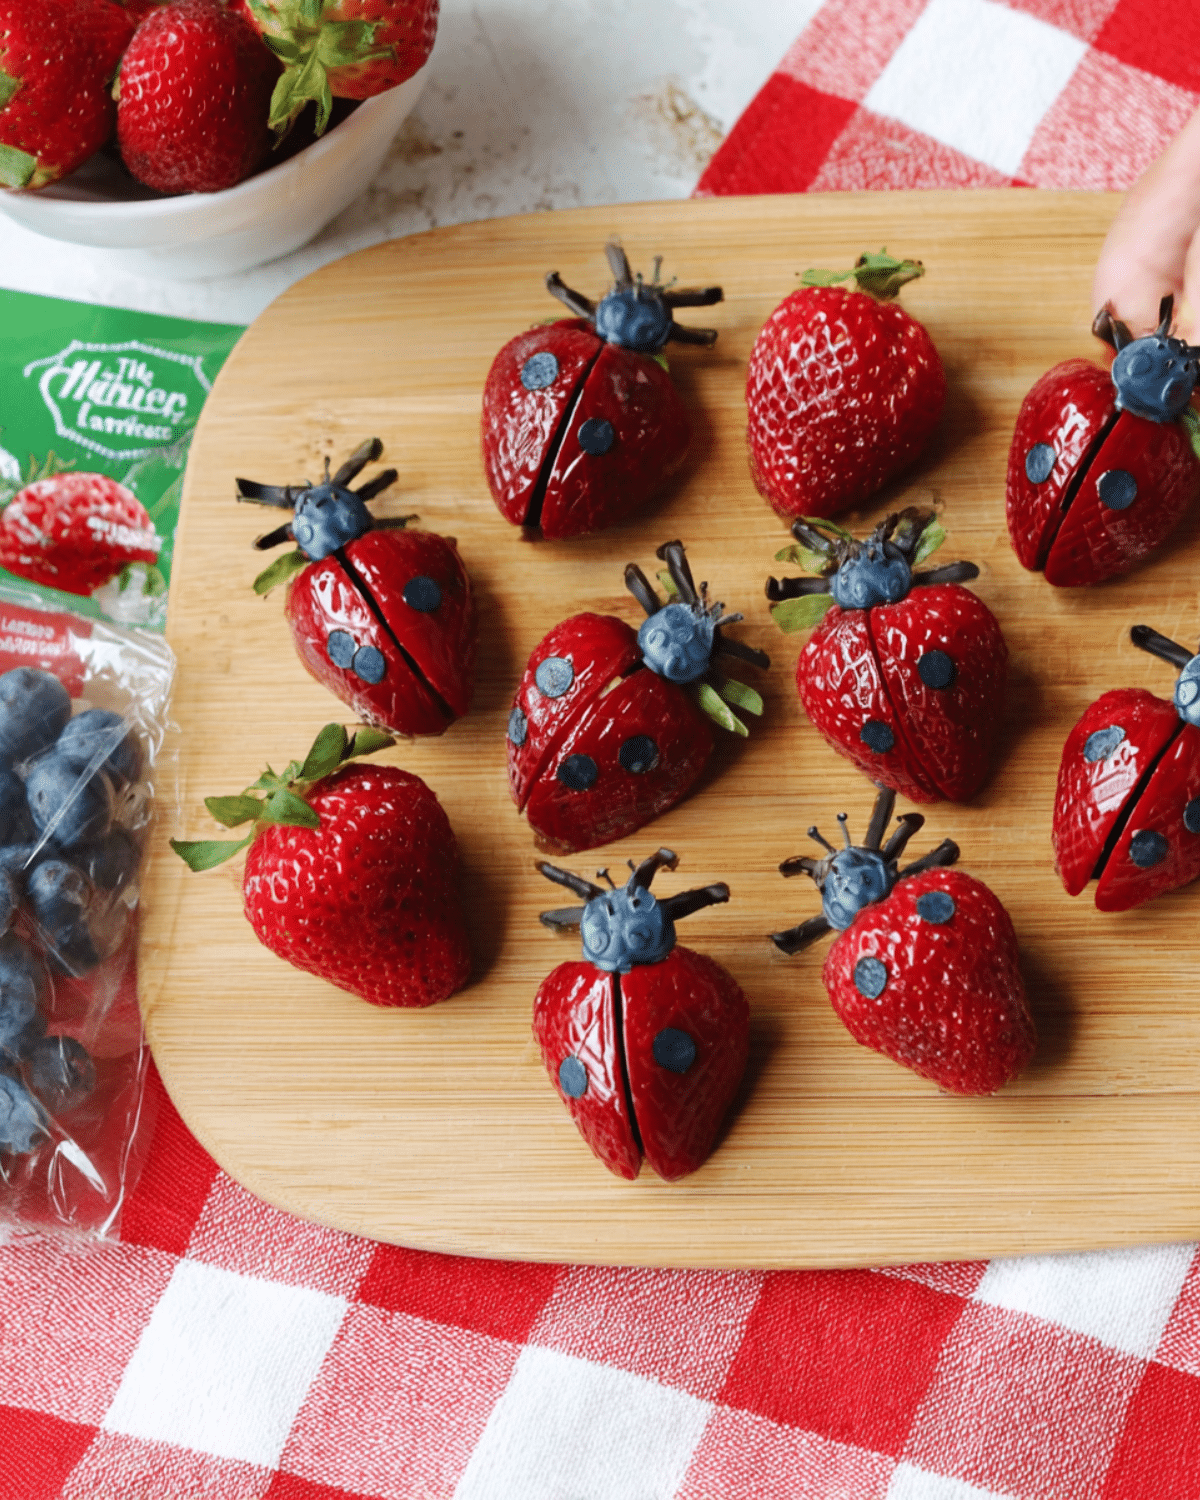
Let’s face it—getting kids excited about healthy snacks can be tough. But when you turn fruit into art, everything changes. These little ladybugs are made by halving strawberries to create wings, adding a blueberry for a head, and decorating with chocolate to form spots and legs. Suddenly, fruit becomes fun. This isn’t just a snack—it’s a story on a plate.
When you make food visually playful, it activates curiosity and engagement, especially with younger children. These strawberry ladybugs look like toys but taste like dessert, which is a win-win for parents and picky eaters alike.
Why even picky eaters will love them
Strawberry ladybugs work because they’re cute, hands-on, and not messy. That’s a huge plus when you’re dealing with little ones. They’re easy to hold, bite-sized, and don’t require utensils. You can also let your kids help decorate them with melted chocolate—giving them a sense of ownership over the snack.
Studies have shown that kids are more likely to eat food they help prepare. Letting them “build” their own ladybugs turns snack time into an activity. Not only are they more likely to enjoy the food—they’ll ask to make it again.
Quick overview of nutritional benefits
Strawberries and blueberries are nutritional powerhouses, especially for children. Just one cup of strawberries packs in more than 100% of the recommended daily intake of vitamin C. Blueberries provide antioxidants, fiber, and are known to support brain health.
Here’s a quick look at what each serving of 2–3 strawberry ladybugs offers:
| Nutrient | Amount (Approx.) | Benefit |
|---|---|---|
| Calories | 126 | Light and snackable |
| Vitamin C | 81 mg | Boosts immunity |
| Fiber | 5g | Supports digestion |
| Sugar | 22g (natural) | No added sugar if you skip sprinkles |
| Fat | 1g | Minimal and heart-healthy |
For a treat that tastes like dessert but supports wellness, strawberry ladybugs deliver on all fronts. They’re sweet, satisfying, and much more wholesome than packaged snacks.
Ingredients and Tools You’ll Need to Create Strawberry Ladybugs
Creating these adorable edible bugs doesn’t take much—just a few fresh ingredients and basic tools you already have at home. Whether you’re prepping for a summer picnic or looking for a hands-on snack project with your kids, this list will help you gather everything you need for sweet, colorful success.
The 4 Simple Ingredients That Make the Magic
You don’t need to go overboard when it comes to ingredients. The beauty of this recipe is in its simplicity. Here’s what you’ll need:
| Ingredient | Quantity | Notes |
|---|---|---|
| Strawberries | 1 pint | Washed, dried, and halved |
| Blueberries | 1 pint | For the ladybug heads |
| Melting Chocolate | 1 bag | Dark chocolate preferred for contrast |
| Chocolate Sprinkles (optional) | 2 tbsp | Used for legs or decorative fun |
Keep in mind: using organic or sustainably-grown berries like those from Naturipe® is a great way to support health-conscious and eco-friendly practices. If you’re making this recipe for a party, double the ingredients to make sure you have enough for everyone.
Don’t miss our strawberry cream cheese pie if you want a decadent twist for dessert lovers.
Kitchen Tools to Simplify Prep
This recipe is designed to be easy and kid-friendly, so you won’t need fancy equipment. Here are a few tools to make the process smoother:
- Piping bag (or a zip-top bag with a tiny corner snipped)
- Paring knife for removing green caps and slicing berries
- Microwave-safe bowl or double boiler for melting chocolate
- Toothpicks or tweezers for placing sprinkles, if using
- Wax paper for a clean, non-stick surface during decorating
Want to save time? You can prep all the berries ahead of time and refrigerate them in a container until you’re ready to assemble. Just be sure they’re completely dry before decorating, or the chocolate won’t stick well.
Choosing the Best Berries for Freshness and Flavor
The secret to vibrant, juicy strawberry ladybugs is choosing firm, ripe fruit. Skip any mushy or overripe berries—they won’t hold their shape and can leak juice into the chocolate, making things messy. Here’s what to look for:
For Strawberries:
- Deep red color with minimal white at the top
- Sweet smell (if it smells like alcohol, it’s overripe)
- Dry packaging—avoid any with condensation
For Blueberries:
- Uniform size and color
- No shriveled skins
- Dry and firm to the touch
Check out our guide on how to store strawberries the smart way to keep your ingredients fresh longer.
By using high-quality fruit, your strawberry ladybugs will not only look adorable but taste incredibly fresh and juicy—just the way kids love.
Step-by-Step Guide: How to Make Strawberry Ladybugs
Once you’ve got your berries and chocolate ready, it’s time for the fun part—turning ordinary fruit into adorable strawberry ladybugs! This recipe is as enjoyable to make as it is to eat, and it’s a great hands-on activity for kids of all ages.
Prepping Strawberries for Wings
Start by rinsing your strawberries under cold water. Make sure they’re completely dry before decorating, or the chocolate won’t stick properly.
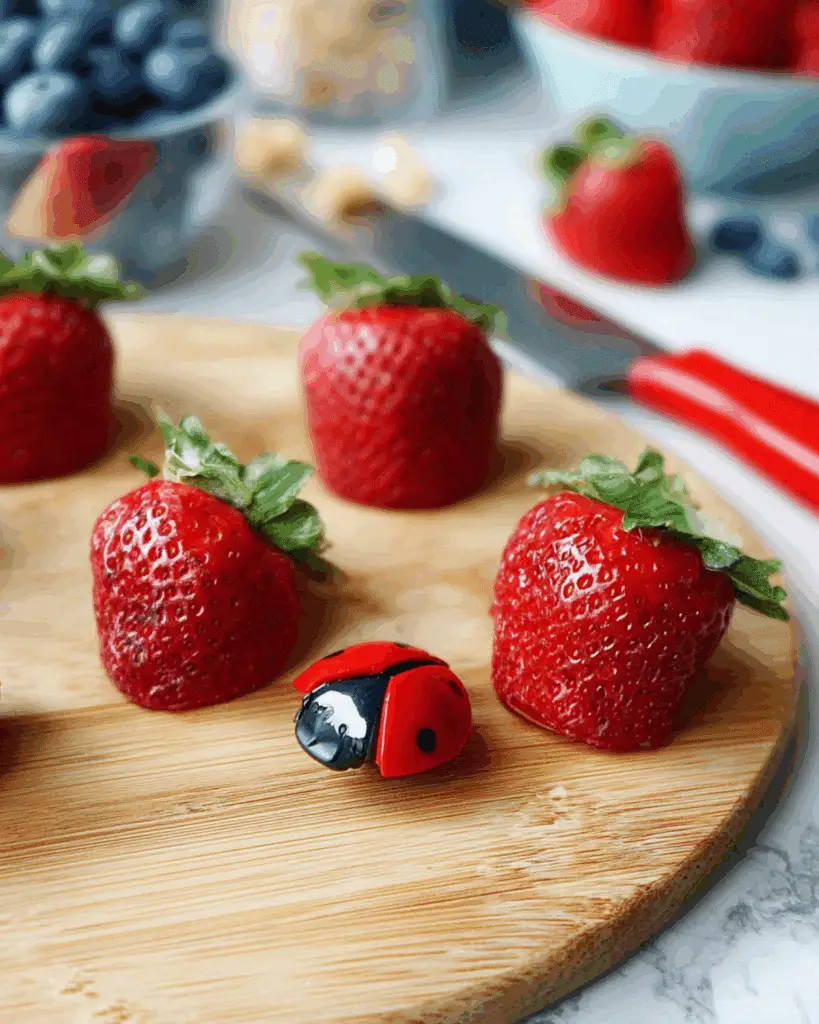
Using a paring knife, cut off the green leafy cap by slicing a small triangle at the top of each berry. This will form a notch where you’ll attach the blueberry head. Then, slice the strawberry in half lengthwise so each half forms the ladybug’s wings.
Pro tip: Don’t slice too thin—you want each half thick enough to hold its shape while decorating.
Check out our healthy watermelon fries for another creative way to slice fruit that’s fun and snackable.
Attaching Blueberry Heads
Next, melt your chocolate in a double boiler or in the microwave using 30-second increments, stirring between rounds until smooth.
Pour the melted chocolate into a piping bag or a zip-top plastic bag with a small hole snipped in one corner. Add a small dot of chocolate onto a blueberry and gently press it into the triangle notch you cut out of the strawberry. Hold it for a second or two until it sticks.
Repeat this step for every strawberry half until each one has its own cute blueberry head.
Creating Chocolate Details and Ladybug Legs
With your piping bag still warm and ready, pipe a thin line of chocolate down the center of the strawberry to create the ladybug’s back. Then, add three small chocolate dots on each side for the wing spots. Kids especially love helping with this part!
To add legs, you have two options:
- Use chocolate sprinkles and attach them to the sides with a dot of melted chocolate.
- Pipe small lines of chocolate directly on the tray near the bottom edge of the strawberry.
Either way, it adds character to your ladybugs and makes them look even more lifelike!
Looking for more food art ideas? Discover great ideas like our apple cake pops recipe that kids will love decorating and devouring.
Tips to Get Kids Involved in Decorating
Getting your children involved in the process isn’t just about fun—it’s a great way to build confidence in the kitchen. Here’s how to include them:
- Let them dip blueberries in chocolate
- Have them add sprinkles or pipe chocolate dots
- Use this as a counting activity (e.g., 3 dots on each side, 6 legs, 1 blueberry head)
Encouraging participation transforms snack-making into a learning experience.
Don’t miss our wafer pencil cookies for another hands-on dessert project perfect for back-to-school season.
Once the ladybugs are decorated, place them on wax paper and chill in the fridge for 10 minutes so the chocolate hardens before serving.
Smart Tips for Storage, Presentation, and Serving
Once you’ve created your strawberry ladybugs, it’s time to serve them up in style—or store them safely for later. With a few smart moves, you’ll keep them looking adorable and tasting fresh.
How to Store Ladybugs Before Serving
Strawberry ladybugs are best served the same day they’re made, but if you need to prep in advance, here’s how to store them right:
- Refrigerate on a flat tray: Place them on a wax paper–lined baking sheet or shallow container.
- Avoid stacking: They’re delicate, and stacking will smudge the chocolate or detach the blueberry heads.
- Cover loosely with plastic wrap: This prevents moisture buildup while keeping them fresh.
- Serve within 24 hours for the best appearance and flavor.
Pro tip: Avoid storing in airtight containers, which can trap moisture and make the chocolate sweat.
Want to extend your fruit game even further? Check out our berry watermelon fruit salad for another refreshing crowd-pleaser.
Creative Ways to Present Them at Parties and School Events
Strawberry ladybugs aren’t just delicious—they’re also a visual centerpiece. Try these ideas to take your snack tray from cute to unforgettable:
- Arrange in a spiral or garden pattern on a white platter with mint leaves for “grass”
- Use bento boxes for snack-time lunches
- Pair them with fun toothpick flags labeled with each child’s name
- Include them in a fruit tray shaped like a butterfly or rainbow
They’re especially perfect for themed parties like “Garden Tea Party,” “Bug Safari,” or “Spring Fling.” Pair with colorful drinks and flower-shaped fruit skewers to keep the fun going.
Don’t miss our rainbow fruit salad with honey lime dressing for a vibrant side dish to accompany your ladybug creations.
Best Pairings and Drink Ideas
To round out your snack table, pair your ladybugs with these refreshing sides and drinks:
| Pairing Idea | Why It Works |
|---|---|
| Cheesecake fruit salad | Creamy and tangy, complements the fruity sweetness |
| Infused water with mint and berries | Light and kid-approved |
| Lemonade slushies | Keeps the party cool and citrusy |
| Mini muffins or graham crackers | Balances texture with crunch and soft bites |
These pairings give your guests something to sip and savor without overpowering the delicate sweetness of the strawberry ladybugs.
Strawberry Ladybugs and Food Art for Picky Eaters
Let’s be honest—getting kids to eat fruit can feel like a daily battle. But when you turn everyday produce into something playful and hands-on, everything changes. That’s where food art—and especially strawberry ladybugs—come in.
The Power of Visual Appeal in Kids’ Snacks
Kids are more likely to try new foods when they look fun, familiar, or funny. That’s why strawberry ladybugs work so well: they look like something out of a cartoon, not a health food aisle.
Turning a strawberry into a bug might sound silly to adults, but for kids, it’s exciting and interactive. It’s all about presentation over persuasion—and the more whimsical the plate, the better the chance they’ll gobble it up.
Need more ideas like this? Discover great ideas like our notebook paper Rice Krispies treats that use classic snacks in clever ways.
Encouraging Children to Prep with You
When kids help in the kitchen, they feel a sense of pride and control. Plus, studies show that children who help prepare food are far more likely to eat it—especially when it’s healthy.
Here are a few fun ways to involve them:
- Let them wash and dry the fruit
- Have them stick on blueberries for the heads
- Challenge them to pipe the most perfect chocolate dots
Turn it into a game, and snack time becomes a learning activity.
Check out our apple Oreo balls for another fun prep-together treat that lets kids mix, roll, and enjoy their handiwork.
Other Easy Fruit Art Ideas to Try
If your little ones love the strawberry ladybugs, try these simple ideas next:
- Banana dolphins: Slice bananas and insert blueberries into the “mouth” for dolphin-shaped snacks
- Watermelon popsicles: Slice watermelon into triangles and insert popsicle sticks
- Fruit rainbows: Arrange berries, kiwi, and pineapple in a curved rainbow on a platter
- Animal toast: Use nut butter, bananas, and blueberries to create faces on bread
With a little creativity, your snack time can become a mini art gallery—and a nutrition boost in disguise.
Common Mistakes and How to Avoid Them
Even a simple recipe like strawberry ladybugs can go wrong without a few basic precautions. Whether you’re prepping for a party or just having fun with the kids, these common missteps can lead to messier results or frustrated little helpers. Let’s keep it smooth with these avoid-and-succeed tips.
Using Overripe Fruit or Runny Chocolate
One of the biggest issues with food art is ingredient texture. Overripe strawberries can leak juice, slide around, or become too mushy to hold their shape. And if your chocolate isn’t thick enough, it won’t stick to the fruit or form clear dots and lines.
Avoid it by:
- Choosing firm, bright red strawberries with no soft spots
- Letting melted chocolate cool slightly to thicken before piping
- Testing one ladybug before decorating the full batch
Check out our strawberry matcha latte recipe for another idea where ripe strawberries shine when used fresh.
Not Drying Fruit Properly
Wet fruit and chocolate are a recipe for disaster. Water causes chocolate to seize up and slide off. Even a bit of condensation can ruin the final look.
Here’s what to do:
- Dry strawberries and blueberries thoroughly after rinsing
- Lay them on a paper towel for 5–10 minutes before decorating
- Avoid prepping in a steamy kitchen—moisture in the air can affect your results too
Skipping the Chill Before Serving
Strawberry ladybugs may be no-bake, but they still need a little fridge time to hold their shape. Warm chocolate will smudge or melt if served too quickly—especially at summer picnics or birthday parties.
Fix this by:
- Chilling decorated ladybugs for 10–15 minutes
- Serving them on a cool tray (avoid leaving them in the sun)
- Keeping them refrigerated until guests arrive
Looking for a cool treat alternative? Don’t miss our iced mango matcha latte recipe that pairs perfectly with fruity snacks.
FAQs About Strawberry Ladybugs
How long do strawberry ladybugs last in the fridge?
Strawberry ladybugs are best enjoyed within 24 hours. Store them in a single layer on a wax paper–lined tray and refrigerate loosely covered. After 1 day, the chocolate may begin to sweat and the berries can soften.
Can I use other fruits instead of strawberries and blueberries?
Yes! While strawberries and blueberries create the most classic ladybug look, you can substitute raspberries for the body or small grapes for the heads. Just keep in mind that the contrast and shape may vary.
What type of chocolate works best for decorating?
Dark chocolate works best visually and holds shape well. However, you can use semi-sweet, milk, or even white chocolate if your kids prefer it. Use a piping bag or Ziploc to apply details cleanly.
Are strawberry ladybugs suitable for parties or picnics?
Absolutely! They’re a hit at baby showers, birthday parties, spring celebrations, or any gathering. Keep them cool, prep ahead, and serve them on decorative trays for a fun and healthy treat display.
Conclusion: A Wholesome, Creative Snack You’ll Want to Make Again
If you’re searching for a recipe that’s quick, healthy, and kid-approved, strawberry ladybugs check every box. With just four ingredients and under 20 minutes, you’ve got an adorable snack that transforms fresh fruit into pure joy. From picky eaters to party guests, everyone loves this edible art.
So the next time your kids reach for a sugary treat, bring out the berries, melt the chocolate, and let them decorate their own little ladybugs. It’s wholesome, hands-on fun—deliciously disguised as a snack.
Looking for more simple treats? Don’t miss our cheesecake fruit salad recipe to serve alongside your ladybugs for a fruity dessert duo.
PrintStrawberry Ladybugs
Strawberry Ladybugs are a fun, no-bake fruit snack made with just four ingredients. They’re perfect for kids, quick to assemble, and ideal for parties or healthy treats.
- Prep Time: 10 minutes
- Cook Time: 5 minutes
- Total Time: 15 minutes
- Yield: 4 servings
- Category: Snack
- Method: No-Bake
- Cuisine: American
- Diet: Vegetarian
Ingredients
- 1 pint strawberries, rinsed and halved
- 1 pint blueberries, rinsed and dried
- 1 bag melting chocolate
- 2 tablespoons chocolate sprinkles (optional)
Instructions
- Wash and dry all the fruit thoroughly.
- Cut each strawberry in half lengthwise and remove the green cap by cutting a triangle at the top.
- Melt chocolate in a double boiler or microwave in 30-second increments, stirring until smooth.
- Place chocolate into a piping bag or zip-top bag with a corner snipped.
- Add a dot of chocolate to a blueberry and press it into the triangle notch of the strawberry to form the head.
- Pipe a line of chocolate down the center of each strawberry half and add dots for ladybug spots.
- Optional: Attach chocolate sprinkles dipped in melted chocolate to the bottom sides for legs.
- Chill decorated ladybugs in the refrigerator for 10–15 minutes to set.
Notes
- Use firm, ripe strawberries for best results.
- Ensure fruit is completely dry before decorating to help chocolate stick.
- If you don’t have a piping bag, use a zip-top plastic bag with the corner snipped.
- Serve the same day for best freshness and appearance.
- Let chocolate cool slightly before decorating to avoid runny results.
Nutrition
- Serving Size: 2-3 strawberry ladybugs
- Calories: 126
- Sugar: 22g
- Sodium: 2mg
- Fat: 1g
- Saturated Fat: 0.3g
- Unsaturated Fat: 0.5g
- Trans Fat: 0g
- Carbohydrates: 31g
- Fiber: 5g
- Protein: 2g
- Cholesterol: 0mg