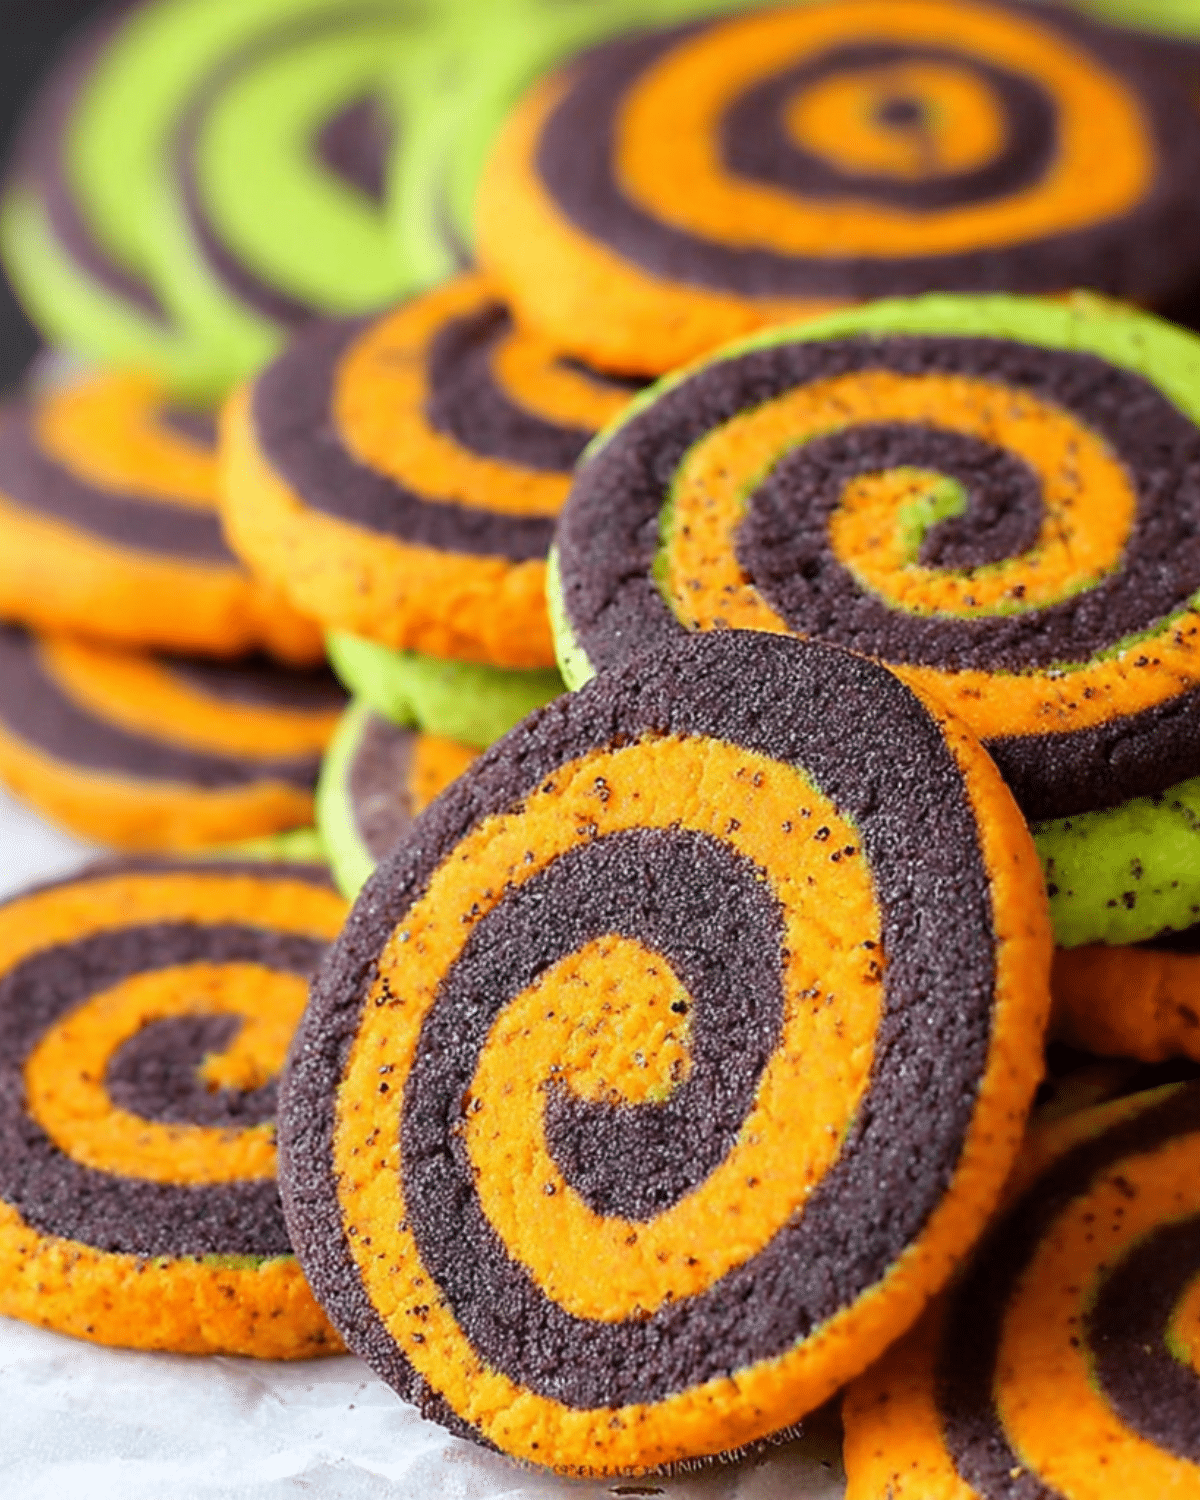
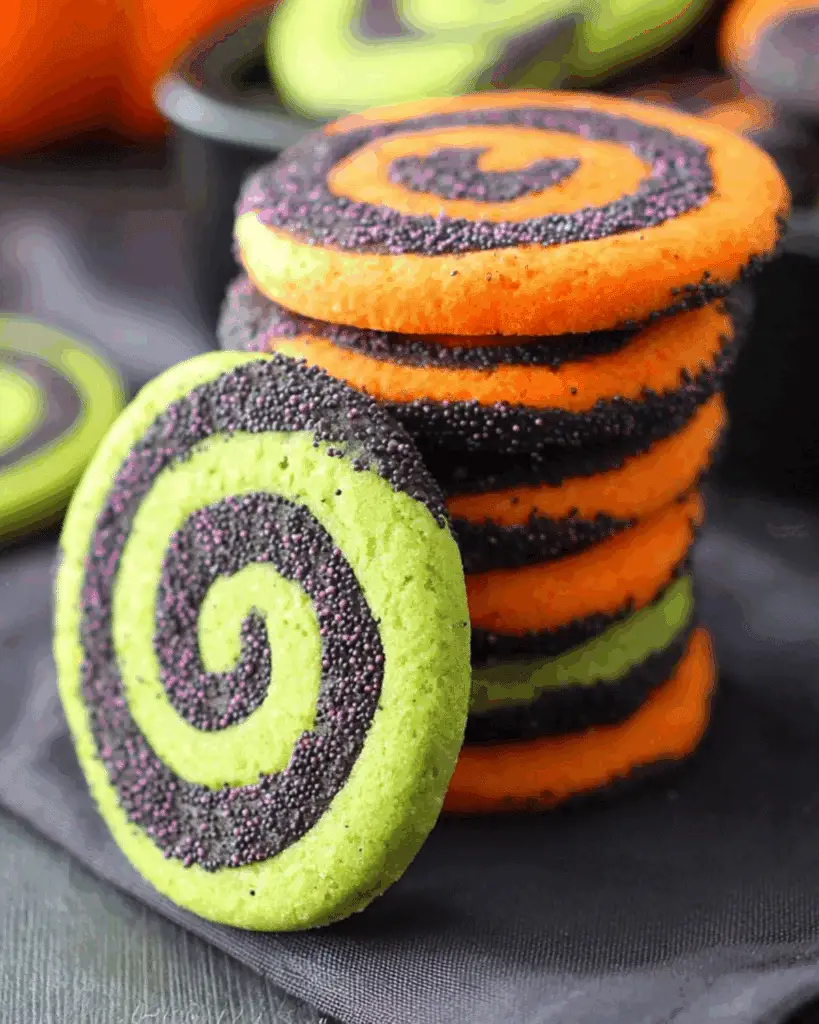
If you’re hunting for a Halloween treat that’s equal parts spooky, sweet, and stunning, Spiral Halloween Cookies should be at the top of your list. These vibrant swirl cookies are soft, chewy, and bursting with holiday spirit—whether you go for the classic orange-and-black combo or experiment with purples, greens, and sprinkles galore. Best of all, they’re a hit with kids and adults alike and are easier to make than they look.
In this guide, you’ll learn exactly how to make spiral Halloween cookies at home. From choosing the right ingredients and color combinations to pro tips for achieving perfect pinwheels, we’ll walk you through it step-by-step. And if you’re looking to whip up a hauntingly delicious party table, don’t miss our Halloween popcorn balls recipe—a festive pairing for your cookie platter!
JUMP TO
Table of Contents
Why Spiral Halloween Cookies Are the Ultimate Festive Bake
A spooky twist on classic sugar cookies
Spiral Halloween cookies take the humble sugar cookie to the next level. By layering and rolling colored doughs into a tight log, then slicing and baking, you get that signature pinwheel swirl that’s both playful and polished. The contrast of dark and bright colors makes them instantly recognizable and perfect for Halloween parties or trick-or-treat goody bags.
Unlike many Halloween desserts that rely on complicated decorations or rare ingredients, these cookies use a standard sugar cookie base and just a splash of gel food coloring. That means you can whip up a batch with pantry staples and still impress a crowd.
Perfect for parties, gifting, or fall baking
These cookies hold their shape well, making them ideal for stacking in tins or wrapping in treat bags. Whether you’re hosting a spooky sleepover, making teacher gifts, or just getting into the October baking spirit, spiral cookies are your go-to.
They also stay soft for days, so they’re perfect for prepping ahead—a huge win during the busy Halloween season. Looking for another festive make-ahead dessert? Discover great ideas like our cinnamon roll cookies, which also hold up beautifully over time.
Customizable colors and themes for any Halloween vibe
While orange and black are the traditional go-to, don’t be afraid to explore bold combos like green and purple or black and neon. Want something extra eerie? Use edible glitter, blood-red streaks, or eyeball sprinkles to push the creepy factor.
You can even let kids choose their own color themes—it turns the baking process into a fun family activity. Check out our spooky Halloween cake pops for more decorating inspiration.
Key Ingredients and Tools You’ll Need
Ingredient list with alternatives and brands to try
Here’s what you’ll need for your spiral Halloween cookies:
| Ingredient | Quantity | Notes |
|---|---|---|
| All-purpose flour | 3 cups | Spoon & level for accuracy |
| Baking powder | 1 tsp | Helps create light texture |
| Salt | ½ tsp | Balances sweetness |
| Butter (softened) | 1 cup | Use real butter for best flavor |
| Granulated sugar | 1½ cups | White sugar is best |
| Large eggs | 2 | Room temperature |
| Vanilla extract | 2 tsp | Pure vanilla for richer flavor |
| Gel food coloring | As needed | Use orange, black, green, purple |
| Halloween sprinkles | Optional | Choose non-melting types |
Pro Tip: Avoid liquid food coloring—it waters down the dough and dulls the vibrancy. Use concentrated gel-based color like AmeriColor or Wilton’s “electric” shades for that bold Halloween flair.
Tools that make cookie prep a breeze
Having the right tools on hand can streamline your baking process. Here’s what’s helpful:
- Electric mixer (stand or hand-held)
- Rolling pin
- Plastic wrap or parchment paper
- Sharp thin-bladed knife or dental floss (unscented)
- Pizza cutter (to trim straight edges)
- Parchment-lined baking sheets
Want to try other creative cookie tools? Don’t miss our cookie empanadas—they’re as fun to make as they are to eat.
Choosing the right food coloring for vivid swirls
Not all food colorings are equal. For Halloween cookies, you want colors that pop and don’t fade when baked. Here are some combos that work beautifully:
- Electric Orange + Super Black
- Electric Green + Super Black
- Electric Purple + Electric Green
If your dough isn’t vibrant enough, knead in more gel a little at a time. Avoid overmixing, which can toughen your cookies.
Step-by-Step Guide to Making Spiral Halloween Cookies
Making these swirl cookies might look intimidating, but the process is straightforward once you break it down. With just a few steps—mixing, coloring, rolling, chilling, and slicing—you’ll have bakery-worthy Halloween cookies with that iconic spiral.
Mixing and coloring the dough
Start by creaming together softened butter and granulated sugar until light and fluffy. Add eggs and vanilla extract, mixing until smooth. In a separate bowl, whisk the flour, baking powder, and salt. Gradually combine the dry and wet ingredients until a smooth dough forms.
Now it’s time for color. Divide your dough evenly depending on how many colors you want. For the classic two-tone swirl, divide in half—color one batch black and the other orange. Use gel food coloring for vivid results, and make sure to mix each dough separately to avoid muddled hues.
Once your dough is colored, shape each portion into a flat rectangle. Wrap them in plastic wrap and chill for at least one hour. This step is key for easy rolling and clean layers later on.
Rolling and forming the iconic swirl
After chilling, roll out each rectangle on a lightly floured surface to about ¼-inch thickness. Make sure both layers are the same size. Place one colored dough over the other, gently pressing to stick. Trim the edges with a pizza cutter so you get clean, straight lines.
To create the spiral, carefully roll the dough into a log from the long edge. Keep the roll tight and even. If you want to add sprinkles to the outer edge, brush the dough log lightly with water and roll it in Halloween-themed sprinkles.
Wrap the log tightly in plastic wrap again and chill for another hour. Chilling helps firm up the dough, making it easier to slice cleanly.
Looking for inspiration? Try our ghost Oreo balls for another spooky treat that pairs perfectly with these cookies.
Chilling, slicing, and baking tips for perfect spirals
Once your log is firm, preheat your oven to 350°F (175°C). Using a sharp, thin knife (or dental floss for extra precision), slice the dough into rounds about ¼-inch thick. Thinner slices may burn, while thicker ones might not cook through—so aim for uniformity.
Place slices on a parchment-lined baking sheet about 2 inches apart. Bake for 10–12 minutes or until the tops are set and no longer shiny. Don’t overbake—these cookies are meant to stay soft and chewy.
Let them cool on the pan for 5 minutes before transferring to a wire rack. Then, dig in or store in an airtight container for up to 5 days. Want to add more to your Halloween spread? Don’t miss our bloody red velvet popcorn recipe for a sweet and spooky pairing.
Expert Baking Tips for Perfect Spiral Cookies Every Time
How to avoid dough cracking or spreading
The most common issue bakers face is cracking dough while rolling or spreading cookies during baking. Here’s how to fix both:
- Always chill your dough—twice! Once after coloring and again after forming the log.
- Don’t skip trimming the edges for clean rolling. Uneven layers lead to sloppy spirals.
- If your dough cracks when rolling, let it sit at room temp for 5–10 minutes and try again.
Getting even layers for a consistent spiral effect
Use a ruler to ensure each rolled-out rectangle is the same size. Uneven layers can cause off-center spirals. Stack the layers carefully, pressing lightly to remove air pockets. Want to master more dough techniques? Learn more about vanilla buttercream frosting tricks that pair beautifully with swirl cookies.
Storing and freezing the dough or baked cookies
You can store baked cookies in an airtight container at room temperature for 4–5 days. To freeze:
- Cookie dough log: Wrap tightly in plastic and freeze up to 2 months. Let it thaw in the fridge overnight before slicing and baking.
- Baked cookies: Once cooled, place in a freezer-safe container with parchment between layers. They’ll keep for up to 1 month.
This makes them perfect for prepping ahead of Halloween parties or school events. And if you need a quick treat while waiting on cookies to bake, check out our no-bake pumpkin cheesecake—a fall favorite that’s ready in minutes.
Color Combinations & Decorating Ideas to Match the Halloween Spirit
Traditional orange & black vs. bold green & purple
Halloween doesn’t have to be limited to just orange and black—though that’s a classic. Try:
- Orange + Black: The classic Halloween swirl combo
- Green + Purple: Great for a witchy, magical look
- Black + Electric Green: Adds a neon twist
- Purple + Orange: Perfect for candy corn vibes
Switch it up each year and let kids vote on the combo they love most. Want more eerie dessert ideas? Check out our halloween dirt cups recipe—a ghoulishly fun option to pair with your cookies.
Adding sprinkles, sugar crystals, or edible glitter
Before slicing, roll the dough log in Halloween sprinkles or colored sanding sugar. Press lightly so they adhere. Avoid using cheap sprinkles that melt or bleed in the fridge. Pro tip: Use jimmies, not nonpareils—they hold their shape better when baked.
If you’re feeling extra creative, drizzle cooled cookies with black candy melts or white chocolate webs for a creepy finish.
Kid-friendly and spooky versions
Turn these into a fun kids’ activity by letting them choose the colors and decorate with edible googly eyes or mini candy bats. The best part? These cookies taste great no matter how they look.
Hosting a family Halloween night? Pair the cookies with our Halloween buffalo chicken dip for a sweet and savory party platter.
Troubleshooting Common Mistakes
Dough too soft or sticky? Here’s the fix
If your dough feels too wet or sticky to work with, try:
- Adding 1–2 tablespoons of flour
- Chilling longer (especially after adding coloring)
- Rolling between two sheets of parchment paper
Avoid over-flouring during rolling—that can make cookies dry and tough.
Colors bleeding or not vivid enough? What to adjust
Colors not popping? You may be:
- Using liquid food coloring (use gel instead)
- Under-mixing the coloring
- Letting colors blend in the bowl (mix separately)
Bleeding usually occurs if sprinkles are added too early or if moisture hits colored dough. Chill properly before decorating.
Spiral not holding shape? What went wrong
Most spiral fails happen because:
- Dough was too warm while slicing
- Log wasn’t chilled long enough
- Roll wasn’t tight enough
Always use a sharp knife and chill the dough twice for best results.
FAQs About Spiral Halloween Cookies
Can I make spiral cookies ahead of time?
Yes! You can refrigerate the dough log up to 4 days before slicing and baking. You can also freeze it for up to 2 months.
How do I get vibrant colors without taste issues?
Use gel food coloring instead of liquid. Brands like AmeriColor or Wilton’s deliver bold shades without altering the taste.
Can this recipe be made gluten-free or vegan?
Yes, with substitutions:
-Use a 1:1 gluten-free flour blend
-Use plant-based butter and egg replacers (like flax eggs)
Texture may vary slightly, but flavor stays spooky-good.
Conclusion: Make Your Halloween Extra Sweet with Spiral Cookies
With their bold colors, soft centers, and hypnotic swirls, Spiral Halloween Cookies are the ultimate spooky treat. They’re easy to make, fun to customize, and guaranteed to be the star of any Halloween party table. Whether you’re baking with kids or prepping ahead for a spooky bash, this recipe brings the fun and flavor.
Don’t miss our caramel apple nachos for a no-bake Halloween dessert everyone will love. Happy haunting—and happy baking!
PrintSpiral Halloween Cookies
Spiral Halloween Cookies are vibrant, soft sugar cookies with eye-catching swirls in festive colors like orange, black, purple, and green. Perfect for Halloween parties, gifts, or spooky baking fun.
- Prep Time: 15 minutes
- Cook Time: 10 minutes
- Total Time: 2 hours 25 minutes
- Yield: 20 cookies
- Category: Dessert
- Method: Baking
- Cuisine: American
- Diet: Vegetarian
Ingredients
- 3 cups all-purpose flour
- 1 tsp baking powder
- 1/2 tsp salt
- 1 cup butter, softened
- 1 1/2 cups granulated sugar
- 2 large eggs
- 2 tsp vanilla extract
- 1 tsp orange gel food coloring
- 1 tsp black gel food coloring
- Halloween sprinkles (optional)
Instructions
- Cream softened butter and sugar together until light and fluffy.
- Add eggs and vanilla extract. Mix well.
- In a separate bowl, whisk together flour, baking powder, and salt.
- Gradually add the dry mixture to the wet mixture and mix until a smooth dough forms.
- Divide the dough into two equal parts. Add orange coloring to one, and black to the other. Mix each separately.
- Shape each dough into a flat rectangle, wrap in plastic, and chill for at least 1 hour.
- Roll out each dough to 1/4-inch thickness. Stack one over the other and trim the edges.
- Roll the layered dough into a tight log. Wrap and chill for another hour.
- Preheat oven to 350°F (175°C). Slice the log into 1/4-inch rounds.
- Place cookies on parchment-lined baking sheet 2 inches apart. Bake for 10–12 minutes until tops are set.
- Cool on the pan for 5 minutes, then transfer to a wire rack.
Notes
- Use gel food coloring for vibrant results without altering the dough texture.
- Chill the dough twice—once after mixing, once after forming the log.
- Roll dough between parchment sheets to prevent sticking.
- Use a sharp knife or unflavored dental floss for clean cookie slices.
- Store in airtight container for up to 5 days or freeze for up to 1 month.
Nutrition
- Serving Size: 1 cookie
- Calories: 180
- Sugar: 13g
- Sodium: 70mg
- Fat: 8g
- Saturated Fat: 5g
- Unsaturated Fat: 2g
- Trans Fat: 0g
- Carbohydrates: 25g
- Fiber: 0.5g
- Protein: 2g
- Cholesterol: 25mg