Halloween isn’t just about candy anymore—it’s also about impressing with spooky, savory eats like Pizza Skulls. These creepy little pizza pockets shaped like skulls are taking over Halloween menus everywhere. Whether you’re planning a ghoulish party or want to serve a fun dinner to your family, pizza skulls check every box: they’re cheesy, customizable, and surprisingly easy to make. In this article, you’ll learn everything you need—from ingredients and step-by-step instructions to creative filling ideas and serving tips. Looking for inspiration? Try our Witch Hat Crescent Rolls Recipe for more Halloween party fun.
JUMP TO
Table of Contents
What Are Pizza Skulls and Why They’re a Halloween Hit
A fun twist on traditional pizza
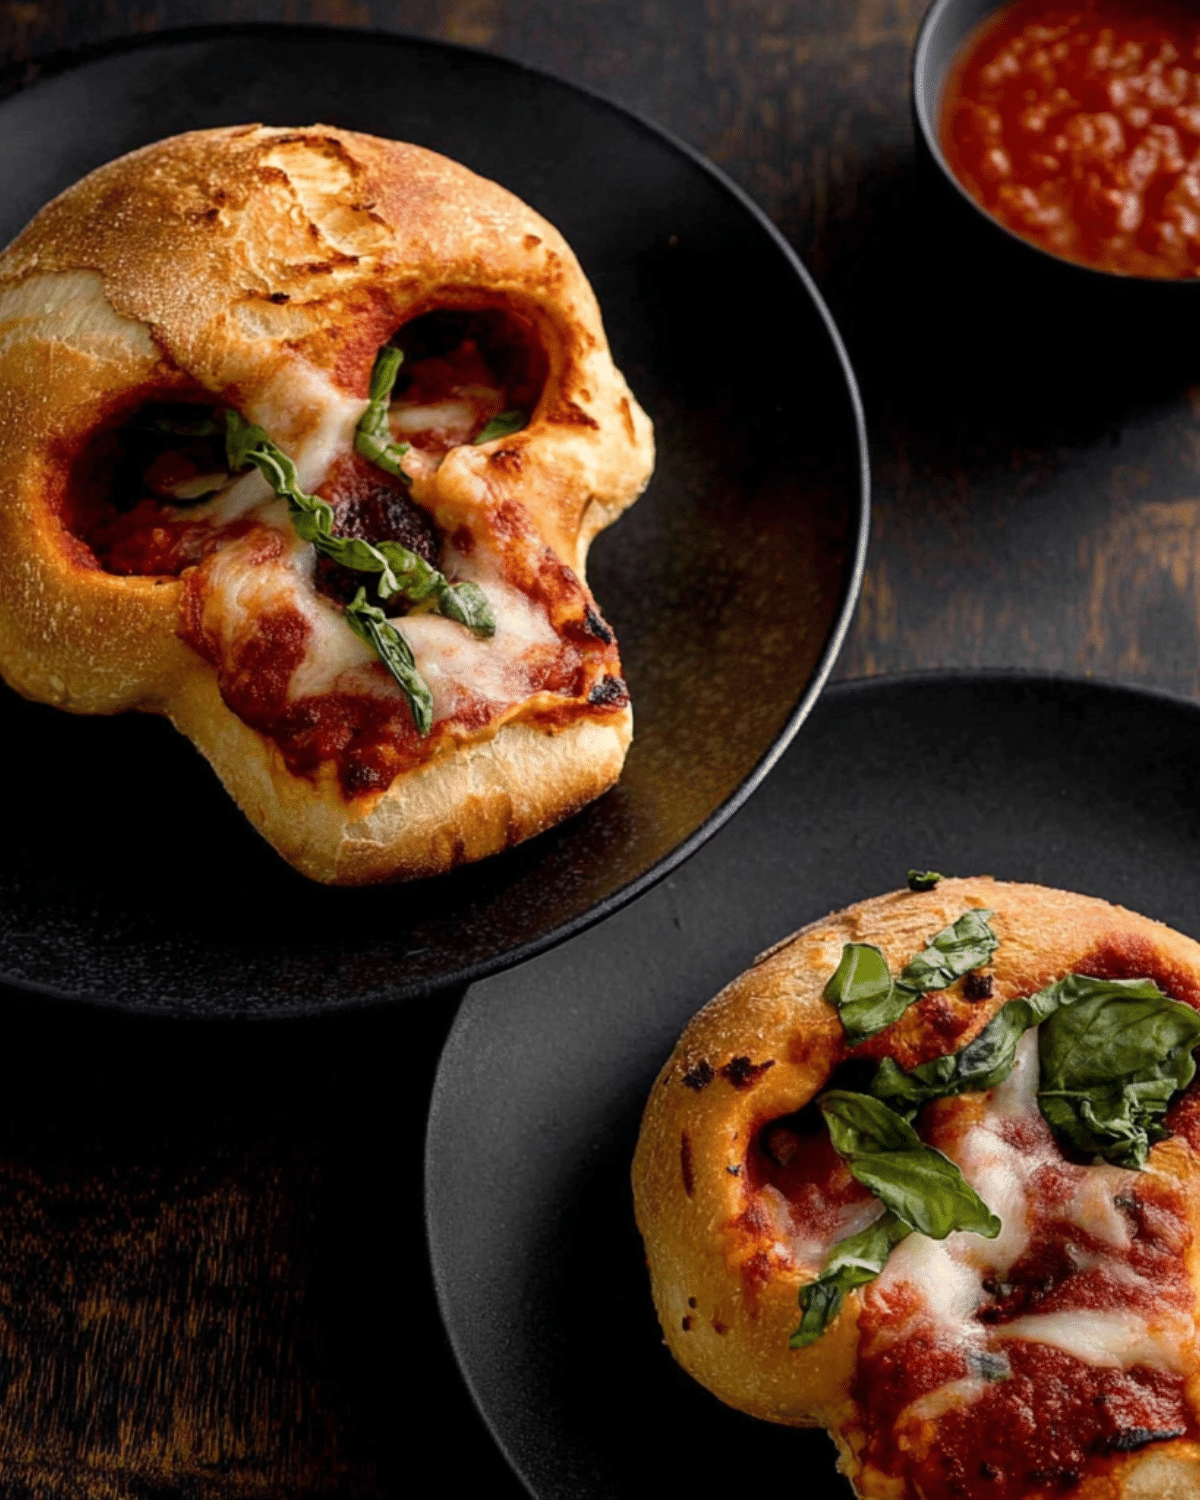
Pizza skulls are just what they sound like—mini pizzas shaped like skulls, baked in special pans. Unlike flat pizza, they’re more like stuffed pockets, loaded with cheese, sauce, and toppings. Their eerie look makes them perfect for Halloween, but honestly, they’re great any time you want a handheld pizza with flair.
Why they’re perfect for spooky season parties
Serving these creepy skulls instantly upgrades your Halloween spread. Their shape grabs attention, especially from kids, and the flavor keeps everyone coming back for seconds. Plus, they’re easy to eat while mingling, which makes them perfect for parties, potlucks, and movie nights.
Customization ideas for every eater
One of the best things about pizza skulls is how easy they are to personalize. You can go classic with mozzarella and pepperoni, or get fancy with goat cheese and caramelized onions. Have picky eaters? Make half with meat and half vegetarian. Want a healthier version? Try spinach, mushrooms, and light mozzarella. Don’t miss our Creepy Deviled Eggs for another easy, crowd-pleasing Halloween snack.
Must-Have Ingredients for Perfect Pizza Skulls
Choosing the right dough (store-bought vs homemade)
Both homemade and store-bought pizza dough work great here. If you’re short on time, opt for the pre-rolled dough found in grocery stores. Homemade dough gives you more control over thickness and flavor. Aim to roll it to about ¼-inch thickness for best results. For flaky alternatives, crescent roll dough can also work in a pinch.
Toppings and fillings to wow your guests
Classic pizza ingredients are a great place to start—mozzarella, pizza sauce, Parmesan, pepperoni, and sausage. But don’t stop there. Try creative combos like:
| Filling Type | Ingredients |
|---|---|
| Meat Lovers | Sausage, bacon, pepperoni, shredded mozzarella |
| Veggie | Spinach, black olives, mushrooms, feta cheese |
| Hawaiian | Ham, pineapple, mozzarella, marinara |
| Spicy | Jalapeños, spicy sausage, pepper jack cheese |
You can even include cooked corn, mini meatballs, or Italian herbs for flavor depth.
The best skull-shaped pan for baking
A skull-shaped cakelet pan is essential. These pans are available from brands like Wilton and Nordic Ware, often sold at Walmart, Target, or Amazon. Silicone versions work too, but metal pans give a crispier crust. Be sure to grease them well to prevent sticking and achieve that spooky, defined skull shape. Check out Spider Web Halloween Brownies for another creative pan-based Halloween dessert idea.
How to Make Pizza Skulls Step by Step
Prepping the dough and pan the right way
Start by spraying your skull pan with cooking spray. Then, roll your dough into a ¼-inch thick sheet and cut it into rectangles—about 6 for a 6-cavity pan. Press each dough piece gently into the pan cavities, letting it mold to the shape of the skulls.
Assembling your scary-good filling layers
Layer each dough mold with about a tablespoon of pizza sauce, a generous amount of shredded mozzarella, a sprinkle of Parmesan, and your favorite toppings. Add one last spoonful of sauce on top before folding the dough over the filling and sealing the edges.
Baking tips for golden, crisp perfection
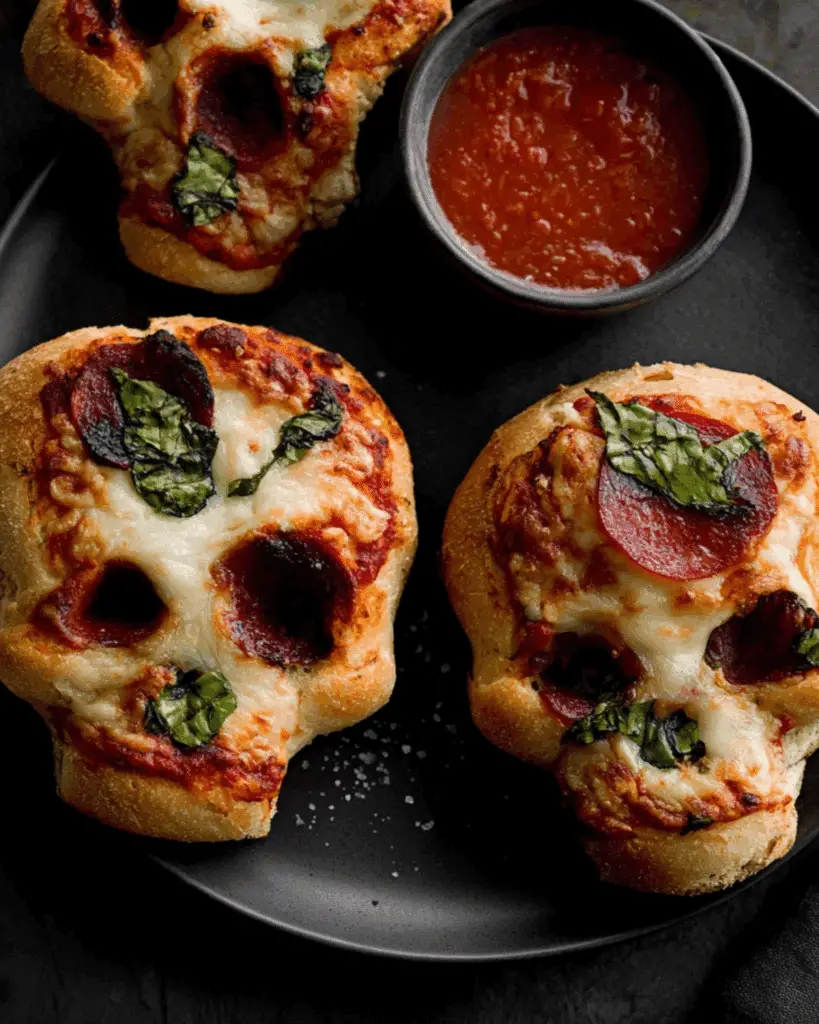
Place the filled pan in the fridge while you preheat your oven to 400°F. This helps the dough set and bake evenly. Once hot, bake the skulls for 16 to 20 minutes, or until golden brown. Let them rest for 5 minutes before unmolding. Serve with marinara for dipping, and garnish with chopped parsley or basil if desired. Discover great ideas like our Eyeball Brownies Recipe to complete your Halloween menu.
Tips, Tricks, and Troubleshooting for Pizza Skulls
Preventing leaks and overbaking
Overfilling is the #1 cause of pizza skull fails. Stick to about 2 tablespoons of filling per skull. Press the dough tightly together at the seams, especially at the top where the dough folds over. If your crust browns too quickly while the inside is still doughy, loosely tent with foil during the last 5–7 minutes of baking.
To avoid sticking, grease every inch of your mold—especially the crevices. A pastry brush and neutral oil like avocado oil work well for this.
Make-ahead and storage advice
Want to prep these ahead? Assemble the skulls, cover the pan with plastic wrap, and refrigerate for up to 24 hours before baking. After baking, store leftovers in an airtight container in the fridge for up to 3 days.
You can also freeze fully baked pizza skulls. Let them cool completely, wrap them individually in foil, then store in freezer-safe bags. Reheat from frozen at 350°F for 15–18 minutes.
How to reheat without drying out
To keep that cheesy, gooey texture, reheat pizza skulls in the oven or an air fryer—never the microwave, which turns the crust chewy. For best results, wrap them in foil and bake at 350°F until warmed through, about 10 minutes. Don’t miss our Pumpkin Cheesecake Dip Recipe—a great sweet dip to balance these savory bites.
Creative Variations to Try with Pizza Skulls
Vegetarian, meaty, and international flavor twists
Pizza skulls aren’t just for pepperoni fans. Here are some flavor-packed alternatives to surprise your guests:
| Theme | Ingredients |
|---|---|
| Tex-Mex | Taco-seasoned beef, black beans, cheddar, salsa |
| Breakfast | Scrambled eggs, cooked bacon or sausage, cheddar |
| Greek | Feta, olives, spinach, red onion, oregano |
| BBQ Chicken | Shredded BBQ chicken, red onion, mozzarella |
These ideas allow you to match any party theme or guest preference while keeping the spooky vibe alive.
Sweet skulls: dessert pizza skull ideas
Believe it or not, skull pans can be used for dessert too. Use crescent roll dough and fill with Nutella, marshmallows, or apple pie filling. Dust the tops with cinnamon sugar or drizzle with chocolate after baking for a scary-good treat.
Kid-friendly vs adult gourmet versions
Kids love simple, familiar flavors like pepperoni and cheese or ham and pineapple. Adults may prefer elevated options—think goat cheese and caramelized onion or buffalo chicken with blue cheese. You can even label each skull flavor with spooky toothpick tags for fun. Check out Stained Glass Cookies for a dessert that looks as cool as it tastes.
Serving and Presentation Tips for Halloween Fun
Dipping sauces and spooky sides
The best sidekick for your pizza skulls? Dipping sauces! Here are a few ideas:
- Classic marinara: Always a hit
- Garlic butter: Rich and indulgent
- Ranch dressing: Especially for spicy or veggie-filled skulls
- Spicy arrabbiata: For a heat-loving crowd
Pair them with themed sides like carrot fingers (baby carrots with almond “nails”) or a witch’s brew punch for full Halloween vibes.
Garnish ideas to bring them to life
Add life (or un-dead flair) to your skulls by brushing melted butter on top and sprinkling with Italian seasoning or red pepper flakes. For a gory effect, drizzle red pizza sauce on the “face.” Want to go all out? Add edible googly eyes after baking for a silly touch.
Making a skull-themed dinner platter
Arrange your pizza skulls on a black tray surrounded by fake spider webs or plastic spiders for drama. Place dipping sauces in skull shot glasses or mini cauldrons. Balance the meal with a spooky salad (think spinach, blood orange slices, and “eyeball” mozzarella balls).
Don’t miss our Coconut Red Curry Drip Beef Recipe if you’re planning a more global Halloween dinner menu.
Frequently Asked Questions (FAQs)
Can I make pizza skulls without a skull pan?
Yes, you can. If you don’t have a skull-shaped pan, use a muffin tin or mini loaf pan instead. While they won’t have the spooky look, they’ll still be delicious and easy to eat. You could also free-form them into rustic hand pies.
How do you keep pizza skulls from falling apart?
Avoid overfilling, and make sure to press the dough together tightly at the seams. Chilling the assembled skulls for 10 minutes before baking also helps firm them up. Finally, let them rest 5 minutes after baking before unmolding.
Can I freeze pizza skulls before or after baking?
Both work! To freeze before baking, assemble the skulls, freeze them on a tray, then store in a zip-top bag. Bake from frozen, adding 5–7 extra minutes. For post-bake freezing, wrap cooled skulls in foil and reheat at 350°F.
What’s the best dough for pizza skulls?
Store-bought dough is quick and works well, but homemade dough offers better flavor. Look for doughs labeled “classic” or “Neapolitan” style. Crescent roll dough works for sweeter or flakier versions. If you’re planning a themed meal, don’t miss our Crockpot Lasagna Soup Recipe—it’s a cozy main dish that pairs beautifully with pizza skulls.
Conclusion: Make Halloween Deliciously Memorable
Pizza Skulls are more than just cute—they’re the perfect balance of spooky fun and mouthwatering comfort food. Whether you’re hosting a Halloween party or whipping up a creative dinner for your family, this customizable recipe is a guaranteed crowd-pleaser. The best part? They’re easy enough for beginners and fun enough to make with kids.
From prepping and baking tips to bold filling ideas, now you’ve got all the tools to make these Halloween treats a haunting success. Check out our Candy Cane Cookies Recipe to start planning your next holiday-inspired meal.
PrintPizza Skulls
Pizza Skulls are spooky, cheesy stuffed pizza pockets baked in skull-shaped molds. Perfect for Halloween parties or themed dinners, they’re easy to customize with various toppings and fillings for both kids and adults.
- Prep Time: 20 minutes
- Cook Time: 20 minutes
- Total Time: 40 minutes
- Yield: 6 pizza skulls
- Category: Lunch, Dinner, Appetizer
- Method: Baking
- Cuisine: American
- Diet: Vegetarian
Ingredients
- 13 to 16 ounces of pre-made pizza dough
- 3/4 to 1 cup pizza sauce
- 2 cups shredded mozzarella cheese
- 1/4 cup Parmesan cheese (grated)
- Mini pepperoni (about 6 ounces)
- Cooked sausage (about 8 ounces)
- Sliced black olives
- Chopped sliced ham
- Crumbled crispy bacon
- Mini Italian meatballs
- Cooked corn kernels
- Baby spinach
- Fresh basil
- Cooking spray for greasing pan
- Marinara sauce (for serving)
- Chopped parsley or basil (for garnish)
Instructions
- Preheat the oven to 400°F (200°C).
- Spray the skull baking pan thoroughly with cooking spray to prevent sticking.
- Roll the pizza dough out on a lightly floured surface until it’s about 1/4-inch thick. Cut into 6 rectangles.
- Place each dough piece into the cavities of the skull mold, pressing to fit the shape.
- Layer each with about 1 tablespoon pizza sauce, mozzarella, a sprinkle of Parmesan, and your chosen toppings.
- Add a final layer of sauce (no more than 1 tablespoon), then fold and pinch the dough to seal the skull.
- Chill the filled pan in the refrigerator while the oven continues to preheat.
- Bake for 16–20 minutes or until the crust is golden brown and fully cooked.
- Let the skulls rest for 5 minutes, then gently remove from the pan.
- Serve warm with marinara sauce and garnish with chopped parsley or basil if desired.
Notes
- Do not overfill skulls to avoid leaking and uneven baking.
- Chilling before baking helps the dough hold its shape.
- Store leftovers in an airtight container for up to 3 days.
- Freeze baked skulls individually for longer storage.
- Reheat in oven or air fryer to keep crust crisp.
Nutrition
- Serving Size: 1 pizza skull
- Calories: 270
- Sugar: 5g
- Sodium: 839mg
- Fat: 10g
- Saturated Fat: 5g
- Unsaturated Fat: 3g
- Trans Fat: 0g
- Carbohydrates: 32g
- Fiber: 1g
- Protein: 13g
- Cholesterol: 29mg