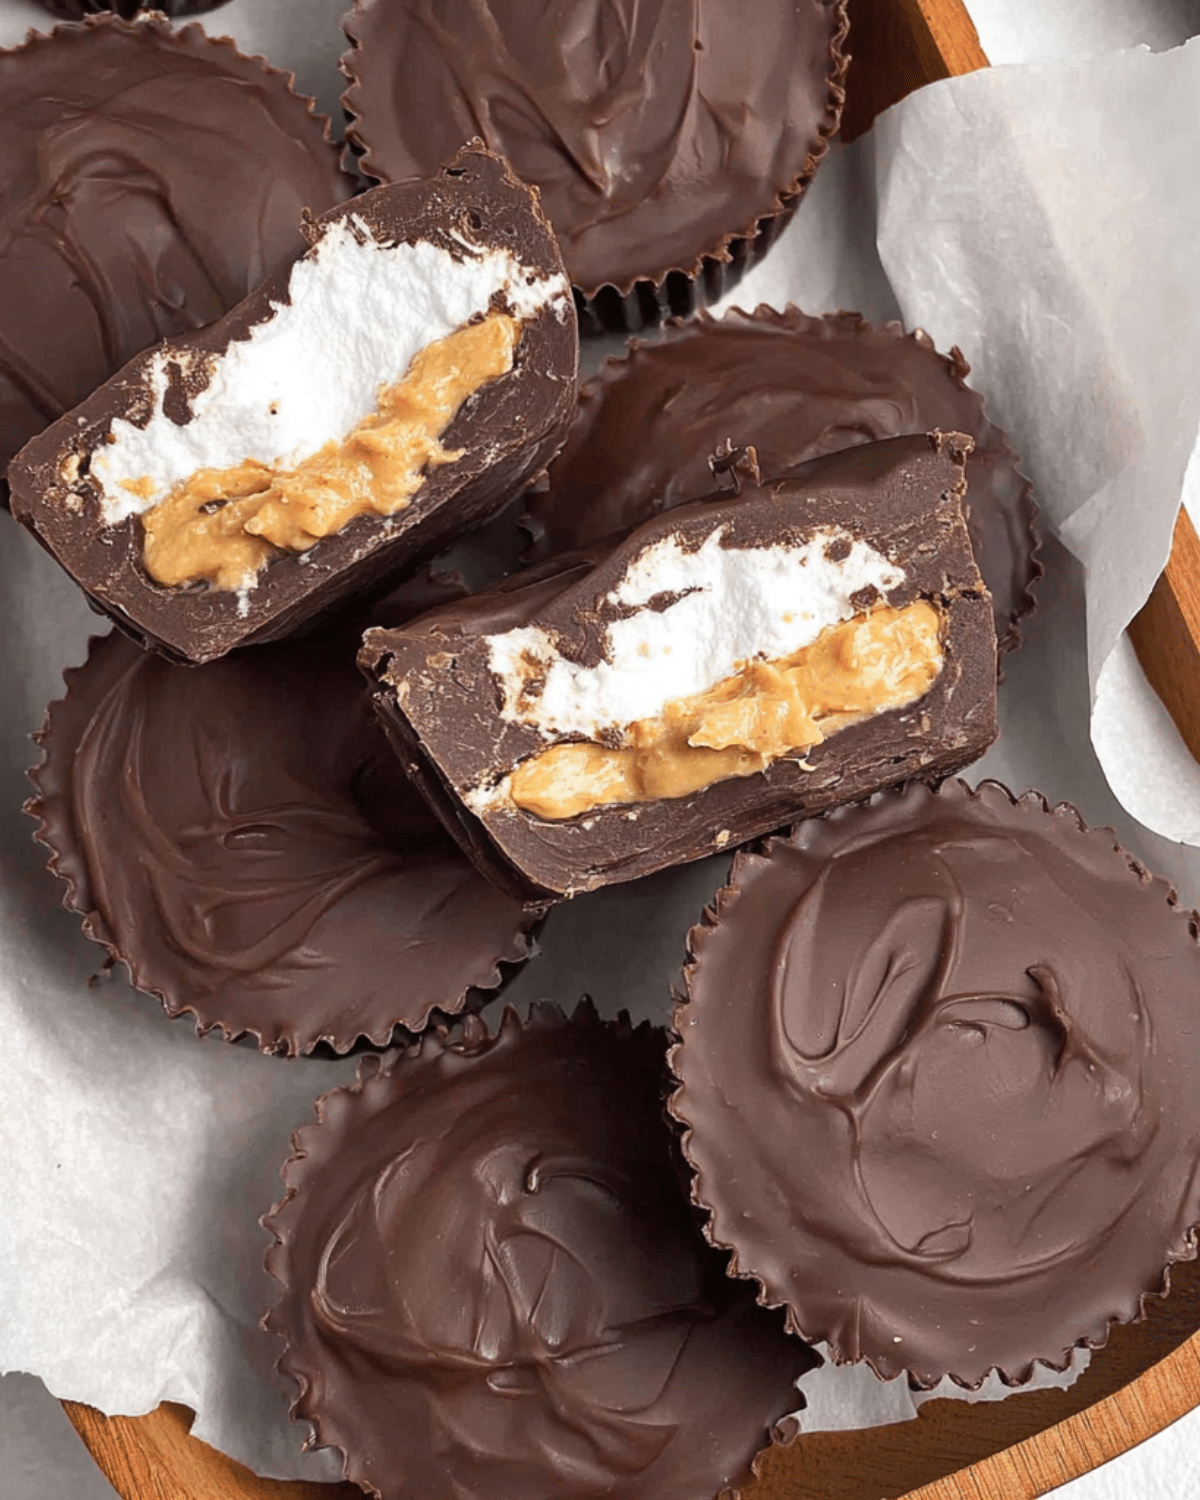
If you’re craving a rich, sweet treat that hits all the right notes of creamy, gooey, and chocolatey, these Peanut Butter Marshmallow Cups will win your heart. A clever twist on Reese’s Mallow-Top Cups, this no-bake dessert features layers of semi-sweet chocolate, velvety peanut butter, and fluffy marshmallow crème—made right in your kitchen with just five ingredients.
Whether you’re prepping for the holidays, hosting a party, or just need a freezer-friendly snack, this simple treat satisfies every sweet tooth. It’s quick, budget-friendly, and fun to make—even with kids. Don’t miss our Nutter Butter Trifle Dessert Recipe if you love peanut butter-based creations.
JUMP TO
Table of Contents
What Are Peanut Butter Marshmallow Cups?
A Sweet Spin on Reese’s Classic
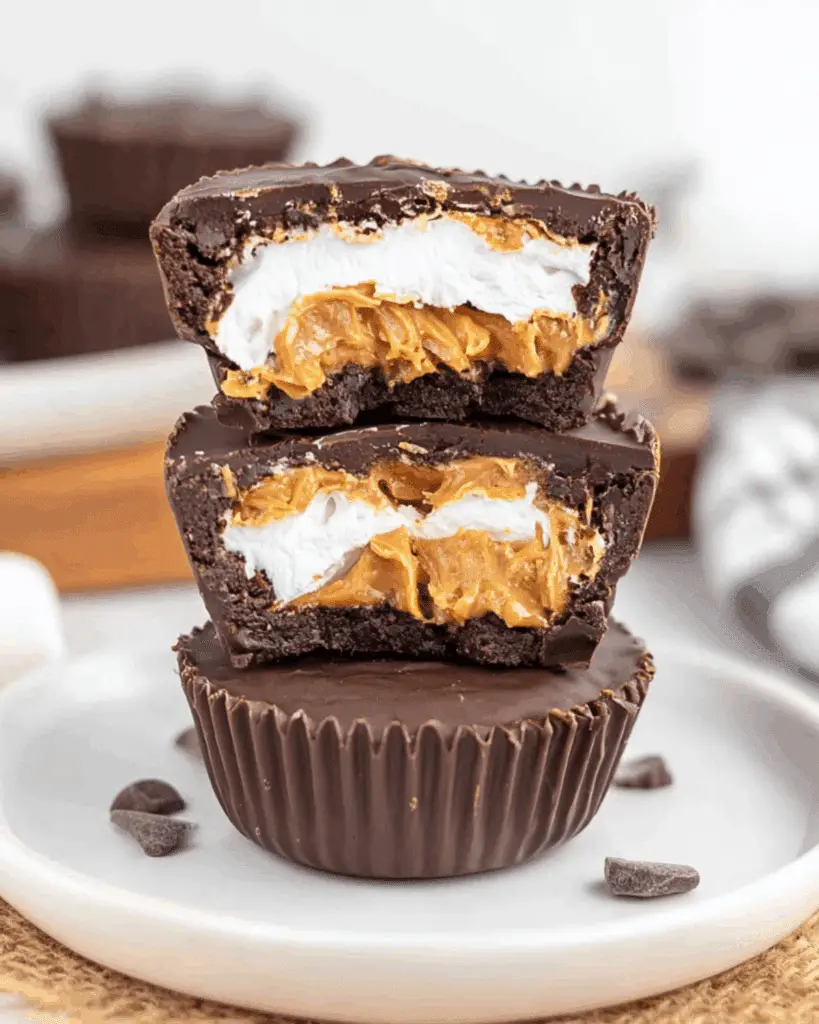
Peanut Butter Marshmallow Cups are the perfect marriage of homemade charm and candy-aisle nostalgia. Inspired by Reese’s Mallow-Top Peanut Butter Cups, these no-bake bites deliver all the layers you love—only fresher and creamier. With a base and top of melted chocolate encasing a duo of peanut butter and marshmallow, the flavor combo is truly addictive.
Why This Treat Has Gone Viral
There’s a reason food blogs and TikTok feeds are filled with variations of this recipe. First, it’s a no-bake dessert that doesn’t skimp on indulgence. Second, it uses pantry staples you probably already have on hand. Most importantly, the end result is better than store-bought—more chocolate, more peanut butter, and a marshmallow center that’s irresistibly gooey.
Check out our No-Bake Chocolate Chip Cookie Dough Truffles for another quick candy fix that doesn’t need an oven.
Perfect for All Occasions – From Holidays to Midnight Cravings
Because these marshmallow peanut butter cups are individually portioned, they’re perfect for gifting or party platters. You can dress them up for Valentine’s Day, add spooky toppers for Halloween, or make a double batch for your holiday cookie tray. They also freeze beautifully, meaning you can satisfy cravings anytime.
Looking for inspiration? Try our Rocky Road Candy Recipe for another chocolatey classic loaded with marshmallows.
Essential Ingredients for Peanut Butter Marshmallow Cups
Choosing the Right Chocolate for Melting
The key to rich and glossy chocolate layers lies in your chocolate chip selection. For best results, use high-quality semi-sweet chips like Ghirardelli. Milk or dark chocolate works, too, but steer clear of budget chips—they often contain waxes and additives that resist melting smoothly. If you love layered chocolate desserts, don’t miss our Chocolate Lasagna Dessert Recipe.
| Type of Chocolate | Flavor Profile | Best For |
|---|---|---|
| Semi-sweet (e.g., Ghirardelli) | Balanced sweet & rich | Traditional flavor lovers |
| Milk chocolate | Extra sweet & creamy | Kids and milk chocolate fans |
| Dark chocolate (60–70%) | Bold, intense chocolate | Adults or reduced sugar option |
Peanut Butter Perfection: What Type Works Best?
For a perfectly smooth filling, use traditional peanut butter like Jif, Skippy, or Reese’s. Avoid natural peanut butter—it contains more oil and separates easily, which can make your cups greasy or cause the layers to slide. Want to explore more peanut butter recipes? Don’t miss our Classic Peanut Butter Cookies for a timeless baked treat.
Marshmallow Crème vs Fluff: What’s the Difference?
Both work just fine in this recipe. Marshmallow crème (like Jet-Puffed) is a bit stiffer, making it easier to scoop and layer. Marshmallow fluff tends to be lighter and airier. Whichever you use, just be sure to freeze the layer properly before adding the final chocolate topping to keep the layers neat.
Equipment and Prep Tips Before You Begin
Tools You’ll Need for Success
You don’t need fancy tools—just a few basics:
- Muffin tin
- Cupcake liners
- Microwave-safe bowls
- Spoons or mini cookie scoop
- Handheld electric mixer
These help you move quickly and cleanly through the layering process.
Pro Prep Tips to Avoid Sticky Situations
Before you even melt your chocolate, line your muffin tin with cupcake liners. This makes removal easy and mess-free. Also, have all your ingredients measured and ready before starting—things move fast once the chocolate is melted. Be sure to freeze each layer before adding the next to prevent the fillings from blending into each other.
Step-by-Step: How to Make Peanut Butter Marshmallow Cups
Melting and Molding the Chocolate Shell
Start by melting ¾ cup of semi-sweet chocolate chips in a microwave-safe bowl. Heat in 30-second intervals, stirring in between until smooth—this should take about 1½ to 2 minutes depending on your microwave.
Scoop about ½ tablespoon of melted chocolate into each cupcake liner placed in a standard muffin tin. Spread the chocolate evenly on the bottom without letting it climb up the sides too much.
Pro Tip: Use two spoons—one to scoop, one to scrape—to get a clean transfer and a smooth layer.
Place the tray in the freezer for 10 minutes to allow the chocolate to set completely.
Making the Creamy Peanut Butter Filling
While the chocolate base chills, prepare your peanut butter filling. In a mixing bowl, beat together:
- ½ cup creamy peanut butter
- 6 tablespoons powdered sugar
- 1½ tablespoons unsalted butter (softened)
Use a hand mixer on medium speed until the mixture is smooth and creamy. This combo gives the filling a sweet, melt-in-your-mouth texture with just the right firmness.
Scoop about 2 teaspoons of the peanut butter mix onto each chilled chocolate base. Gently press and spread it into an even layer, leaving a small gap around the edges so it doesn’t touch the cupcake liner.
Freeze again for 10 minutes.
Layering with Marshmallow Crème
Next, top each peanut butter layer with 1 teaspoon of marshmallow crème. Keep it centered for that signature layered look.
Tip: Lightly dampen your finger and press the crème down gently to flatten it. This trick prevents sticking and keeps your layers smooth.
Return the tray to the freezer for another 10 minutes. Freezing between layers is crucial—it ensures each component sets properly and keeps the textures clean.
Finishing with a Chocolate Top
Melt the remaining 1 cup of chocolate chips the same way as before.
Scoop enough melted chocolate over each cup to cover the marshmallow and peanut butter layers. Use the back of your spoon to gently spread the chocolate out to the edges of the liner, fully sealing in the filling.
Freeze for a final 10 minutes or until the chocolate is completely hardened. At this point, your cups should be solid, shiny, and easy to peel from the liners.
Pro Tips for Best Results
Keeping the Layers Clean and Distinct
The secret to picture-perfect peanut butter marshmallow cups lies in freezing each layer completely before adding the next. Rushing this step can cause your marshmallow to mix with the chocolate or your peanut butter to sink.
Another tip? Always use room-temperature butter and sifted powdered sugar in the filling to prevent lumps and clumps.
Looking for more freezer-friendly desserts? Don’t miss our No-Bake Pumpkin Cheesecake Recipe.
Storage Tips: Fridge or Freezer?
These treats keep incredibly well:
| Storage Method | How Long They Last | Tips |
|---|---|---|
| Fridge | Up to 2 weeks | Store in airtight container |
| Freezer | Up to 2 months | Thaw in fridge before serving |
If storing for a party or gift-giving, place parchment paper between layers to prevent sticking.
Easy Flavor Variations You’ll Love
Want to level up your peanut butter marshmallow cups?
- Add a crunch: Place a pretzel crisp or crushed graham cracker in the base before the peanut butter.
- Flavor twist: Use almond butter or cookie butter in place of peanut butter (same consistency is key).
- Holiday style: Mix in crushed peppermint, mini M&M’s, or drizzle with white chocolate for seasonal flair.
Discover great ideas like our Magic Brownie Cookies if you’re in the mood for something equally rich and festive.
FAQs About Peanut Butter Marshmallow Cups
Can I Use Natural Peanut Butter in This Recipe?
It’s not recommended. Natural peanut butter tends to separate and contains more oil, which can affect the texture and structure of your cups. Stick with traditional creamy peanut butter brands like Jif or Skippy for best results.
How Long Do These Last in the Fridge or Freezer?
When stored in an airtight container, they’ll last up to 2 weeks in the fridge or 2 months in the freezer. For the best texture, thaw frozen cups in the fridge overnight before serving.
Do I Have to Use Cupcake Liners?
Yes, cupcake liners make the cups easier to remove and keep the layers neat. Silicone liners work well too and are reusable. Skipping liners can lead to sticking and broken cups.
Can I Add Mix-Ins Like Pretzels or Nuts?
Absolutely. For added crunch and flavor, try mixing crushed pretzels, graham crackers, or chopped nuts into the peanut butter layer—or sprinkle them over the chocolate topping before it sets.
Final Thoughts on These No-Bake Peanut Butter Marshmallow Cups
Peanut Butter Marshmallow Cups are proof that simple ingredients can deliver irresistible results. With just 15 minutes of hands-on prep, you get a rich, gooey, chocolatey candy that’s perfect for any occasion.
Whether you’re making these for a dessert tray, gifting them during the holidays, or just indulging in an after-dinner treat, they’re bound to impress. No baking. No fuss. Just layer, freeze, and enjoy.
Don’t miss our Fireball Fudge Dessert Recipe for another bold, crowd-pleasing treat that delivers maximum flavor with minimal effort.
PrintPeanut Butter Marshmallow Cups

Peanut Butter Marshmallow Cups are an easy, no-bake candy treat made with just five ingredients. These layered chocolate cups are filled with creamy peanut butter and fluffy marshmallow crème, making them the perfect indulgence for any occasion.
- Prep Time: 15 minutes
- Cook Time: 0 minutes
- Total Time: 55 minutes
- Yield: 12 cups
- Category: Dessert
- Method: No-Bake
- Cuisine: American
- Diet: Vegetarian
Ingredients
- 1¾ cups semi-sweet chocolate chips, divided (¾ cup and 1 cup)
- ½ cup creamy peanut butter
- 6 tablespoons powdered sugar
- 1½ tablespoons unsalted butter, room temperature
- 4 tablespoons marshmallow creme
Instructions
- Line 12 muffin cups with cupcake liners and set aside.
- Melt ¾ cup of chocolate chips in a microwave-safe bowl in 30-second intervals, stirring until smooth.
- Scoop about ½ tablespoon of melted chocolate into each liner and spread evenly. Freeze for 10 minutes.
- In a mixing bowl, beat together peanut butter, powdered sugar, and butter until smooth.
- Scoop 2 teaspoons of the peanut butter filling onto each chocolate base. Spread evenly, avoiding edges. Freeze for 10 minutes.
- Add 1 teaspoon of marshmallow crème on top of peanut butter. Flatten gently. Freeze for 10 more minutes.
- Melt remaining 1 cup of chocolate chips using the same method. Cover each cup fully with chocolate and spread to edges. Freeze for a final 10 minutes.
- Remove from freezer and serve chilled or store as directed.
Notes
- Use only traditional creamy peanut butter for best consistency.
- High-quality chocolate chips melt more smoothly than generic brands.
- Don’t rush the chilling process—each layer must set fully before adding the next.
- Recipe doubles easily and stores well in the freezer.
- Silicone liners can be reused and make removal easier.
Nutrition
- Serving Size: 1 cup
- Calories: 250
- Sugar: 16g
- Sodium: 49mg
- Fat: 17g
- Saturated Fat: 8g
- Unsaturated Fat: 8g
- Trans Fat: 0.1g
- Carbohydrates: 22g
- Fiber: 3g
- Protein: 4g
- Cholesterol: 5mg