There’s a unique kind of satisfaction that comes from baking your own bread—especially when the process is simpler than you’d expect. No-knead bread delivers that same bakery-quality flavor and crust without the need for complex techniques, long kneading sessions, or specialized tools. If you’ve ever thought bread baking was too technical or time-consuming, this recipe will change your perspective.
With no-knead bread, you’ll witness the transformation of just four basic ingredients into a rustic, crusty loaf with minimal effort. You don’t need experience to master it—only a bowl, some patience, and a hot oven. Let this be your guide to making one of the most rewarding breads you’ll ever bake.
Table of Contents
What Is No-Knead Bread and Why Everyone’s Obsessed
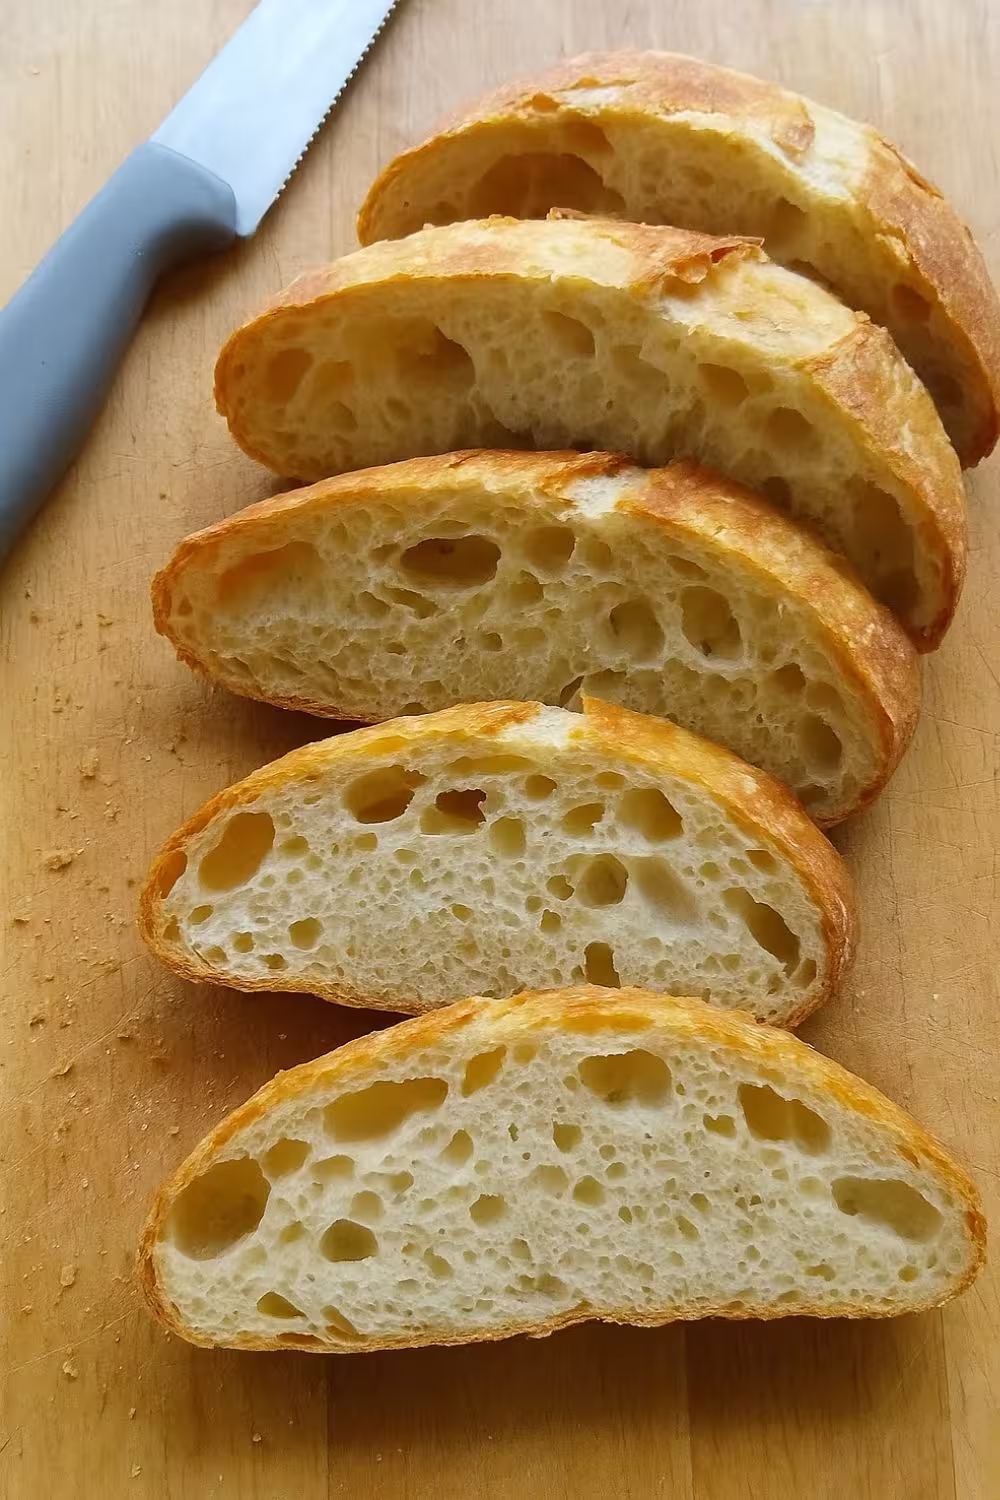
No-knead bread is exactly what it sounds like: a bread-making method that eliminates kneading. Instead of using physical effort to develop gluten, it uses time. The dough ferments slowly over 12 to 18 hours, allowing gluten strands to form naturally. This method results in a chewy, airy crumb and a crisp, golden crust—hallmarks of traditional artisan loaves.
Originally popularized by Jim Lahey and later featured in The New York Times, this technique has taken the home baking world by storm. It’s beloved by both beginners and seasoned bakers for its ease and outstanding results.
Why You’ll Love This Foolproof No-Knead Bread Recipe
There are many reasons why this bread might become your go-to recipe:
- No kneading required: Forget sore arms or struggling with sticky dough.
- Minimal equipment: All you need is a bowl, spoon, and oven-safe pot or Dutch oven.
- Unmatched texture: A crunchy crust with a beautifully open crumb interior.
- Four ingredients: Bread flour, water, yeast, and salt—simple and accessible.
- Hands-off process: Most of the time is passive, so you can prepare it while you sleep or work.
Ingredients for No-Knead Bread
Here’s a breakdown of what makes this bread work:
- Bread Flour
This high-protein flour helps create structure and chewiness in the finished loaf. - Warm Water
Water activates the yeast and allows the flour to absorb moisture during fermentation. - Instant or Active Dry Yeast
Yeast acts as the leavening agent, allowing the dough to rise slowly over time. - Salt
Adds flavor and controls yeast activity during fermentation. - Optional: Cornmeal or extra flour for dusting
Prevents sticking and gives the bottom of the loaf a rustic finish.
How to Make No-Knead Bread Step-by-Step
Step 1 – Mix the Dough
In a large bowl, combine your dry ingredients—flour, salt, and yeast. Then add warm water and stir until a shaggy, sticky dough forms. There’s no need to knead. Just cover the bowl with plastic wrap or a clean towel.
Step 2 – Let the Dough Rise (Bulk Fermentation)
Allow the dough to rest at room temperature for 12 to 18 hours. During this time, the yeast ferments the dough, creating gas bubbles that will result in that classic airy texture. The dough will double in size and appear bubbly on top when ready.
Step 3 – Shape and Rest
Lightly flour your hands and a work surface. Turn out the dough and gently fold it into a round shape. Avoid deflating the dough too much. Let it rest for about 30 to 60 minutes while your oven preheats.
Step 4 – Preheat and Bake
Preheat your oven to 450°F. If using a Dutch oven, place it inside the oven to heat as well. Carefully transfer the dough to a piece of parchment paper, then lower it into the hot pot. Cover and bake for 30 minutes. Then uncover and bake for another 15–20 minutes until golden brown.
Step 5 – Chill for 10 Minutes Before Slicing
Once the bread is out of the oven, let it sit for at least 10 minutes. This allows the interior to finish setting and prevents a gummy texture when sliced.
Tips for the Best No-Knead Bread Every Time
Even though this bread is low-effort, a few small tweaks can elevate your results:
- Use a Dutch oven: It traps steam, which creates a crisp, crackly crust.
- Don’t rush the rise: The longer fermentation time develops better flavor and texture.
- Flour your surface and hands lightly: This makes shaping easier without overworking the dough.
- Let it cool before slicing: It’s tempting to cut into warm bread, but waiting improves the structure.
- Try a cold ferment: Placing the dough in the fridge for 24–48 hours enhances flavor even more.
Easy No-Knead Bread Variations to Try
Once you’ve mastered the basic loaf, you can personalize it with flavorful additions:
- Whole Wheat: Replace up to half the flour with whole wheat for a heartier texture.
- Cheddar Jalapeño: Mix in shredded cheese and chopped peppers before the first rise.
- Cranberry Walnut: Add dried cranberries and chopped nuts for a slightly sweet loaf.
- Olive Rosemary: Fold in chopped olives and a teaspoon of dried rosemary.
- Seeded Crust: Roll the shaped dough in sesame, flax, or poppy seeds before baking.
Serving Ideas for No-Knead Bread
You can enjoy this bread in countless ways:
- Serve warm with salted butter or olive oil and vinegar.
- Make rustic sandwiches with your favorite deli fillings.
- Use as a base for avocado toast or crostini.
- Pair with soups like tomato basil or minestrone.
- Toast and top with jam, cheese, or nut butter.
Storage, Freezing, and Reheating Tips
Proper storage extends the life of your loaf without compromising texture:
- At room temperature: Store wrapped in a towel or paper bag for 2–3 days.
- In the freezer: Wrap slices or whole loaves in plastic and then foil. Freeze for up to 3 months.
- To reheat: Warm slices in the toaster or reheat the whole loaf in a 300°F oven for 10 minutes.
Nutrition and Dietary Notes
No-knead bread is not only simple but also clean in terms of ingredients:
- Naturally vegan and dairy-free.
- Contains no added sugars or preservatives.
- Approximate values per slice:
- Calories: ~140
- Carbohydrates: ~28g
- Protein: ~4g
- Fat: ~0.5g
- Fiber: ~1g
You can also adjust the recipe to fit dietary needs by using whole grain flours or reducing sodium.

FAQs About No-Knead Bread
Can I make no-knead bread without a Dutch oven?
Yes. Use a heavy pot with a lid or a baking sheet covered with foil to create a steam environment.
Why is my no-knead bread dense?
This often happens when the dough hasn’t fermented long enough or the yeast is no longer active.
Can I use all-purpose flour?
Yes, though bread flour gives better rise and structure. All-purpose will yield a slightly softer loaf.
How do I know it’s baked through?
It should sound hollow when tapped on the bottom and have a deep golden color.
The no-knead method makes bread baking more accessible than ever. With minimal effort and maximum reward, this recipe offers you a pathway to beautiful, delicious bread that fits into your schedule. Whether you’re new to baking or simply want a simpler method, no-knead bread proves that great results don’t require complexity.
Try it for yourself—watch your dough bubble and rise, smell the incredible aroma as it bakes, and hear the crunch as you slice into the crust. One loaf is all it takes to see why this method has earned its place in kitchens around the world.
PrintThe Best No-Knead Bread Loaf

No-knead bread is a simple, rustic artisan loaf made with just four ingredients and no kneading required. Its long fermentation time delivers a chewy, airy crumb and a crispy golden crust, all with minimal effort.
- Prep Time: 10 minutes
- Cook Time: 45 minutes
- Total Time: 13 hours
- Yield: 1 loaf
- Category: Bread
- Method: Baking
- Cuisine: Artisan/European
- Diet: Vegan
Ingredients
- Bread Flour – provides high protein for structure and chew
- Warm Water – activates the yeast and hydrates the dough
- Instant or Active Dry Yeast – allows the bread to rise over time
- Salt – enhances flavor and regulates fermentation
- Optional: Cornmeal or extra flour – used for dusting to prevent sticking
Instructions
- In a large bowl, mix flour, salt, and yeast.
- Add warm water and stir until a sticky dough forms. No kneading needed.
- Cover the bowl and let the dough rise at room temperature for 12–18 hours.
- Turn out the dough onto a floured surface and gently shape into a round loaf.
- Let the dough rest for 30–60 minutes while preheating the oven to 450°F with a Dutch oven inside.
- Transfer the dough to the hot Dutch oven (use parchment paper for easier handling).
- Bake covered for 30 minutes, then uncovered for 15–20 minutes until golden brown.
- Let the bread chill for 10 minutes before slicing to allow the crumb to set.
Notes
- Use a Dutch oven to trap steam and create a crispy crust.
- Allow the dough to ferment longer for deeper flavor.
- Handle the dough gently to maintain air bubbles for an open crumb.
- Let the loaf cool fully to avoid a gummy interior.
- Experiment with flavor add-ins like herbs, cheese, or olives.
Nutrition
- Serving Size: 1 slice
- Calories: 140
- Sugar: 0g
- Sodium: 190mg
- Fat: 0.5g
- Saturated Fat: 0g
- Unsaturated Fat: 0.5g
- Trans Fat: 0g
- Carbohydrates: 28g
- Fiber: 1g
- Protein: 4g
- Cholesterol: 0mg