Looking for a spooky, kid-approved Halloween treat that’s both delicious and delightfully creepy? These Marshmallow Rice Krispies Halloween Brains are everything you need to wow your party guests or surprise trick-or-treaters. With just a handful of pantry staples—like marshmallows, butter, and rice cereal—you can whip up these no-bake desserts in under 30 minutes. Whether you’re hosting a Halloween bash or preparing fun snacks for school, this creepy twist on a classic treat will steal the show.
Looking for inspiration? Try our Raw Meat Rice Krispies recipe for another scary dessert that’ll freak out your guests.
JUMP TO
Table of Contents
Why Marshmallow Rice Krispies Halloween Brains Are the Perfect Spooky Party Snack
Kid-friendly and adult-approved Halloween fun
There’s something about the combination of gooey marshmallow and crunchy cereal that brings everyone together—especially when it’s shaped like a brain. Kids love the gross-out factor, and adults enjoy the nostalgic bite of a classic treat. Plus, this is one of those Halloween desserts that’s safe for little hands to help with.
These treats hit the sweet spot between spooky and silly. You can even wrap them in cellophane and hand them out to trick-or-treaters. Don’t miss our Halloween Pretzel Rods if you’re after more fun and shareable goodies.
No-bake, low-mess, and fast to make
One of the best things about these marshmallow Rice Krispies Halloween brains is that they’re totally no-bake. That means no oven, no waiting for cookies to cool, and no clean-up nightmare. All you need is a stovetop or microwave, a bowl, and a baking sheet.
The process is easy enough for kids to get involved, making it a perfect afternoon activity in the days leading up to Halloween. Plus, the mess factor is low, especially when you follow the pro tips on oiling your hands before shaping the mixture.
The creepy brain design that guests will rave about
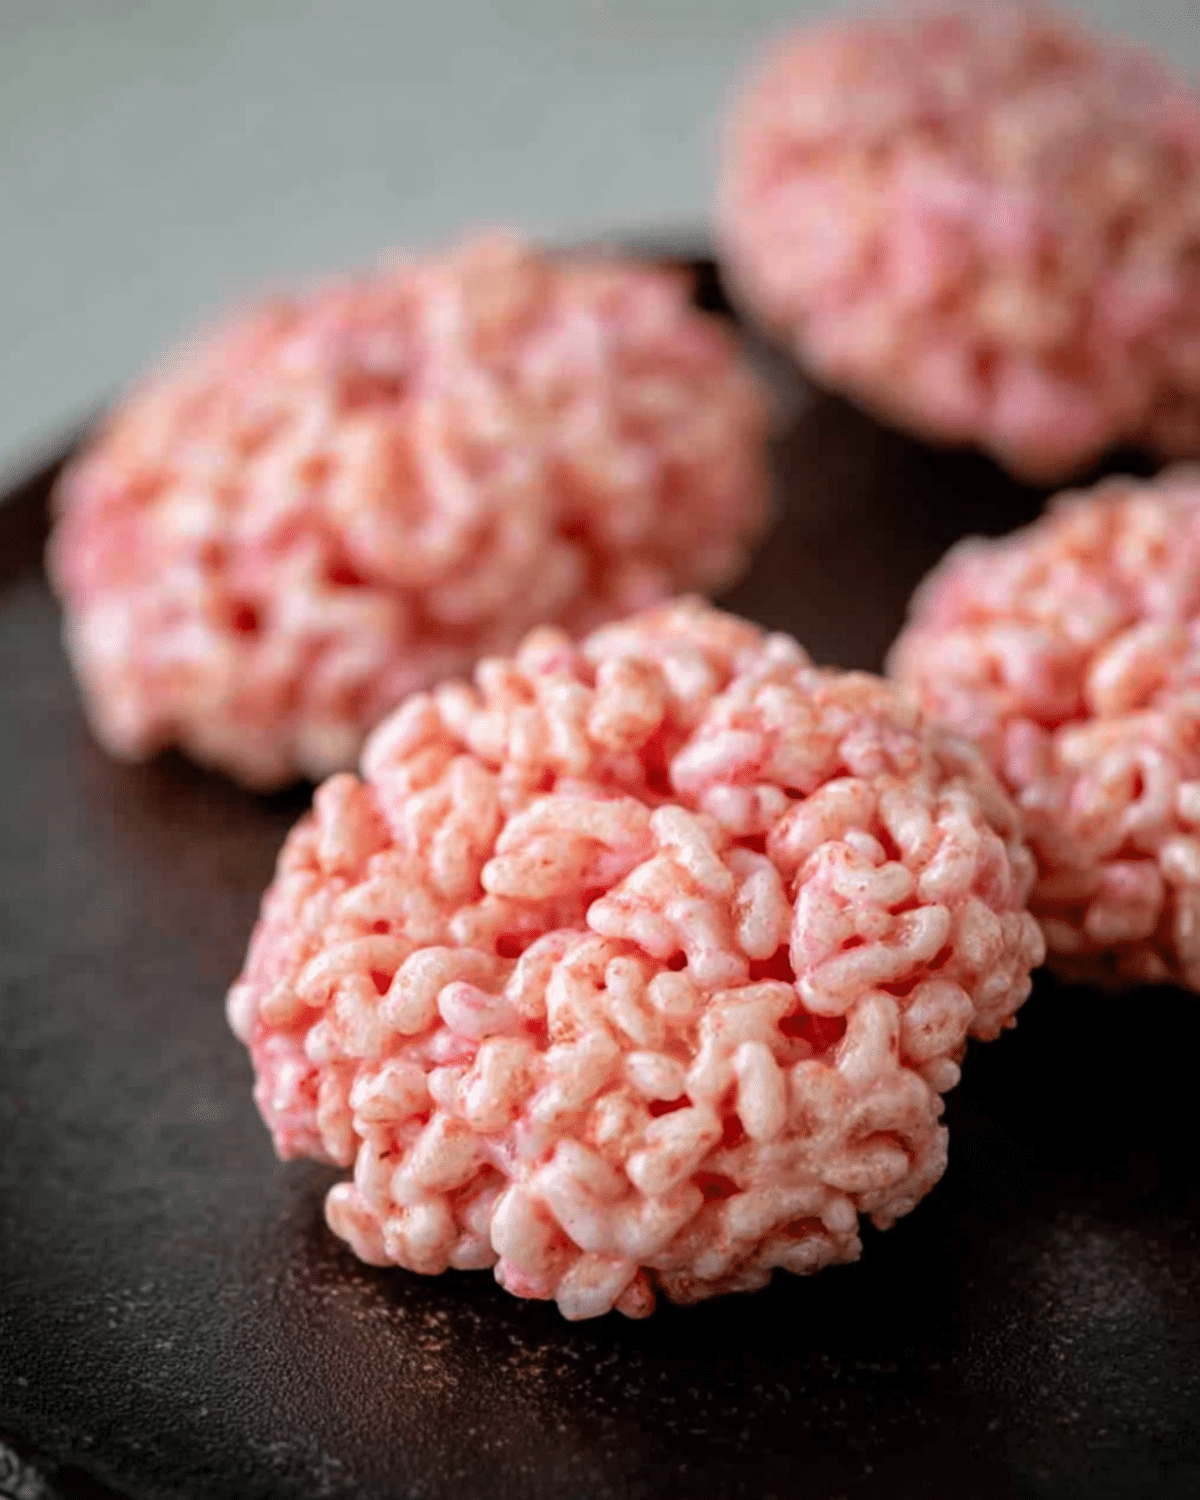
These Halloween treats go beyond taste—they’re visual stunners. With a light pink hue from melted marshmallows and just the right drizzle of red icing, the finished treats eerily resemble real brains. They look fantastic on a Halloween snack table next to our Mummy Fudge, adding variety and visual interest.
And because they’re hand-formed, each brain ends up looking a little different—just like the real thing. Creepy? Totally. Memorable? You bet.
Ingredients Needed to Make Rice Krispies Brains
The essentials: marshmallows, rice cereal, and butter
To make these spooky brains, you only need five simple ingredients:
| Ingredient | Purpose |
|---|---|
| Marshmallows (pink & white) | Melts to create the sticky, brainy texture |
| Butter | Helps melt the marshmallows smoothly |
| Salt | Enhances the flavor |
| Rice Krispies cereal | The base for the “brain matter” |
| Red writing icing (optional) | For that realistic, bloody look |
Any brand of crispy rice cereal works fine, including store-brand versions. And mini marshmallows can melt faster, but regular-sized ones do the job too.
Discover great ideas like our Bloody Red Velvet Popcorn for another gross-looking Halloween snack with major crowd appeal.
Optional spooky additions for extra flair
Want to elevate your Halloween Rice Krispies brains even more? Try these add-ons:
- Candy eyeballs: Insert on top to create monster brains
- Black licorice: Wrap around for brain veins
- Edible glitter or spray color: Adds shimmer and more creep factor
- Cherry or strawberry jam: For a juicy, oozing effect
If you’re aiming for theatrical or over-the-top displays, these extras can turn a simple treat into a haunting masterpiece.
Where to shop or what to substitute if you’re short
Most of these ingredients are pantry staples, especially during fall. However, if you’re in a pinch:
- Swap rice cereal for cornflakes or puffed rice.
- Use vegan marshmallows if you need a gelatin-free option.
- Replace butter with coconut oil for a dairy-free version.
And if you’re making a big batch, grab your ingredients in bulk at warehouse stores or discount grocery chains.
Check out our Ghost Oreo Balls if you need a second quick, no-bake Halloween treat using pantry items.
Step-by-Step Guide to Shaping the Brains
Melting marshmallows the right way (microwave vs. stovetop)
The foundation of any Rice Krispies treat is the marshmallow-butter mix. While many people use the microwave for convenience, the stovetop method gives you greater control and avoids scorching.
To do this, place butter and marshmallows in a heatproof bowl over a pan of simmering water (double boiler style). Stir occasionally until fully melted and smooth. At first, the mixture will look chunky and sticky—just keep stirring and trust the process.
If you’re short on time, the microwave method works too: Heat butter and marshmallows in 30-second bursts, stirring between rounds until fully combined. Be careful not to overheat or you’ll end up with dry, rubbery brains.
Handling the sticky mixture: oiling tricks
Here’s the deal: this mixture is incredibly sticky. But don’t panic. The trick is to oil everything—your spoons, your fingers, even the knife you use to shape the brain groove.
Keep a small bowl of neutral oil (like vegetable or coconut) next to your workspace. Oil two tablespoons, then scoop and shape a mound of the mixture onto parchment paper. Use lightly oiled fingers to press the blob into a rounded brain shape. It should be slightly oval and about palm-sized.
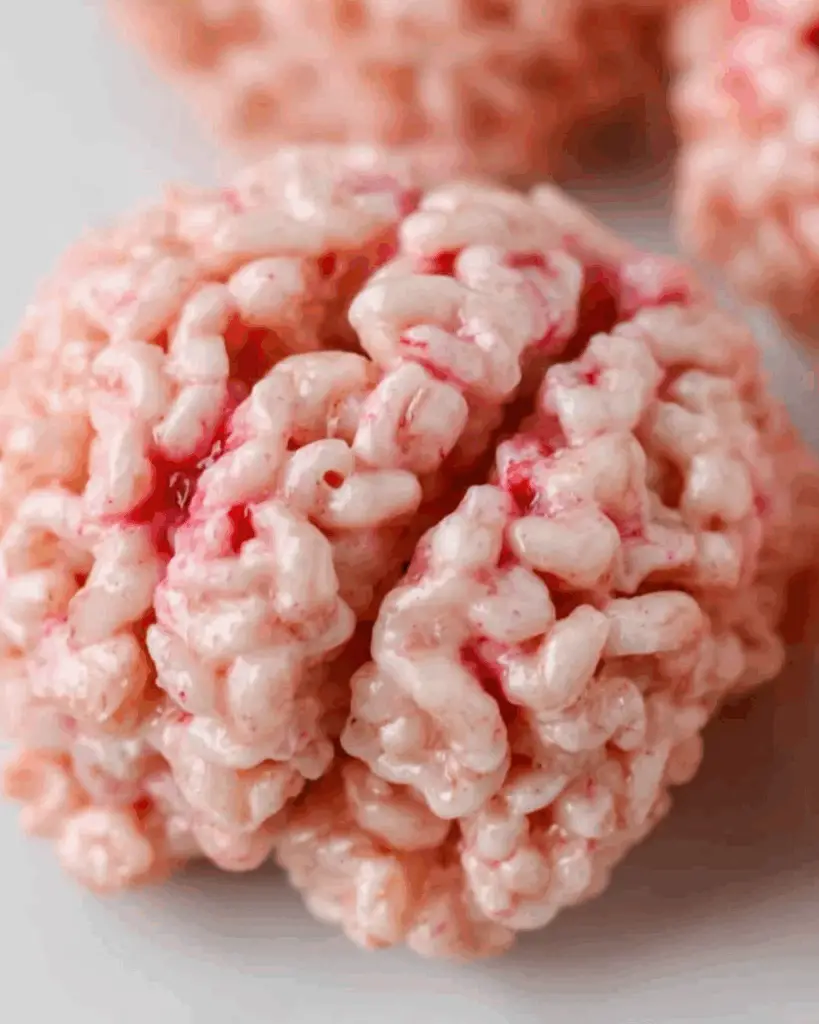
Carving brain-like shapes with household tools
To create the signature “brain fold,” take a table knife, lightly coat it in oil, and press a line through the center of each mound. This groove gives the treat a real anatomical look, adding to the Halloween horror vibe.
If you’re making a large batch, do five mounds at a time. Let them cool slightly, then go back to create the indentations—this method prevents smudging and keeps your brain shapes clean.
Don’t miss our Halloween Dirt Cups for another creative way to repurpose simple ingredients into something seasonally spooky.
Tips for Serving and Storing These Halloween Treats
Keeping brains fresh and firm
Once formed, let your brains sit out at room temperature for at least 4 hours to firm up. For best results, keep them in a cool, dry space—not in the fridge, where condensation can cause them to go soggy.
Once fully set, store them in an airtight container lined with wax or parchment paper. They’ll stay fresh for up to 3 days, making them ideal to prep a few days ahead of your Halloween party.
Packaging ideas for trick-or-treaters
If you’re handing these out on Halloween night, wrap each brain in clear cellophane bags and tie with black or red ribbon. Add a fun label like “Zombie Snacks” or “Fresh Brain Bites.”
Want even more gory snack inspiration? Check out our Caramel Apple Dessert Cups—another Halloween winner for parties and candy bags.
Display tips for your Halloween table
Presentation goes a long way with Halloween snacks. Lay your brains out on a black tray with a drizzle of red icing “blood.” Add plastic spiders, skeleton hands, or a fog machine for ambiance.
Better yet, place them on top of red jelly or inside mini cauldrons to create an ultra-creepy display. Stack them on a cupcake stand for height and visual drama.
And for a savory break? Don’t miss our Easy Pizza Stuffed Pumpkins—the perfect pairing for a creepy dessert spread.
Creative Variations on the Rice Krispies Brains
Colored icings, candy eyes, and edible blood
Spice things up with food coloring or edible spray paint. A bit of black or green gel food coloring in the mix can turn your brains into toxic zombie mush. Drizzle red writing icing generously for a “fresh from the skull” effect.
Stick on candy eyes for an added freak-out moment—especially fun for kids’ parties. Or try melted raspberry jam for a realistic, oozing “blood” that’s both tasty and terrifying.
Turning brains into mini monsters or cupcakes
Feeling adventurous? Shape smaller brains and stick them on top of mini chocolate cupcakes. Or use cake pop sticks to turn them into lollipops. You can even press the mixture into silicone skull or zombie molds for perfectly shaped horror treats.
For a little twist, add chocolate chips or crushed Oreos to the cereal mix for added crunch and color.
Adapting for different dietary needs
Got allergies or food sensitivities in your crowd? No problem. Here are quick swaps:
- Use vegan marshmallows (gelatin-free)
- Swap butter for coconut oil
- Pick gluten-free rice cereal
- Avoid red dye by using beetroot powder or natural fruit juice for color
These changes still deliver spooky goodness without compromising anyone’s dietary needs.
Common Mistakes to Avoid When Making Halloween Brains
Too much butter? Not enough marshmallow?
It might seem tempting to add extra butter for easier mixing—but be careful. Too much fat prevents the mixture from setting properly and will result in greasy, floppy brains. On the flip side, skimping on marshmallows makes the mixture too dry and hard to shape.
Stick to the base ratio: 4 tablespoons of butter + 2 cups of marshmallows + 4 cups of cereal. This blend gives the perfect texture—malleable, but not sticky to the point of frustration.
When the mixture won’t set right
If your brains aren’t holding their shape, you may have added too much cereal or not melted your marshmallow mixture enough. Be patient while melting, and don’t add the cereal until the marshmallow mix is totally smooth.
Give the shaped treats time to firm up—4 to 5 hours minimum. Rushing this step is a recipe for squishy, misshapen brains.
Avoiding messy fingers and flat brains
Shaping these spooky snacks is hands-on—but that doesn’t mean your kitchen has to be a sticky war zone. Always keep a small bowl of oil nearby and reapply often. This simple trick makes molding faster and cleaner.
Also, avoid flattening the brains too much while shaping. You want them to look plump and round—not like deflated pancakes.
Frequently Asked Questions (FAQs)
Can I make marshmallow Rice Krispies Halloween Brains ahead of time?
Absolutely. These treats store well in an airtight container for up to 3 days, making them ideal for prepping before Halloween parties or school events.
How do I make the brain shape look more realistic?
Use a lightly oiled knife to press a clean groove down the center of each brain mound. For extra effect, drizzle red icing or raspberry syrup into the groove to mimic blood vessels.
What kind of food coloring is best for edible blood?
Gel-based red food coloring or red icing gel works best for a rich, deep “blood” look. You can also use strawberry jam thinned with a bit of water for a natural, realistic drizzle.
Conclusion: Why You’ll Make These Brains Every Halloween
These Marshmallow Rice Krispies Halloween Brains combine everything you want in a holiday treat—creepy looks, crowd-pleasing flavor, and no-bake simplicity. They’re a blast to make, easy to customize, and guaranteed to steal the show on your Halloween snack table.
With only a few ingredients and a little creativity, you’ll have treats that kids and adults alike will remember year after year. Whether you’re planning a spooky party or need a quick classroom snack, this is one Halloween recipe you’ll return to again and again.
Looking for more eerie and edible Halloween recipes? Don’t miss our Jalapeno Popper Mummies—a spicy and savory option to pair with your sweet brains.
PrintMarshmallow Rice Krispies Halloween Brains
These Marshmallow Rice Krispies Halloween Brains are spooky, kid-friendly no-bake treats made with gooey marshmallows and crispy cereal. Perfect for Halloween parties or creepy snack tables, they’re fast, fun, and wildly delicious.
- Prep Time: 30 minutes
- Cook Time: 0 minutes
- Total Time: 4 hours 30 minutes
- Yield: 15 brains
- Category: Snack, Dessert
- Method: No-Bake
- Cuisine: Modern Australian
- Diet: Vegetarian
Ingredients
- 4 tablespoons butter
- 2 cups pink and white marshmallows
- 1/4 teaspoon salt
- 4 cups Rice Krispies cereal
- 1 tube red writing icing (optional)
Instructions
- Line a tray with non-stick parchment paper.
- Place butter and marshmallows in a heatproof bowl set over simmering water.
- Stir until butter melts and marshmallows become smooth.
- Add salt and stir to combine.
- Turn off heat and mix in Rice Krispies until evenly coated.
- Oil two spoons and scoop the mixture into mounds on the tray.
- Use oiled fingers to shape into brains and lightly flatten.
- Use a lightly oiled knife to press a groove down the center of each brain.
- Repeat until mixture is used up, reshaping as needed.
- Drizzle red icing for a bloody effect (optional).
- Let set at room temperature for 4–5 hours before serving.
Notes
- Use mini marshmallows for faster melting.
- Any crispy rice cereal can be substituted.
- Oil your hands and tools to reduce sticking.
- Brains can be stored for up to 3 days in an airtight container.
Nutrition
- Serving Size: 1 brain
- Calories: 87
- Sugar: 6g
- Sodium: 113mg
- Fat: 3g
- Saturated Fat: 1g
- Unsaturated Fat: 2g
- Trans Fat: 0g
- Carbohydrates: 14g
- Fiber: 0g
- Protein: 0g
- Cholesterol: 8mg