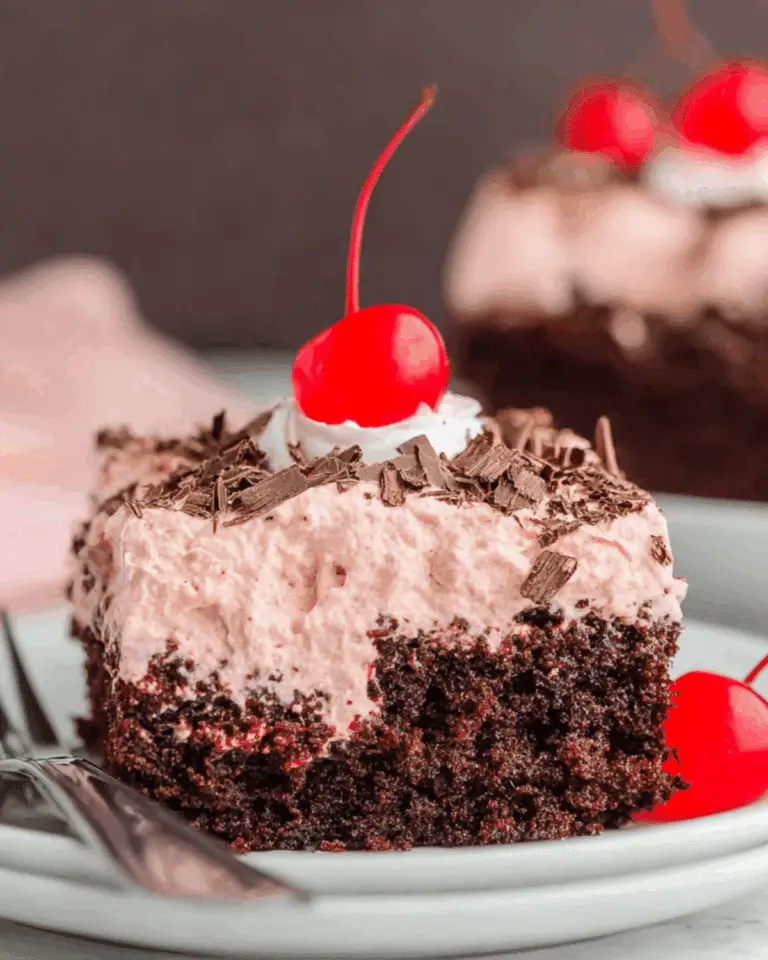
Looking for a light, creamy, no-bake dessert that still feels indulgent? Cherries in the Snow might just be the easiest show-stopping treat you’ll ever make. With fluffy angel food cake, sweet cherry pie filling, and a cloud-like cream cheese layer, this retro favorite has made a major comeback in modern kitchens. Whether you’re prepping for a summer BBQ, Christmas dinner, or an effortless weeknight treat, this dessert fits right in.
And if you’re into make-ahead desserts or need a quick crowd-pleaser, Cherries in the Snow ticks all the boxes. It’s the kind of recipe your grandma used to make—and now it’s your turn to master it. Check out our Christmas Fudge Cake if you’re in the mood for more nostalgic sweets.
Let’s dive into what makes this treat such a timeless winner.
JUMP TO
Table of Contents
What is Cherries in the Snow?
The nostalgic roots of this vintage dessert
“Cherries in the Snow” is more than just a dessert—it’s a slice of Americana. Originating sometime in the mid-20th century, this layered no-bake treat became a potluck staple thanks to its ease, elegance, and flavor. The name alone evokes wintertime imagery, with ruby-red cherries nestled atop a fluffy white base, mimicking fresh snow.
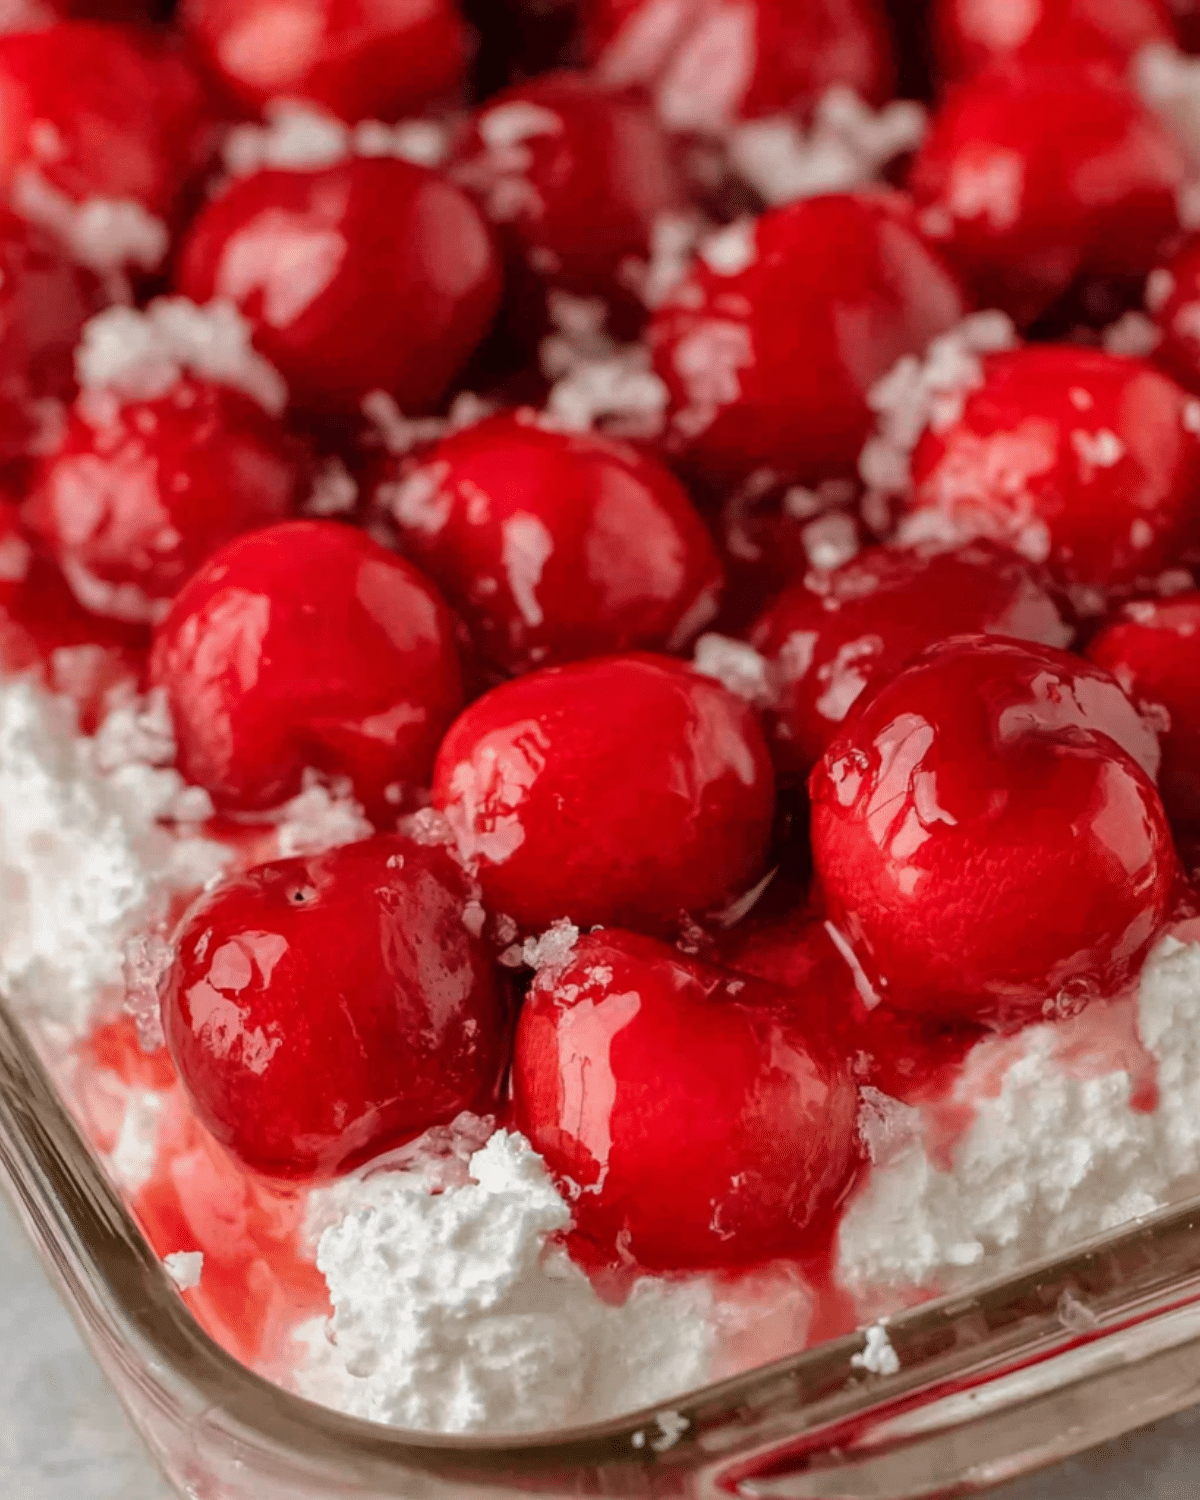
Unlike traditional baked cakes or pies, this dessert requires no oven time. Its foundation is usually angel food cake, torn into soft pieces, layered with sweetened cream cheese, whipped topping, and canned cherry pie filling. The result? Light, creamy, fruity perfection.
Why it’s still a favorite today
In a world of complex layered cakes and trendy desserts, Cherries in the Snow has remained a classic for three big reasons:
- It’s fast – Prep takes just 20 minutes.
- It’s versatile – Serve it in a trifle dish, baking pan, or even individual cups.
- It’s visually stunning – The red-and-white contrast is pure eye candy.
People still love it because it feels like a fancy dessert, but it’s as easy as mixing and layering. It’s especially popular during the holidays, but you’ll find it at summer cookouts and baby showers, too.
Looking for inspiration? Try this fun holiday punch drink to pair with it!
How it compares to similar layered desserts
Cherries in the Snow often gets compared to Heaven on Earth Cake or Cherry Trifle, but here’s what sets it apart:
| Dessert | Cake Base | Cream Layer | Topping |
|---|---|---|---|
| Cherries in the Snow | Angel Food Cake | Sweetened Cream Cheese + Whip | Cherry Pie Filling |
| Heaven on Earth Cake | Pound Cake | Sour Cream + Pudding | Pie Filling |
| Cherry Trifle | Cake or Brownies | Custard or Cream | Berries |
The cream cheese adds richness without being heavy, and the whipped topping keeps the texture light and fluffy. It’s comfort food that won’t weigh you down.
Ingredients You’ll Need for Cherries in the Snow
Simple pantry staples with big impact
What makes this dessert especially appealing is its short ingredient list. Here’s all you need:
| Ingredient | Notes |
|---|---|
| Cream Cheese (8 oz) | Use full-fat for best texture |
| Powdered Sugar (½ cup) | Sweetens the filling smoothly, no graininess |
| Milk (½ cup) | Helps thin the cream cheese mix for easy folding |
| Cool Whip (12 oz) | Use thawed, not frozen |
| Angel Food Cake (9”) | Store-bought or homemade—your call |
| Cherry Pie Filling | Use 2 cans (21 oz each); “More Fruit” varieties work best |
This no-bake cherry dessert proves that you don’t need complicated ingredients for something beautiful and delicious.
Substitutions and customizations
Make it your own with easy swaps:
- Use whipped cream instead of Cool Whip for a fresher taste (but shorter shelf life).
- Try white cake or pound cake instead of angel food for a richer base.
- Replace cherry filling with blueberry, raspberry, or even strawberry pie filling.
Love twists on the classics? Discover great ideas like our pumpkin angel food cake for a seasonal spin.
Making it gluten-free or low-fat
This dessert adapts well for different diets:
- Gluten-Free: Use a gluten-free angel food cake or make your own with gluten-free flour.
- Low-Fat: Opt for reduced-fat cream cheese, fat-free Cool Whip, and light pie filling.
- Sugar-Free: Try monk fruit powdered sweetener and sugar-free cherry filling.
For more sweet-yet-light options, check out this apple crisp dessert recipe for a fruit-forward fix.
Step-by-Step: How to Make Cherries in the Snow
Preparing the creamy filling
Start by letting your cream cheese sit at room temp—this ensures a silky texture. In a large bowl, whip the cream cheese and powdered sugar together with a hand mixer. Add the milk in two batches (¼ cup at a time), mixing until smooth.
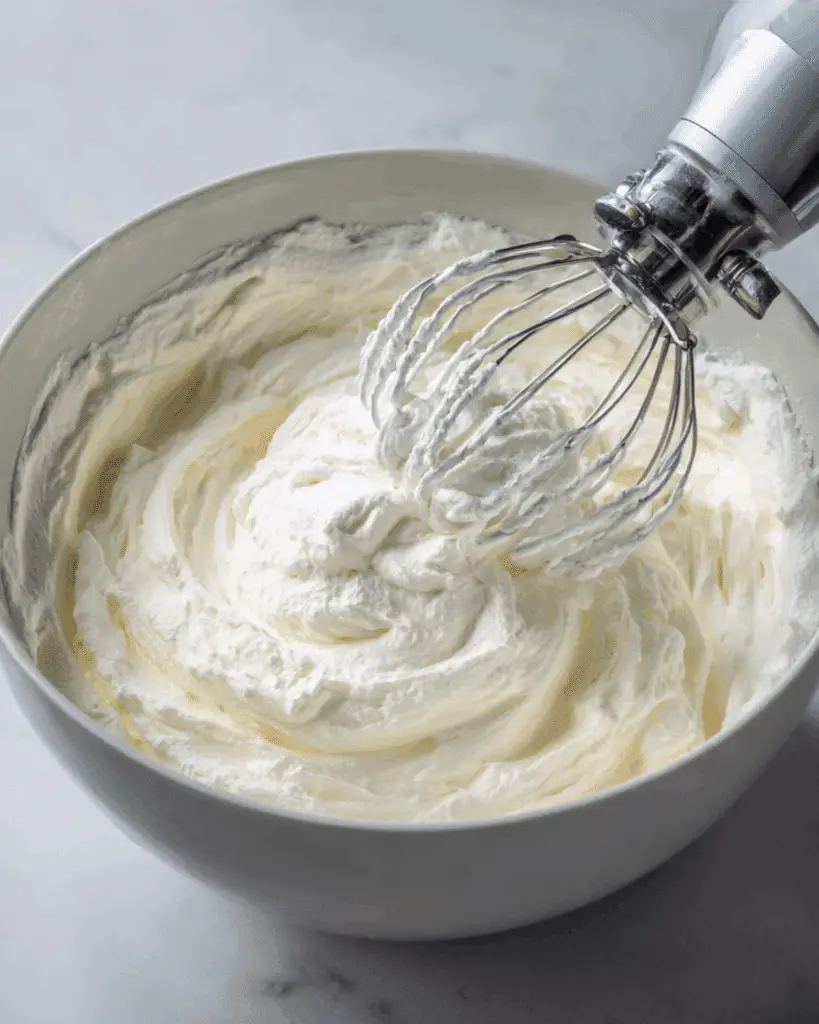
Next, gently fold in the thawed Cool Whip. Don’t overmix—it should stay light and fluffy.
Assembling the dessert layers
Tear the angel food cake into bite-sized chunks. Fold these into the cream mixture until well combined. Spread this mixture into a 9×13-inch glass pan or trifle dish.
Now, spoon the cherry pie filling evenly across the top. You want full coverage, with cherries in every bite.
Don’t miss our cherry pie bars if you’re craving even more ways to use cherry pie filling.
Tips for chilling, storing, and serving
- Refrigerate for at least 2 hours before serving. Overnight is even better for flavor melding.
- Use a glass dish for a pretty presentation.
- Store leftovers in an airtight container for up to 4 days.
This dish is a dream for hosts—prep it the night before and serve it straight from the fridge.
Recipe Variations Worth Trying
Changing up the fruit topping
While classic Cherries in the Snow relies on cherry pie filling, the base of cream and cake is the perfect canvas for experimenting. You can easily swap out cherries for other fruit fillings without losing the magic.
Popular options include:
| Fruit Topping | Flavor Profile | Best Occasion |
|---|---|---|
| Blueberry Pie Filling | Sweet and slightly tart | 4th of July, brunches |
| Raspberry Filling | Bright and tangy | Valentine’s Day, baby showers |
| Strawberry Sauce | Light and summery | Mother’s Day, garden parties |
| Peach Pie Filling | Mild and mellow | Late summer BBQs |
Homemade fruit sauces also work beautifully. Check out our cranberry-orange preserves for a zesty winter upgrade.
Swapping angel food cake for other bases
Not everyone loves the spongy lightness of angel food cake—and that’s okay. You’ve got options:
- White cake: Denser and a bit sweeter
- Pound cake: Rich and buttery for a more indulgent dessert
- Gluten-free cake: Works wonderfully if you’re hosting guests with dietary restrictions
Whatever base you choose, just make sure it’s sturdy enough to hold the creamy topping without getting soggy too fast.
Discover great ideas like our coconut sweet potato lentil soup for a contrasting savory side.
Presentation ideas: trifle dishes & parfaits
Presentation can take Cherries in the Snow from casual to elegant:
- Trifle dish: Perfect for layering the cake, cream, and cherries multiple times. Ideal for holidays.
- Mason jars or parfait glasses: Great for individual servings at bridal showers or dinner parties.
- Mini dessert cups: Kids love their own portion, and there’s less mess.
For festive flair, top with white chocolate curls, slivered almonds, or a sprig of mint.
When to Serve Cherries in the Snow
Perfect holidays and family gatherings
This dessert shines brightest on the holiday table. Its red and white palette makes it an obvious choice for Christmas, but it also fits perfectly into Thanksgiving, Valentine’s Day, or even the Fourth of July lineup.
It’s nostalgic and crowd-pleasing—grandma will love it, and the kids will go back for seconds.
Looking for more festive fun? Don’t miss our Christmas cookie bars for another hit holiday treat.
Make-ahead tips for party planners
Cherries in the Snow is one of those magical recipes that tastes better the next day. That makes it a dream for hosts who like to prep ahead:
- Make 24 hours in advance for optimal flavor melding.
- Use a covered glass dish to keep it fresh.
- Avoid topping with fruit until the cream layer is fully chilled, if layering for visual effect.
Want to double the batch for a large party? Simply make it in two separate pans rather than one deep dish to ensure even layering.
Kid-friendly and no-oven occasions
Since there’s no baking involved, this is also a great recipe for kids to help make. Let them tear the cake, stir the cream cheese, or even layer the dessert in mini cups.
It’s also perfect for:
- Hot summer days (no oven, no sweat)
- Dorm-room desserts
- Last-minute dinner guests
Expert Tips for Success
Avoiding sogginess and deflation
A common issue with layered no-bake desserts is sogginess. Here’s how to keep your Cherries in the Snow light and fluffy:
- Use fresh cake: Day-old angel food cake works best; avoid overly moist or crumbly cakes.
- Fold gently: Don’t over-mix the whipped topping or it’ll collapse.
- Layer smartly: Don’t press down when adding layers—let the dessert stay airy.
How to get even layers every time
The key to a stunning presentation is even distribution:
- Use an offset spatula or spoon to smooth each layer before adding the next.
- If using a trifle dish, layer from the outside in to create that eye-catching look.
- Chill between layers if you’re building multiple stacks.
Want more layered inspiration? Check out our chessman banana pudding dessert for another creamy classic.
How long can it stay fresh in the fridge?
Stored properly, this dessert keeps beautifully for up to 4 days. Just cover tightly with plastic wrap or a sealed lid.
Avoid freezing, as the texture of the cream and cake may become unpleasant when thawed.
| Storage Method | Duration | Notes |
|---|---|---|
| Fridge (covered) | 3–4 days | Best eaten within 48 hours |
| Freezer | Not advised | Texture may separate upon thawing |
FAQs About Cherries in the Snow
Can I make Cherries in the Snow a day ahead?
Absolutely. In fact, it’s recommended. Making it a day in advance allows the layers to settle and the flavors to develop. Just be sure to cover the dish tightly and refrigerate it.
What can I use instead of Cool Whip?
Fresh homemade whipped cream is a great substitute if you want to avoid processed ingredients. Just whip heavy cream with a bit of powdered sugar and vanilla extract until stiff peaks form. Note that it won’t hold up as long in the fridge compared to Cool Whip.
Can I use fresh fruit instead of canned pie filling?
Yes, but you’ll want to cook the fruit into a compote or sauce. Using raw cherries directly may result in a watery top layer. A quick cherry compote with cornstarch, sugar, and lemon juice gives you a homemade pie-filling texture.
How do I make this dessert less sweet?
To reduce sweetness:
-Use unsweetened whipped cream instead of Cool Whip
-Use low-sugar or homemade fruit toppings
-Cut the powdered sugar in the cream cheese layer by half
It still turns out flavorful but lighter on sugar.
Can I freeze Cherries in the Snow?
Freezing is not recommended. The cream layer may separate, and the cake could become soggy when thawed. It’s best enjoyed fresh within 3–4 days from the fridge.
Conclusion: Is Cherries in the Snow Worth Making?
If you’re looking for a no-fuss, no-bake dessert that still wows a crowd, Cherries in the Snow is your go-to. It’s light yet indulgent, pretty yet simple, nostalgic yet timeless. Whether you’re hosting a holiday feast or just need a sweet fix on a Tuesday night, this layered cherry delight delivers.
And if you’re into easy recipes that feel special, don’t miss our egg nog pie or cookie dough dip—perfect next steps in your dessert journey.
PrintCherries in the Snow
Cherries in the Snow is a no-bake, vintage dessert made with angel food cake, a creamy sweetened cream cheese filling, and cherry pie topping. It’s light, fluffy, and perfect for holidays, potlucks, and family gatherings.
- Prep Time: 20 minutes
- Cook Time: 0 minutes
- Total Time: 20 minutes
- Yield: 15 servings
- Category: Dessert
- Method: No-Bake
- Cuisine: American
- Diet: Low Fat
Ingredients
- 8 ounces cream cheese, room temperature
- 1/2 cup powdered sugar
- 1/2 cup 2% milk
- 12 ounces Cool Whip, thawed
- 1 (9-inch) pre-baked angel food cake
- 2 cans (21 ounces each) cherry pie filling
Instructions
- In a large bowl, use a hand mixer to beat the cream cheese and powdered sugar until smooth and creamy.
- Add 1/4 cup of milk, mix until smooth, then add the remaining 1/4 cup and mix again.
- Gently fold in the Cool Whip until well incorporated.
- Tear the angel food cake into bite-sized pieces and fold into the cream mixture.
- Spread the mixture evenly into a 9×13-inch glass baking dish.
- Top with the cherry pie filling, spreading it evenly over the cream layer.
- Cover and refrigerate for at least 2 hours before serving, or overnight for best results.
Notes
- Use full-fat cream cheese for best texture.
- Store-bought or homemade angel food cake can be used.
- Use “More Fruit” pie filling for a richer cherry layer.
- Store leftovers covered in the fridge for up to 4 days.
- Can be layered in a trifle dish or individual cups for presentation.
Nutrition
- Serving Size: 1 slice
- Calories: 214
- Sugar: 10g
- Sodium: 82mg
- Fat: 8g
- Saturated Fat: 6g
- Unsaturated Fat: 2.3g
- Trans Fat: 0.01g
- Carbohydrates: 33g
- Fiber: 0.5g
- Protein: 2g
- Cholesterol: 16mg