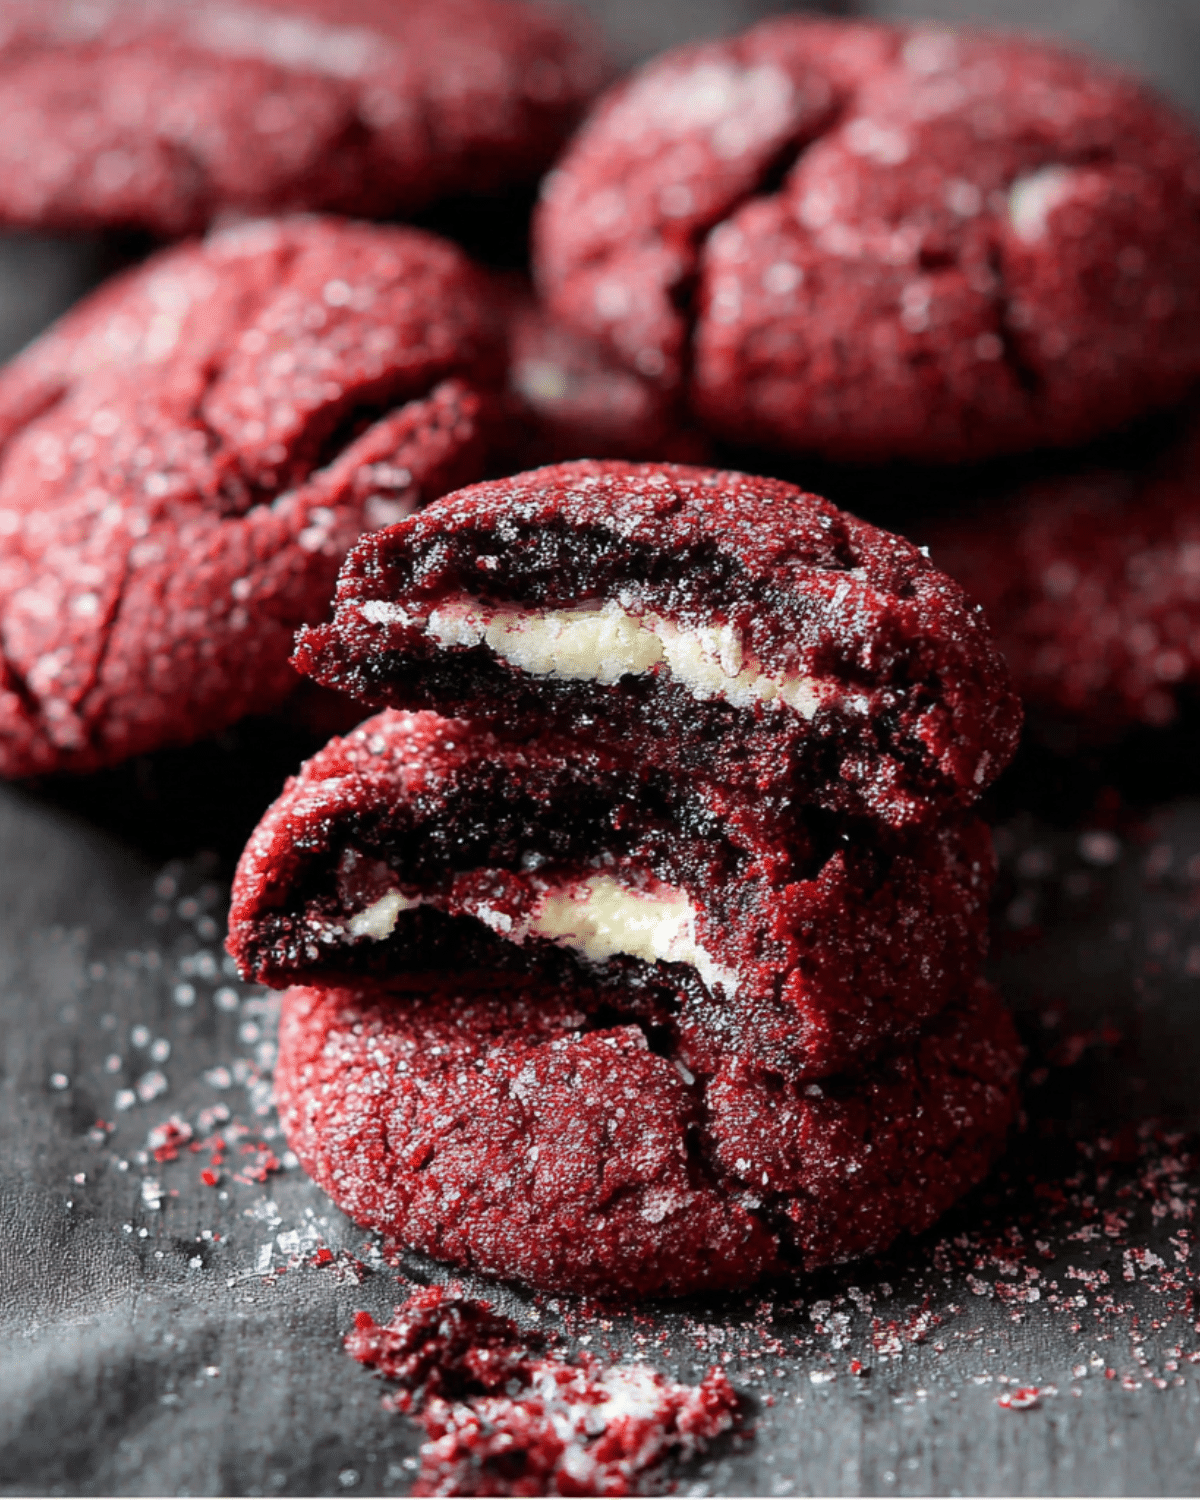
Red Velvet Cream Cheese Cookies are the ultimate indulgence for cookie lovers who crave something beyond ordinary. With their vibrant red hue, soft chewy texture, and a surprise cream cheese filling that melts in your mouth, these cookies are a showstopper at every gathering. Whether it’s Valentine’s Day, Christmas, or simply a weekend craving, this recipe delivers bakery-style perfection every time.
In this guide, we’ll explore what makes these cookies so special, the essential ingredients you’ll need, and pro baking tips that guarantee flawless results.
JUMP TO
Table of Contents
What Makes Red Velvet Cream Cheese Cookies So Special
The Perfect Blend of Cocoa and Vanilla
At the heart of red velvet flavor lies the subtle balance of unsweetened cocoa powder and vanilla extract. Unlike regular chocolate cookies that lean toward rich bitterness, red velvet cookies offer a mild cocoa taste paired with a creamy sweetness that delights the palate. That perfect blend is what gives these cookies their signature “red velvet” charm — not too chocolaty, not too plain, but just right.
The gentle flavor profile allows the tangy cream cheese center to shine without overpowering the cookie base. When baked properly, each bite delivers the nostalgic warmth of homemade baking with a twist of sophistication.
Why the Cream Cheese Filling Elevates the Cookie
The cream cheese filling isn’t just an add-on — it’s the soul of these cookies. When the cookies bake, the chilled cream cheese core turns into a luscious, gooey surprise that complements the cookie’s soft texture. The tang from the filling balances the sweetness, making every bite perfectly indulgent.
This is what sets Red Velvet Cream Cheese Cookies apart from other stuffed cookie recipes. It’s a dessert that feels like two treats in one — a velvety red cookie on the outside and a rich cheesecake bite on the inside. If you’ve ever tried stuffed desserts from Food Network, you’ll recognize that this filling transforms a simple cookie into a showpiece dessert worthy of praise.
Texture and Color – The Magic Combo
One of the most striking features of these cookies is their texture — soft, chewy edges with a melt-in-your-mouth center. The deep red color isn’t just for looks; it gives these cookies a festive flair perfect for gifting or dessert platters.
The rich red color comes from food coloring enhanced by the cocoa powder’s hue. For the best results, use high-quality red gel coloring, which keeps its brightness after baking. The contrast of the white cream cheese filling peeking through adds a bakery-quality finish that makes these cookies as beautiful as they are delicious.
Ingredients You’ll Need for the Best Red Velvet Cream Cheese Cookies
Before you start mixing, having all ingredients ready ensures smooth baking. The right combination of wet and dry ingredients helps create cookies that are soft, chewy, and loaded with flavor.

Essential Dry Ingredients
The dry ingredients are the backbone of these cookies:
- All-purpose flour: Gives structure and prevents spreading.
- Unsweetened cocoa powder: Adds the subtle chocolate flavor that defines red velvet.
- Baking soda: Keeps the cookies light and soft.
- Salt: Balances sweetness and enhances depth.
When measuring, spoon your flour into the cup rather than scooping directly — this avoids dense, heavy dough.
Wet Ingredients That Add Flavor and Texture
Wet ingredients bring the cookie dough to life. You’ll need:
- Unsalted butter: For richness and soft texture.
- Brown and white sugar: Together, they add moisture and a caramel-like note.
- Egg and egg yolk: Help bind the dough and keep it tender.
- Pure vanilla extract: Enhances the red velvet flavor.
- Buttermilk: Adds tang and keeps the dough soft.
If you’ve loved the texture of cookies like the Soft Sugar Cookies Recipe, this combination will feel familiar — only richer.
The Cream Cheese Filling Components
This part is where the magic happens. For the filling, you’ll need:
- Cream cheese: Full-fat works best for smooth texture.
- Granulated sugar: Sweetens the tang.
- Vanilla extract: Complements the red velvet dough.
Mix until creamy and chill before shaping. Chilled filling is easier to handle and prevents melting while baking.
Optional Add-ins and Variations
Want to make these cookies your own? Try these creative spins:
- White chocolate chips for a double-sweet bite.
- Mini dark chocolate chips for a richer flavor.
- Festive sprinkles for holidays.
You can even drizzle them with white chocolate, like the style used in White Chocolate Drizzle Cookies, for an elegant finish.
Step-by-Step Guide to Making Red Velvet Cream Cheese Cookies
Preparing the Cream Cheese Filling
Start with the filling first. Mix softened cream cheese, sugar, and vanilla until smooth. Scoop teaspoon-sized balls and place them on a parchment-lined tray. Freeze for at least 30 minutes. This makes assembly easier and keeps the filling intact while baking.
Making the Red Velvet Dough
Cream butter, both sugars, and vanilla together until fluffy. Add egg and yolk, followed by food coloring and buttermilk. Gradually mix in dry ingredients — flour, cocoa, baking soda, and salt — until combined.
Chill the dough for at least an hour. Chilling prevents spreading and deepens the flavor. For more chilling tips, check out our guide on How to Chill Cookie Dough for Best Results.
Assembling the Cookies
Scoop about two tablespoons of dough, flatten slightly, and place a cream cheese ball in the center. Wrap the dough around the filling, sealing all sides. Roll lightly to form a smooth ball.
Place cookies on a parchment-lined baking sheet, leaving space between each.
Baking Tips for Perfect Results
Bake at 350°F (177°C) for 13–15 minutes until edges are set but centers look slightly soft. Overbaking dries the cookies, so remove them while the centers still appear tender. They’ll firm up as they cool.
Let cookies rest on the sheet for 10 minutes before transferring to a rack. If you want perfectly uniform results, use a cookie scoop like the ones recommended in Perfect Drop Cookies Guide.
Expert Tips for Red Velvet Cream Cheese Cookie Success
Keep the Cream Cheese Cold
One of the biggest secrets behind perfect Red Velvet Cream Cheese Cookies is temperature control. Always keep your cream cheese filling cold before baking. A chilled center ensures that the cookies bake evenly without the filling leaking out. If the filling softens too much, pop it back into the freezer for a few minutes before assembling.
Don’t Skip Dough Chilling
Warm cookie dough spreads too much in the oven, creating flat, overbaked cookies. Chilling your dough solidifies the butter and keeps the cookies thick and chewy.
Use Quality Food Coloring and Cocoa
The red color defines red velvet. Low-quality colorings fade during baking, leaving dull results. Choose a gel-based red food color for vibrant, lasting hues. Pair it with high-quality cocoa powder for that distinctive mild chocolate tone.
Storage and Freezing Recommendations
Store baked cookies in an airtight container at room temperature for up to 3 days or refrigerate for a week. For longer storage, freeze baked cookies in a zip-sealed bag for up to 2 months. To enjoy, thaw at room temperature for 15 minutes or warm slightly in the microwave for that freshly-baked texture.
Common Mistakes to Avoid
Overmixing the Dough
Mixing your dough too much after adding flour activates gluten, leading to tough, dense cookies. Stir gently until ingredients are just combined.
Incorrect Oven Temperature
If your oven runs hot or cold, your cookies may bake unevenly. Always preheat and use an oven thermometer if possible. Uneven heat causes the cookies to brown on the edges while staying underbaked inside.
Not Sealing the Filling Properly
Seal every cookie completely before baking. Even small cracks can cause the filling to leak out. Use slightly damp fingers to smooth the seams for a perfect seal.
Frequently Asked Questions (FAQ)
Can I make these cookies ahead of time?
Yes! You can refrigerate the cookie dough for up to 48 hours or freeze it for a month. Just allow it to soften slightly before baking.
How do I store Red Velvet Cream Cheese Cookies?
Store them in an airtight container to keep them soft. You can also refrigerate them if your kitchen is warm.
Can I use boxed cake mix instead of homemade dough?
While boxed red velvet cake mix works, homemade dough has a richer flavor and better texture. If you prefer easy shortcuts, see our guide on Easy Cake Mix Cookies.
Can I freeze the cookie dough or baked cookies?
Absolutely. Freeze the shaped cookie dough balls (with filling inside) for up to 2 months. Bake from frozen, adding 1–2 extra minutes.
Why did my filling melt or ooze out during baking?
This happens when the filling isn’t cold enough or if the dough isn’t sealed properly. Always chill both components before baking.
Conclusion – Bake Love into Every Red Velvet Cream Cheese Cookie
Red Velvet Cream Cheese Cookies are a perfect blend of beauty and flavor — soft, chewy, and filled with creamy delight. They’re elegant enough for holidays yet simple enough for a weekend bake. Whether you’re surprising someone or treating yourself, these cookies bring joy in every bite.
PrintRed Velvet Cream Cheese Cookies

These Red Velvet Cream Cheese Cookies are soft, chewy, and filled with a luscious cream cheese center. With their deep red color, subtle cocoa flavor, and creamy filling, they’re the perfect dessert for holidays, parties, or anytime you crave something special.
- Prep Time: 25 minutes (plus chilling time)
- Cook Time: 15 minutes
- Total Time: 1 hour 40 minutes
- Yield: 24 cookies
- Category: Dessert
- Method: Baking
- Cuisine: American
- Diet: Vegetarian
Ingredients
- 2 1/4 cups all-purpose flour
- 2 tablespoons unsweetened cocoa powder
- 1 teaspoon baking soda
- 1/4 teaspoon salt
- 3/4 cup unsalted butter, softened
- 3/4 cup brown sugar
- 1/4 cup granulated sugar
- 1 large egg + 1 egg yolk
- 1 teaspoon pure vanilla extract
- 2 teaspoons red gel food coloring
- 1 tablespoon buttermilk
- 8 oz cream cheese, softened
- 1/4 cup granulated sugar (for filling)
- 1/2 teaspoon vanilla extract (for filling)
- Optional: 1/2 cup white chocolate chips or sprinkles
Instructions
- In a medium bowl, whisk together flour, cocoa powder, baking soda, and salt. Set aside.
- In a large bowl, cream butter, brown sugar, and white sugar together until light and fluffy.
- Add egg, egg yolk, vanilla extract, red food coloring, and buttermilk. Mix until combined.
- Gradually add dry ingredients to wet ingredients. Stir until a soft dough forms. Chill for 1 hour.
- Meanwhile, mix softened cream cheese, 1/4 cup sugar, and 1/2 teaspoon vanilla extract until smooth. Scoop teaspoon-sized portions and freeze for 30 minutes.
- Preheat oven to 350°F (177°C) and line baking sheets with parchment paper.
- Scoop 2 tablespoons of chilled dough, flatten slightly, and wrap around a frozen cream cheese ball, sealing edges completely.
- Arrange cookies on the baking sheet, spaced 2 inches apart.
- Bake for 13–15 minutes or until edges are set but centers look slightly soft.
- Cool on the baking sheet for 10 minutes before transferring to a wire rack. Enjoy warm or store in an airtight container.
Notes
- Chill both dough and filling to prevent leakage.
- Use gel food coloring for vibrant red hue.
- Don’t overbake — cookies firm up as they cool.
- Store cookies in an airtight container for up to 3 days or refrigerate for a week.
- Freeze unbaked dough balls for up to 2 months.
Nutrition
- Serving Size: 1 cookie
- Calories: 180
- Sugar: 13g
- Sodium: 115mg
- Fat: 9g
- Saturated Fat: 5g
- Unsaturated Fat: 3g
- Trans Fat: 0g
- Carbohydrates: 22g
- Fiber: 0.5g
- Protein: 2g
- Cholesterol: 35mg