No-bake Easter nests are one of the most charming, creative, and effortless desserts you can prepare during the spring season. Not only do they look absolutely adorable on any Easter table, but they also deliver a delightful combination of crunchy texture, rich chocolate flavor, and sweet candy toppings. Because they are designed to resemble little bird nests filled with colorful eggs, these treats perfectly capture the joyful spirit of Easter.
Even better, no-bake Easter nests are incredibly simple to make. Since they require no oven time, they are ideal for beginners, busy families, or anyone looking for a quick dessert. With just a few ingredients and minimal preparation, you can create a dessert that feels both fun and impressive.
In this complete and detailed guide, you will learn everything about making the perfect no-bake Easter nests, including ingredients, step-by-step instructions, expert tips, creative variations, serving ideas, storage methods, and answers to frequently asked questions.
JUMP TO
Table of Contents
Why No-Bake Easter Nests Are So Popular
A Perfect Easter-Themed Dessert
No-bake Easter nests are visually designed to match the holiday. Their nest-like shape and candy “eggs” make them a natural fit for Easter celebrations. Because of their festive appearance, they often become a centerpiece on dessert tables.
Easy and No-Bake Convenience
One of the biggest reasons these treats are so popular is their simplicity. Since they require no baking, you can prepare them quickly without worrying about complicated techniques or timing.
Fun for Kids and Families
These nests are not just a dessert—they are also a fun activity. Kids love shaping the nests and adding candy eggs on top. Because the process is hands-on and simple, it becomes a great family bonding experience.
Highly Customizable
Another reason for their popularity is their versatility. You can use different types of chocolate, cereals, or toppings to create unique variations. This makes it easy to adapt the recipe to your taste preferences.
Ingredients for the Best No-Bake Easter Nests
Essential Ingredients List
To make classic no-bake Easter nests, you will need the following ingredients
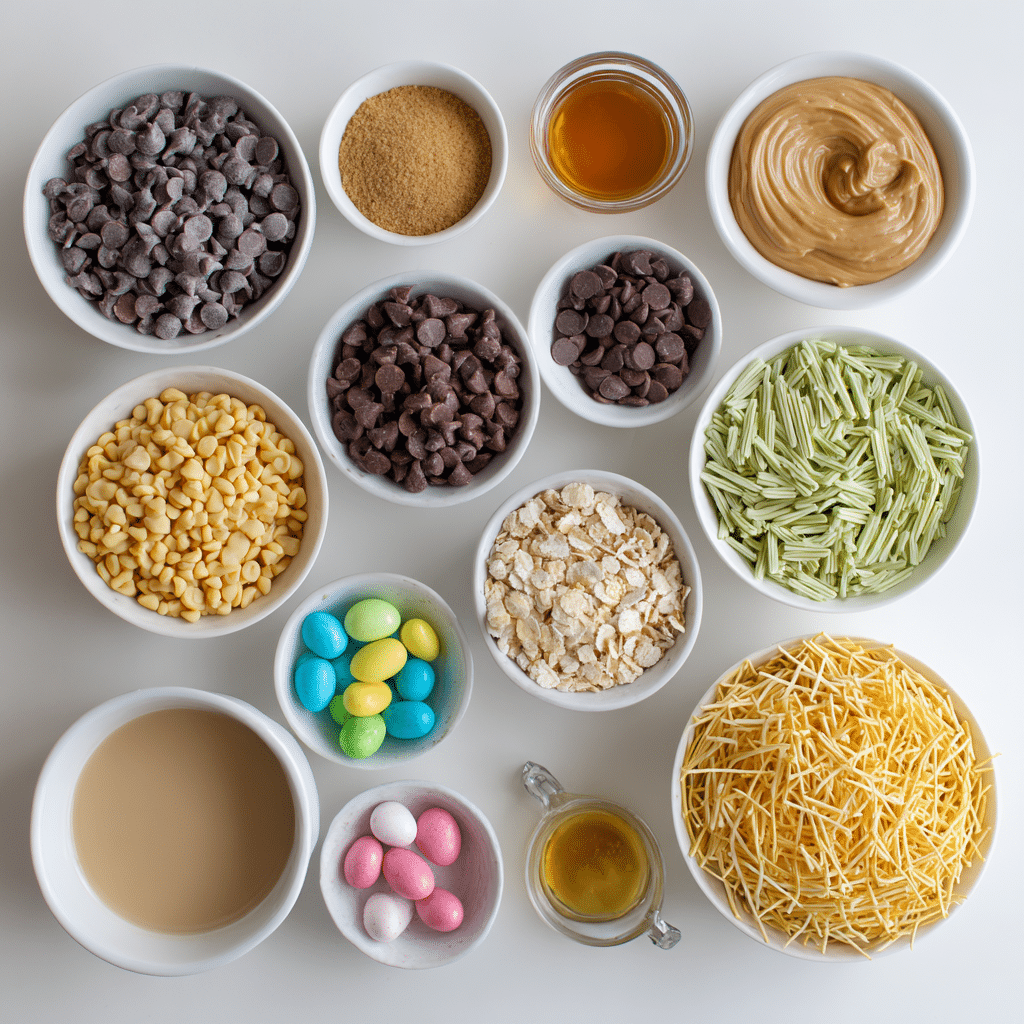
| Ingredient | Purpose |
|---|---|
| 2 cups chocolate chips | Base flavor |
| 1/2 cup peanut butter or butterscotch chips | Adds richness |
| 3 cups chow mein noodles or crispy cereal | Creates nest texture |
| 1 teaspoon vanilla extract | Enhances flavor |
| Mini candy eggs | Decoration |
Choosing the Right Base
Chow mein noodles are commonly used because they create a realistic nest-like appearance. However, crispy rice cereal or cornflakes can also be used for a softer texture.
Chocolate Options
You can use milk chocolate, dark chocolate, or even white chocolate depending on your preference. Each type offers a slightly different flavor and appearance.
Candy Toppings
Mini candy eggs are the most popular topping because they resemble bird eggs. However, jelly beans or chocolate candies can also be used.
Step-by-Step No-Bake Easter Nests Instructions
Step 1: Melt the Chocolate Mixture
In a microwave-safe bowl, combine the chocolate chips and peanut butter or butterscotch chips. Heat in 30-second intervals, stirring between each interval until smooth and fully melted.
Step 2: Add Vanilla Extract
Once the mixture is smooth, stir in the vanilla extract to enhance the flavor.
Step 3: Mix in the Crunchy Base
Add the chow mein noodles or cereal to the melted chocolate mixture. Stir gently until all pieces are evenly coated.
Step 4: Shape the Nests
Scoop small portions of the mixture onto a parchment-lined tray. Use a spoon or your fingers to shape each portion into a nest, creating a small indentation in the center.
Step 5: Add Candy Eggs
Place a few mini candy eggs into the center of each nest while the mixture is still soft.
Step 6: Let Them Set
Allow the nests to set at room temperature or place them in the refrigerator until firm. Once set, they are ready to serve.
Tips for Perfect No-Bake Easter Nests Every Time
Use Low Heat When Melting
Melting chocolate slowly prevents it from burning or becoming grainy. Always use short intervals and stir frequently.
Work Quickly
Once the mixture is ready, shape the nests quickly before it starts to harden.
Use Parchment Paper
This prevents sticking and makes it easier to remove the nests once set.
Keep Sizes Consistent
Using a spoon or cookie scoop helps ensure uniform sizes for even presentation.
Don’t Overmix
Mix gently to avoid breaking the noodles or cereal, which helps maintain the nest texture.
Creative Variations of No-Bake Easter Nests
White Chocolate Nests
Use white chocolate for a lighter color and sweeter flavor. This also creates a beautiful contrast with colorful candy eggs.
Peanut Butter Nests
Add more peanut butter for a richer and nuttier flavor. This variation pairs well with chocolate eggs.
Coconut Nests
Mix shredded coconut into the chocolate for extra texture and a tropical twist.
Healthy Version
Use dark chocolate and add nuts or dried fruits for a slightly healthier option.
Colorful Nests
Add food coloring to white chocolate to create pastel-colored nests that match the Easter theme.
Serving Ideas for No-Bake Easter Nests
Easter Dessert Table
Arrange the nests on a decorative platter with other Easter treats to create a beautiful display.
Gift Packaging
Place them in small boxes or wrap them in clear bags for a thoughtful homemade gift.
Party Treats
Serve them as individual portions for easy sharing at parties.
Kids Activity
Let kids create their own nests with different toppings. This makes dessert time fun and interactive.
Storage and Shelf Life
No-bake Easter nests are easy to store and stay fresh for several days. Keep them in an airtight container at room temperature for up to 3 days. If your environment is warm, store them in the refrigerator to prevent melting.
When stored properly, they maintain both their texture and flavor, making them a great make-ahead dessert option.
Common Mistakes to Avoid
Overheating Chocolate
This can cause the chocolate to become thick and difficult to work with.
Waiting Too Long to Shape
If the mixture cools too much, it becomes harder to form nests.
Using Too Many Add-Ins
Too many ingredients can make the nests difficult to shape and hold together.
Skipping the Indentation
Creating a center space is essential for placing the candy eggs and achieving the nest look.
FAQs About No-Bake Easter Nests
How long do no-bake Easter nests last
They can last up to 3 days at room temperature or longer when refrigerated
Can I freeze no-bake Easter nests
Yes, but they may lose some texture after thawing
Can I use different cereals
Yes, crispy rice cereal or cornflakes work well as substitutes
How do I keep them from sticking
Use parchment paper and allow them to fully set before removing
Conclusion
No-bake Easter nests are the perfect combination of creativity, simplicity, and delicious flavor. Because they are easy to make, require no baking, and allow endless customization, they are a favorite for Easter celebrations. Their charming appearance and delightful taste make them a treat that everyone enjoys.
Once you try making no-bake Easter nests, you will quickly see how fun and rewarding they are. Whether you are making them with family, serving them at a party, or giving them as gifts, this recipe is sure to become a holiday tradition.
PrintNo-Bake Easter Nests Easy Cute Holiday Treat

No-bake Easter nests are a fun and easy dessert made with melted chocolate, crunchy noodles or cereal, and topped with candy eggs to resemble bird nests.
- Prep Time: 15 minutes
- Cook Time: 0 minutes
- Total Time: 45 minutes
- Yield: 12 nests
Ingredients
- 2 cups chocolate chips
- 1/2 cup peanut butter or butterscotch chips
- 3 cups chow mein noodles or crispy cereal
- 1 teaspoon vanilla extract
- 1 cup mini candy eggs
Instructions
- Melt chocolate chips and peanut butter or butterscotch chips in intervals until smooth.
- Stir in vanilla extract.
- Add chow mein noodles or cereal and mix until coated.
- Scoop portions onto parchment paper.
- Shape into nests with a small indentation in the center.
- Add candy eggs to each nest.
- Let set at room temperature or refrigerate until firm.
- Serve and enjoy.
Notes
- Use low heat when melting chocolate.
- Work quickly before mixture hardens.
- Use parchment paper to prevent sticking.
- Store in airtight container.
- Do not overload with toppings.
Nutrition
- Serving Size: 1 nest
- Calories: 210
- Sugar: 18 g
- Sodium: 60 mg
- Fat: 11 g
- Saturated Fat: 6 g
- Unsaturated Fat: 4 g
- Trans Fat: 0 g
- Carbohydrates: 26 g
- Fiber: 1 g
- Protein: 3 g
- Cholesterol: 5 mg