If you’re looking for a savory, aromatic side dish that brings comfort and elegance to your holiday table, this mushroom and herb stuffing is a must-try. It’s rich in umami from sautéed mushrooms, layered with the earthy depth of fresh herbs like sage and thyme, and perfectly crisped on top. Whether you’re serving a traditional Thanksgiving dinner or just want a cozy fall dish, this stuffing recipe checks all the boxes—vegan-friendly, make-ahead, and fully customizable.
It pairs beautifully with classics like roast root vegetables or brussels sprouts with bacon, making it an easy go-to for any festive meal. Let’s break down the secrets that make this stuffing so irresistible.
JUMP TO
Table of Contents
The Secrets Behind a Perfect Mushroom and Herb Stuffing
Choosing the Right Bread for Structure and Flavor
The foundation of every great stuffing is the bread. For this mushroom and herb stuffing, avoid soft, sweet breads like brioche or sandwich bread. Instead, go for a hearty loaf—rustic white bread, French bread, or sourdough are ideal. They absorb broth without falling apart, creating a tender interior with a golden, crisp top.
Day-old bread is best because it’s slightly dry, which helps it soak up all the flavorful liquids. But if you’re working with fresh bread, you can cube it and dry it in the oven for 20–25 minutes at 350°F. The goal is bread that’s firm on the outside but still pliable inside, ensuring a perfect bite every time.
Why You Need a Full Pound of Mushrooms
A standout feature of this recipe is the generous use of mushrooms—a full pound, finely chopped. This isn’t just for flavor—it’s for depth. Mushrooms provide an earthy, umami backbone that traditional stuffings often lack.
You can use white button, cremini, or shiitake mushrooms, or mix them for complexity. For example, cremini adds richness, while shiitake brings woodsy notes. Finely chopping them, ideally using a food processor, allows the mushrooms to almost melt into the stuffing, flavoring every bite without being chunky.
Want even more depth? Stir in some mushroom powder—homemade or store-bought—for an added punch of savory goodness.
Key Aromatics and Herbs to Elevate the Base
Classic stuffing flavors shine through when you combine onion, celery, garlic, and herbs in the right balance. These aromatics provide the base layer of flavor.
The stars here are sage and thyme—iconic holiday herbs that deliver both warmth and brightness. If you have fresh herbs, use them generously. They release vibrant oils as they cook, perfuming the stuffing. But if you’re working with dried, you’ll still get plenty of flavor—just adjust quantities (1 tablespoon fresh = 1 teaspoon dried).
Don’t forget parsley! Added at the end, it brings color and freshness to offset the richness.
Check out how we pair herb-forward flavors in our wild rice salad for more inspiration.
The Importance of Broth and Seasoning
Getting the moisture level right is one of the biggest challenges in stuffing. You want it moist, not mushy—soft inside, crisp outside. This is where broth comes in.
Use a rich vegetable broth if you’re keeping the recipe vegan, or opt for chicken or turkey broth if you’re not. Start with 2 cups and add up to 3 cups total depending on how dry your bread is.
The secret seasoning touch? A bit of pure maple syrup. It balances the savory depth of the mushrooms and herbs with a touch of sweetness.
Taste the mushroom mixture before adding the bread and adjust salt and pepper generously. Remember, bread absorbs flavor, so don’t be shy with seasoning.
Don’t miss our festive brie with honey and nuts for another dish that balances sweet and savory beautifully.
Step-by-Step Guide: How to Make Mushroom and Herb Stuffing
This stuffing may taste like it came out of a gourmet kitchen, but the steps are incredibly simple. Here’s how to make this dish from scratch with rich, savory flavor and the perfect crispy top.
Prep: Drying Bread & Prepping Veggies
Start by cutting your bread into 1-inch cubes. Spread them on a baking sheet and bake at 350°F for 20–25 minutes, stirring occasionally, until the cubes feel dry and crisp on the outside. This step ensures your bread will absorb the broth properly without turning to mush.
While that’s happening, chop your mushrooms finely—either with a sharp knife or in a food processor. Then dice the onion and celery and mince the garlic.
These simple prep steps lay the foundation for a perfectly textured stuffing with deep, consistent flavor throughout.
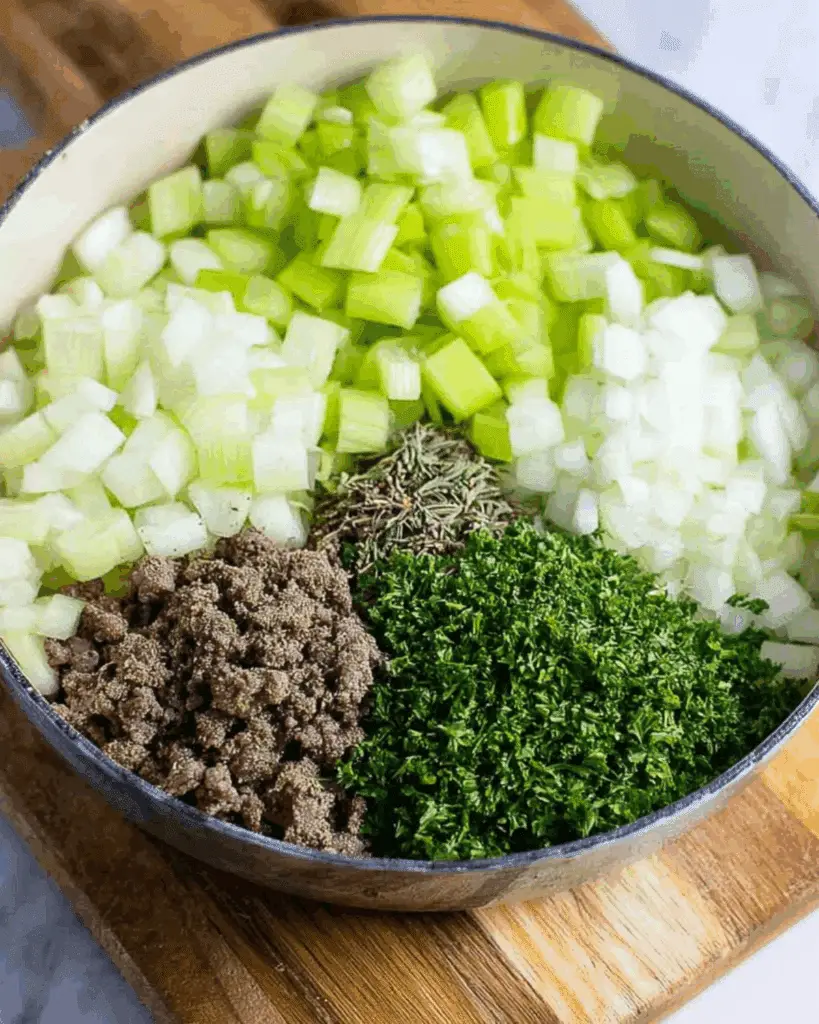
Cooking the Mushroom Mixture for Maximum Flavor
In a large pot or Dutch oven, heat olive oil over medium heat and add your finely chopped mushrooms. Cook them for 5 to 8 minutes, stirring often, until their moisture evaporates and they begin to brown. This step is crucial—browning concentrates their umami-rich flavor.
Next, stir in the onion, celery, garlic, sage, and thyme. Let the vegetables cook down and soften, about 5 minutes, until your kitchen smells like Thanksgiving. Add a tablespoon of maple syrup to round out the flavors.
Now taste. Add ¾ teaspoon sea salt and ½ teaspoon black pepper, then taste again. If it feels flat, don’t be afraid to add another pinch. This base will flavor every bite of your stuffing.
Looking for a perfect match? Try serving it with our juicy slow cooker turkey breast.
Mixing and Moistening the Stuffing
Remove the pot from heat and pour in 2 cups of broth. Stir well, taste again, and adjust seasoning if needed. Then fold in your dried bread cubes and half of the chopped parsley.
Here’s the key: if the bread still looks dry after mixing, add more broth—a ¼ cup at a time, up to 3 cups total. You want the cubes to be moist but not soggy. If you see liquid pooling at the bottom, you’ve added too much.
Once everything is mixed evenly, you’ll notice the stuffing already smells like the holidays.
Looking for a sweet-savory pairing? Try our cinnamon roasted butternut squash.
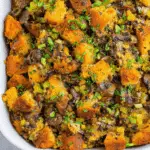
Baking: Achieving the Golden, Crisp Top
Transfer the mixture into a greased 9×13-inch baking dish or a deep 8×8 if you like it thicker. Cover with foil and bake at 350°F for 30 minutes.
Then, uncover the pan and return it to the oven for another 10 to 15 minutes, or until the top is beautifully golden and crisp.
This two-step baking method ensures the inside stays moist and flavorful while the top gets that irresistible crunch.
Need a dessert to round out your holiday table? Don’t miss our apple crisp dessert recipe.
Smart Variations to Make It Your Own
While the base recipe is a winner, you can make it uniquely yours with simple swaps or add-ins. These variations cater to different preferences, dietary needs, and bold flavor ideas.
Protein-Packed Additions
Want a heartier stuffing? Stir in cooked sausage, bacon, or pancetta. Brown the meat first, then cook the veggies in the rendered fat for added richness. Once cooled, mix the meat into the bread mixture before baking.
This adds a smoky, savory layer that turns the stuffing into a main course or the star side dish. It’s especially popular with meat-lovers at the table.
Flavor Enhancers and Texture Twists
If you’re feeling creative, try these flavor boosters:
- Apples: Dice and cook peeled apples with the onions for a sweet contrast.
- Toasted nuts: Walnuts or pecans add crunch and nuttiness.
- Dried cranberries: Provide a pop of color and tartness.
- Mushroom powder: Enhances the earthy tones.
- Parmesan cheese: A sprinkle before baking brings a salty, golden top.
You can also check out flavor layering ideas like in our festive baked brie crackers.
Vegan and Gluten-Free Swaps
To keep the recipe 100% plant-based, use certified vegan bread and vegetable broth. Olive oil replaces butter with ease, and this version still delivers bold, comforting flavors.
For a gluten-free version, use gluten-free rustic bread. Toast it well to maintain structure during baking.
Make-Ahead and Freezer Instructions
This stuffing is incredibly make-ahead friendly:
- Refrigerate: Prepare and refrigerate up to 3 days ahead. Reheat in the oven at 350°F until it reaches 165°F.
- Freeze: Cool completely, then freeze in an airtight container for up to 3 months. Thaw in the fridge and bake uncovered to re-crisp.
Whether prepping for Thanksgiving or a weekend dinner party, you’ll appreciate the stress-free reheat.
Frequently Asked Questions
Can I make mushroom stuffing the night before?
Absolutely. Assemble it the day before, cover, and refrigerate. Bake it just before serving. You may need a few extra minutes in the oven if it’s cold from the fridge.
What’s the best bread for stuffing?
Go for rustic loaves like sourdough or French bread. Avoid soft sandwich bread or brioche, which can get mushy.
How do I keep stuffing from getting soggy?
Use day-old or oven-dried bread, and add broth gradually. The mixture should feel moist but not soaked. If liquid pools at the bottom, you’ve gone too far.
Can I freeze leftover mushroom and herb stuffing?
Yes! Freeze in a sealed container for up to 3 months. Reheat at 350°F until warmed through and crispy on top.
Is this stuffing recipe vegan-friendly?
It is! Use olive oil, vegetable broth, and vegan bread. Despite being meat-free, it’s rich and satisfying.
How long should I bake stuffing uncovered for a crispy top?
After baking covered for 30 minutes, uncover and bake for 10 to 15 minutes more to crisp the top beautifully.
Can I use dried mushrooms or mushroom powder instead of fresh?
You can. Soak dried mushrooms in hot water, chop them finely, and use the soaking liquid as part of the broth. Mushroom powder can also enhance flavor—just add 1 to 3 teaspoons to the mix.
Conclusion: The Ultimate Stuffing That Steals the Show
Whether you’re cooking for a traditional Thanksgiving feast or spicing up a cozy fall dinner, this mushroom and herb stuffing will impress. It’s simple, make-ahead friendly, deeply savory, and endlessly adaptable. Pair it with shredded Brussels sprouts salad or roasted prime rib for a complete, crowd-pleasing holiday meal.
Don’t miss our pecan pie dessert recipe to finish the meal on a sweet note!
PrintMushroom and Herb Stuffing
A savory and aromatic mushroom and herb stuffing made with rustic bread, sautéed mushrooms, fresh herbs, and a hint of maple syrup. Perfect for holiday dinners and easy to make ahead.
- Prep Time: 20 mins
- Cook Time: 1 hr
- Total Time: 1 hr 20 mins
- Yield: 8 to 10 servings
- Category: Side Dish
- Method: Baking
- Cuisine: American
- Diet: Vegan
Ingredients
- 1 large bakery-style rustic bread loaf (1 pound)
- 6 tablespoons (90ml) olive oil
- 1 pound (450g) mushrooms, finely chopped
- 2 cups diced yellow onion (1 large)
- 1 ½ cups diced celery (3 ribs)
- 1 tablespoon minced garlic (3 cloves)
- 2 tablespoons finely minced fresh sage or 2 teaspoons dried sage
- 1 tablespoon finely minced fresh thyme or 3/4 teaspoon dried thyme
- 1 tablespoon pure maple syrup
- 2 to 3 cups (470ml to 700ml) vegetable, chicken, or turkey broth
- 1/4 cup chopped fresh parsley or 1 ½ tablespoons dried parsley
- 3/4 teaspoon fine sea salt, plus more to taste
- 1/2 teaspoon freshly ground black pepper
Instructions
- Preheat oven to 350°F (177°C). Cut bread into 1-inch cubes, spread on a baking sheet, and bake for 20–25 minutes until dry and crisp.
- While bread dries, finely chop mushrooms using a knife or food processor.
- Heat olive oil in a Dutch oven over medium heat. Add mushrooms and cook for 5–8 minutes until browned and moisture evaporates.
- Add onions, celery, garlic, sage, and thyme. Cook for 5 minutes until softened. Stir in maple syrup, salt, and pepper. Taste and adjust seasoning.
- Remove from heat and stir in 2 cups of broth. Mix well and taste again for seasoning.
- Add bread cubes and half the parsley. Mix until bread is moistened. Add more broth as needed, up to 3 cups total, until evenly moist but not soggy.
- Transfer to a greased 9×13-inch baking dish. Cover with foil and bake for 30 minutes.
- Uncover and bake an additional 10–15 minutes until top is golden and crisp.
- Garnish with remaining parsley before serving.
Notes
- Use day-old bread for best texture or dry fresh bread in the oven.
- Use a mix of mushrooms like cremini and shiitake for deeper flavor.
- For vegan version, use vegetable broth and vegan bread.
- Add sausage, nuts, apples, or lentils for variations.
- Can be made ahead and stored in fridge for 3 days or frozen for 3 months.
Nutrition
- Serving Size: 1 of 8 servings
- Calories: 270
- Sugar: 5.2g
- Sodium: 694.7mg
- Fat: 11.4g
- Saturated Fat: 1.6g
- Unsaturated Fat: 9.8g
- Trans Fat: 0g
- Carbohydrates: 37.2g
- Fiber: 4.2g
- Protein: 7.2g
- Cholesterol: 0mg