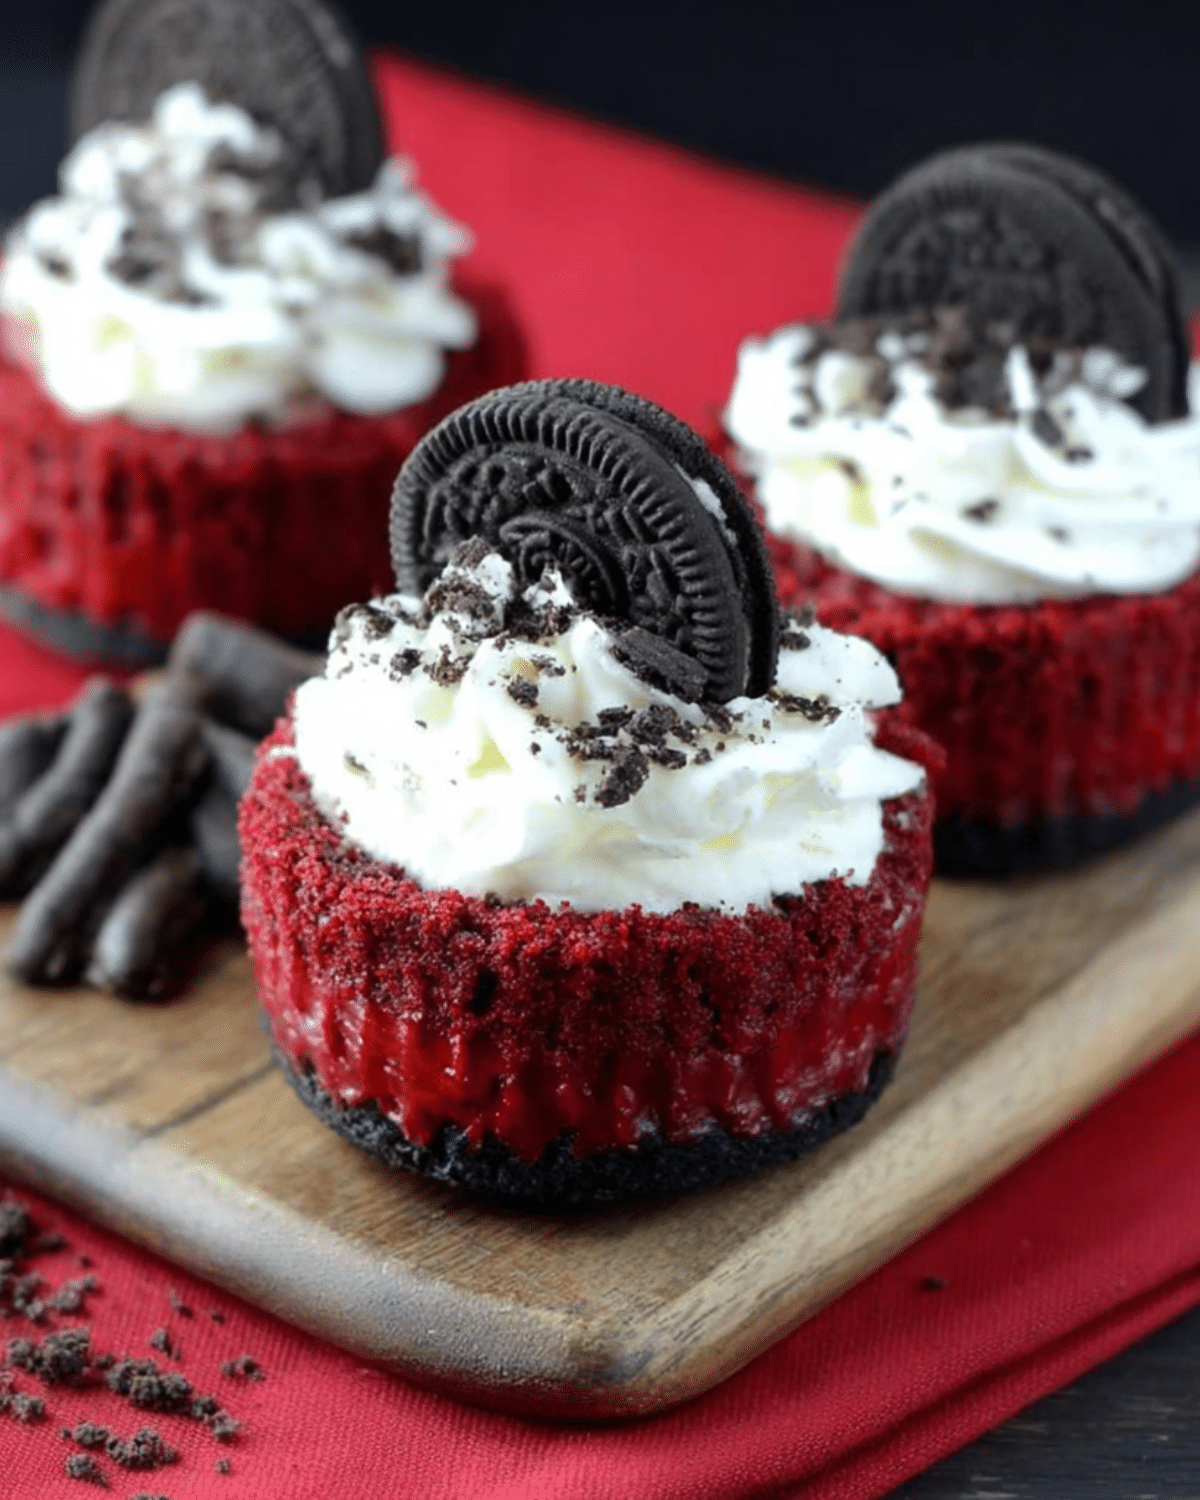
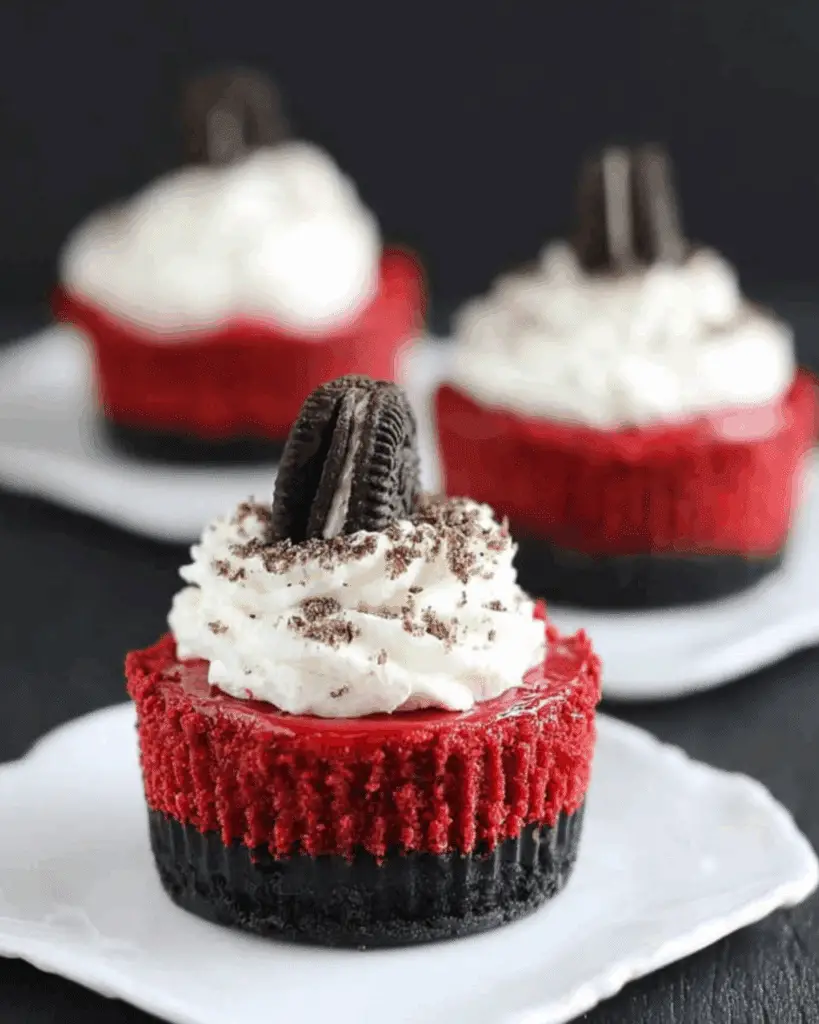
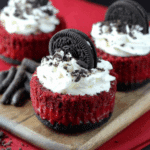
When it comes to indulgent desserts that are perfect for holidays, parties, or a sweet night in, Mini Red Velvet Cheesecakes are simply unbeatable. These eye-catching treats combine the rich cocoa flavor of red velvet cake with the creamy smoothness of cheesecake—all wrapped into perfectly portioned bites. Whether you’re baking for Valentine’s Day or just want to impress your guests with a show-stopping dessert, these mini cheesecakes deliver big flavor in a small package.
In this article, you’ll discover everything you need to make these treats—from the essential ingredients and step-by-step baking instructions, to expert tips on customization and presentation. Along the way, we’ll also share common troubleshooting advice and perfect pairings. If you’re looking for another festive dessert, check out our Red Velvet Crinkle Cookies for a soft, chewy alternative.
JUMP TO
Table of Contents
The Allure of Mini Red Velvet Cheesecakes
What Makes Red Velvet So Popular in Mini Desserts?
Red velvet’s rise to fame isn’t just because of its brilliant color. This beloved cake flavor stands out thanks to its light cocoa notes, tender crumb, and tangy undertone from ingredients like buttermilk or cream cheese. When that same flavor is transformed into mini cheesecake form, it adds a luxurious, dense texture that elevates every bite. And let’s face it: mini desserts are trending because they’re cute, portion-controlled, and always Instagram-worthy.
Beyond flavor, these mini cheesecakes offer a visually stunning finish. The deep red hue set against a white swirl of whipped cream or cream cheese frosting makes them ideal for holidays and romantic dinners. It’s no wonder they’re a go-to choice for Valentine’s Day dessert tables.
The Appeal of Individual Cheesecake Portions
Unlike full-sized cheesecakes, the mini version bakes faster, chills quicker, and travels easier. You don’t need to worry about slicing or serving—just bake, chill, and enjoy. These cheesecakes are also beginner-friendly and require minimal equipment. For family gatherings, brunch spreads, or school parties, serving pre-portioned desserts like these helps keep things clean and simple.
What’s more, their size makes them ideal for freezing, gifting, or even selling at bake sales. Want more bite-sized dessert inspiration? Discover great ideas like Easy Halloween Snack Mix for parties and treats on the go.
Perfect Occasions for Serving These Mini Treats
These mini cheesecakes are a hit at more than just Valentine’s Day. Think weddings, bridal showers, anniversaries, birthdays, and holiday cookie exchanges. You can decorate them to match your event theme using colored toppings, sprinkles, or heart-shaped liners.
Looking for inspiration? Try Layered Pumpkin Cheesecake if you’re prepping for fall-themed events or Thanksgiving—it’s another seasonal favorite that’s just as rich and comforting.
And don’t overlook casual occasions either—these are equally perfect as a cozy dessert after a Sunday dinner. Whether served chilled or slightly warm, their velvety texture and chocolatey undertones make them memorable.
Ingredients & Tools You’ll Need for Mini Red Velvet Cheesecakes
Making these rich, creamy, chocolatey-red cheesecakes at home is easier than you think. The key is using quality ingredients and having the right kitchen tools on hand. Let’s break it all down for you.
Key Ingredients for Flavor & Texture
To achieve that signature red velvet flavor and lush cheesecake consistency, you’ll need the following pantry and fridge staples. Most are likely already in your kitchen.
| Ingredient | Purpose |
|---|---|
| Oreo cookies | Used for the base—provides a chocolatey crunch |
| Unsalted butter | Helps the crust hold together |
| Cream cheese | The rich, creamy star of the filling |
| Sour cream | Adds tanginess and improves texture |
| Granulated sugar | Sweetens the filling just right |
| Cocoa powder | For red velvet’s signature chocolatey taste |
| Red food coloring | Creates that deep red hue |
| Vanilla extract | Adds warmth and enhances overall flavor |
| Eggs | Help bind the filling and create structure |
Tip: Always use full-fat cream cheese for a silky, firm texture. Light cream cheese can make your filling watery or too soft to set properly.
If you’re looking for a cheesecake variation with unique seasonal flair, don’t miss our Chunkin Chocolate Pumpkin Cheesecake—a delicious twist on traditional flavors.
Kitchen Tools That Simplify the Process
You don’t need a fancy kitchen setup to make mini cheesecakes, but having a few basics makes things smoother:
- 12-count muffin pans: Standard size works great—no need for specialty pans.
- Paper liners: For easy removal and no mess.
- Food processor or blender: To finely crush the Oreo cookies for the base.
- Mixing bowls: Separate ones for wet and dry ingredients.
- Hand or stand mixer: For a lump-free, creamy filling.
- Cooling rack: Helps prevent soggy bottoms after baking.
Optional but helpful:
- Cookie scoop: For evenly portioning out crust and filling.
- Piping bag: If you plan to decorate the tops with whipped cream or ganache.
Even if you’re baking with kids or on a tight schedule, these tools streamline your work, and cleanup is a breeze. Speaking of stress-free baking, check out our No-Bake Chocolate Orange Cheesecake for a fuss-free alternative when you want to skip the oven.
Pro Tips for Ingredient Prep
- Room temperature everything: This isn’t just advice—it’s crucial. Cold cream cheese leads to lumps, and cold eggs can prevent a smooth blend. Let everything sit out for 30–60 minutes.
- Don’t overmix: Overbeating introduces air, which leads to cracked cheesecakes. Mix just until combined—especially after adding the eggs.
- Red food coloring quality: Liquid food coloring works fine, but gel color produces a deeper red with less added liquid. Don’t skip it, or you’ll lose that red velvet identity.
Still worried about making the perfect crust or getting the texture right? Learn more about Pumpkin Cheesecake Dip—a softer, spreadable version of cheesecake that’s ultra-forgiving and still a crowd-pleaser.
Step-by-Step Recipe for Mini Red Velvet Cheesecakes
Making these bite-sized desserts may look fancy, but they’re surprisingly simple. Follow these steps and you’ll have bakery-style mini red velvet cheesecakes ready in no time.
Preparing the Oreo Cookie Crust
- Preheat your oven to 350°F and line a muffin pan with 16 cupcake liners.
- Crush the Oreos (no need to remove the filling) using a blender or food processor.
- Mix the crushed cookies with melted butter until the mixture looks like wet sand.
- Spoon and press the crust mixture evenly into the bottoms of the liners.
- Bake for 5 minutes, then remove and let cool slightly while you prepare the filling.
Mixing the Silky Red Velvet Cheesecake Filling
- Beat the softened cream cheese until smooth.
- Add sour cream and sugar, then mix until fully incorporated.
- Mix in cocoa powder, vanilla, and red food coloring on low speed.
- Add the eggs one at a time, beating slowly just until combined. Avoid overmixing!
Baking and Cooling the Mini Cheesecakes
- Pour the filling into the prepared liners—each should be almost full.
- Bake at 350°F for 20 to 22 minutes, or until the centers are just set.
- Allow to cool at room temperature for about 1 hour.
- Transfer to the refrigerator and chill for at least 2 hours before serving.
Don’t miss our Pumpkin Caramel Cheesecake if you love rich, silky cheesecake with a seasonal twist—it’s a must-bake!
Customizing Your Mini Red Velvet Cheesecakes
Toppings to Elevate Your Presentation
The possibilities here are endless. Try:
- Fresh whipped cream
- Chocolate ganache drizzle
- Festive sprinkles for holidays
- Crushed Oreo bits or mini chocolate chips
For extra flair, pipe cream cheese frosting on top and garnish with a white chocolate heart.
Variations for Different Diets or Flavors
Want to shake things up?
- Use gluten-free Oreos for a celiac-friendly crust.
- Swap red food dye for natural beet juice if you prefer dye-free baking.
- Add a swirl of white chocolate or a spoonful of raspberry jam to the batter.
Mini desserts let you experiment. If you’re looking for a fruity twist, check out our Raspberry Cake with Lemon Buttercream—it’s equally show-stopping and great for spring parties.
Mini Cheesecake Troubleshooting Guide
Why Did My Cheesecakes Sink or Crack?
This is often caused by:
- Overbaking or sudden temperature changes
- Overmixing the eggs, which adds too much air
- Not chilling long enough
Pro tip: Let the cheesecakes cool gradually at room temp before refrigerating.
How to Fix a Soft or Undercooked Center
If the center jiggles slightly, that’s okay—it’ll firm up in the fridge. But if it’s very loose, it may need a few extra minutes in the oven. Always bake until the edges are set and the center is just barely jiggly.
Storage Tips to Keep Them Fresh Longer
- Store in an airtight container in the fridge for up to 3 days
- Freeze individually wrapped cheesecakes for up to 1 month
- Thaw overnight in the refrigerator before serving
FAQs About Mini Red Velvet Cheesecakes
Can I Make These Ahead of Time?
Yes, you can! These mini cheesecakes actually taste better after chilling overnight. Make them up to 2 days in advance for best results.
How Long Do Mini Cheesecakes Last in the Fridge?
Stored properly in an airtight container, they’ll stay fresh for 3–4 days in the refrigerator.
Can I Freeze Mini Red Velvet Cheesecakes?
Absolutely. Freeze them in a single layer until solid, then transfer to a zip-top freezer bag. They’ll last up to a month and still taste delicious.
What’s the Best Way to Get the Perfect Red Hue?
Use gel food coloring for a deep, vibrant red without watering down the batter. A small amount goes a long way.
Do I Need a Water Bath for Mini Cheesecakes?
Nope! That’s the beauty of mini cheesecakes—they bake evenly and gently without the hassle of a water bath.
Conclusion: Why You’ll Love Making Mini Red Velvet Cheesecakes Again and Again
Whether you’re new to baking or a seasoned pro, Mini Red Velvet Cheesecakes are a must-add to your dessert rotation. Their rich chocolate flavor, vibrant color, and creamy texture make them an instant crowd-pleaser. You don’t need a special occasion—just the craving for something sweet and stunning. And with easy customization options, they’ll never get boring.
Looking for more holiday-ready treats? Don’t miss our Christmas Tree Deviled Eggs—a savory showstopper to pair with your sweets.
PrintMini Red Velvet Cheesecakes
Mini Red Velvet Cheesecakes are rich, creamy bite-sized desserts made with an Oreo cookie crust and a red velvet cheesecake filling. Perfect for holidays, parties, or any sweet craving.
- Prep Time: 20 minutes
- Cook Time: 22 minutes
- Total Time: 2 hours 42 minutes
- Yield: 16 mini cheesecakes
- Category: Dessert
- Method: Baking
- Cuisine: American
- Diet: Vegetarian
Ingredients
- 15 regular Oreo cookies
- 3 tablespoons (42 g) unsalted butter, melted
- 16 oz (452 g) cream cheese, softened to room temperature
- 2 tablespoons sour cream
- 3/4 cup (90 g) granulated sugar
- 1/4 cup (20 g) cocoa powder
- 1 teaspoon vanilla extract
- 2 tablespoons red food coloring
- 2 large eggs
Instructions
- Preheat oven to 350°F and line two 12-count muffin pans with 16 liners.
- Crush Oreo cookies in a food processor until fine.
- Mix crushed cookies with melted butter until well combined.
- Press the mixture into the bottom of each liner and bake for 5 minutes. Let cool slightly.
- Beat softened cream cheese until smooth.
- Add sour cream and sugar, and mix until fully combined.
- Mix in cocoa powder, vanilla, and red food coloring until smooth.
- Add eggs one at a time, mixing on low speed just until combined.
- Fill liners almost to the top with cheesecake mixture.
- Bake at 350°F for 20–22 minutes, until centers are set.
- Cool at room temperature for 1 hour.
- Refrigerate for at least 2 hours before serving.
Notes
- Use full-fat cream cheese for best texture.
- Let all ingredients come to room temperature before mixing.
- Do not overmix the batter to avoid cracks.
- Mini cheesecakes can be stored in the fridge for up to 3 days.
- Freeze leftovers for up to 1 month for easy future servings.
Nutrition
- Serving Size: 1 mini cheesecake
- Calories: 220
- Sugar: 15g
- Sodium: 160mg
- Fat: 15g
- Saturated Fat: 8g
- Unsaturated Fat: 6g
- Trans Fat: 0g
- Carbohydrates: 19g
- Fiber: 1g
- Protein: 3g
- Cholesterol: 45mg