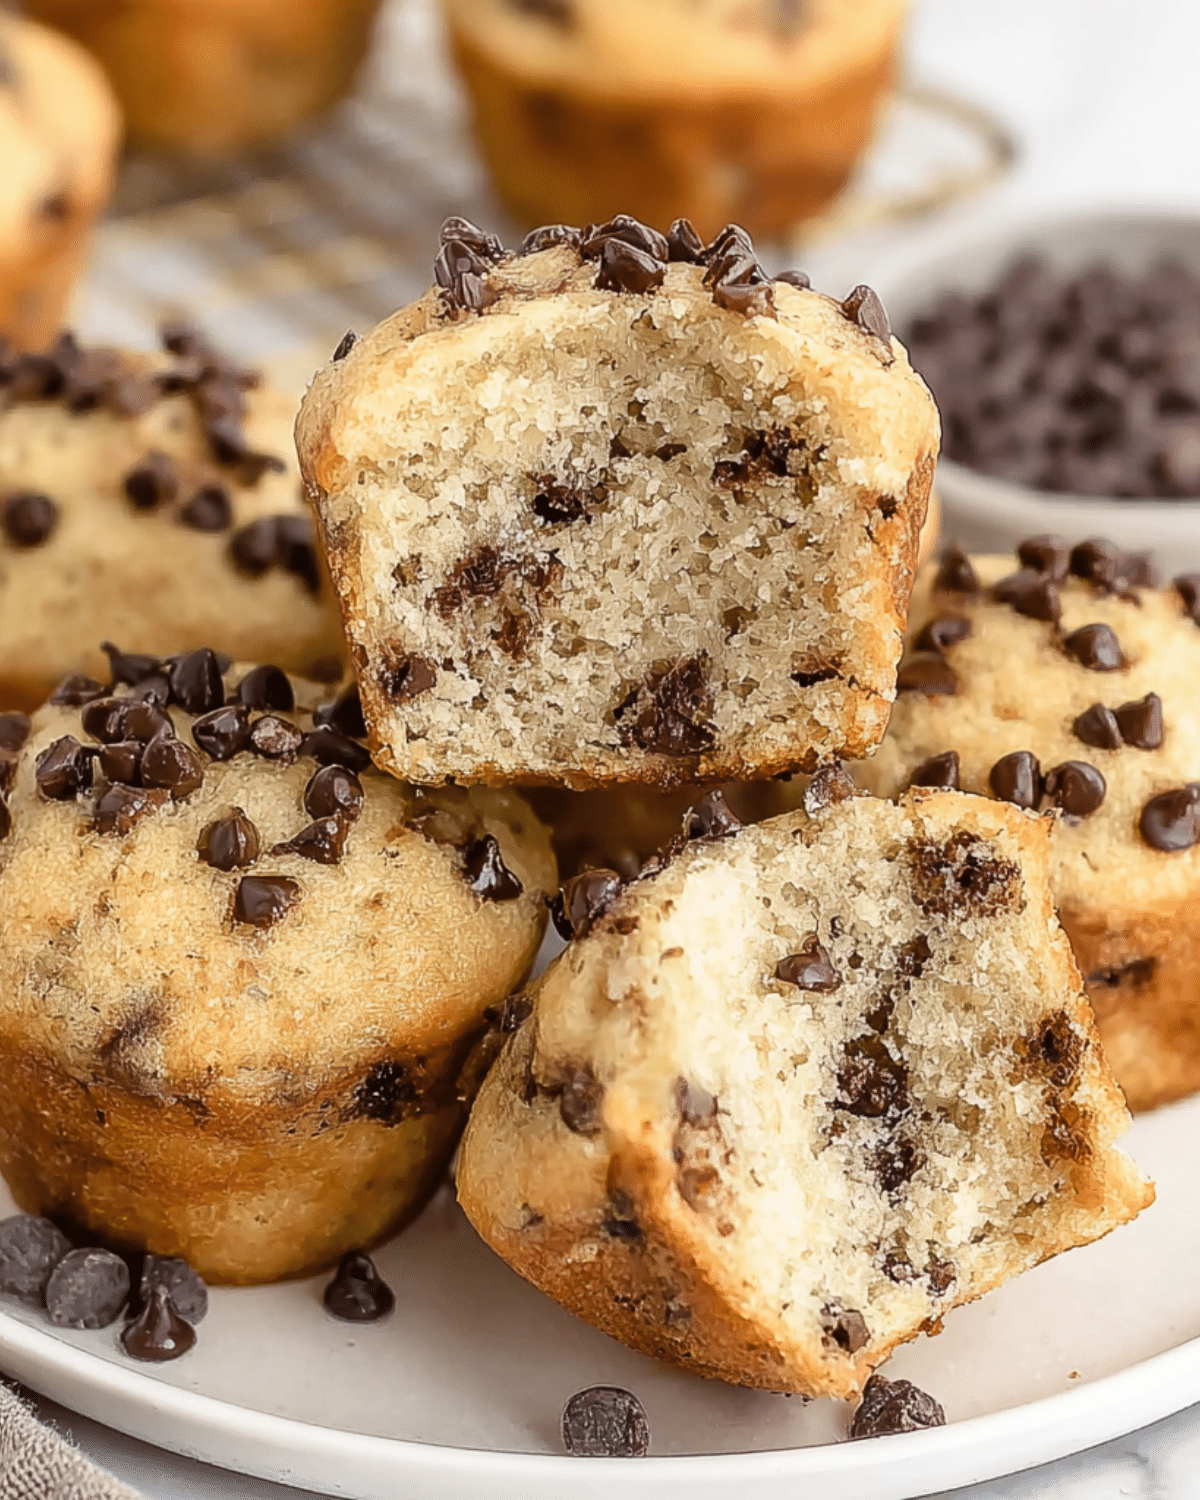
Mini chocolate chip muffins are more than just a sweet treat—they’re a bite-sized burst of joy you can enjoy anytime, anywhere. Whether you’re prepping for a busy week of school lunches or craving a nostalgic snack with a cup of coffee, these little muffins offer bakery-quality flavor in a size that fits right into your palm. In this guide, you’ll discover everything you need to make mini chocolate chip muffins that rival your favorite bakery’s—crispy on the outside, moist and fluffy on the inside, and generously packed with chocolate chips.
Looking for inspiration? Try our Pumpkin Protein Muffins Recipe for another easy and delicious snack option.
Let’s dig into what makes these mini muffins a go-to recipe that you’ll want to bake on repeat.
JUMP TO
Table of Contents
What Makes These Mini Chocolate Chip Muffins So Irresistible?
Small Size, Big Flavor: Why Mini Muffins are the Perfect Snack
It’s no secret that small snacks are all the rage, and mini muffins hit that sweet spot—literally. Their bite-sized nature makes them ideal for kids’ lunchboxes, post-workout bites, or anytime snacking without the guilt of overindulgence. Each muffin is packed with flavor and perfectly portioned, making them a convenient, no-mess snack.
They’re also great for sharing. Bring a batch to a brunch, potluck, or bake sale, and watch them disappear in minutes. And because you’re using mini chocolate chips, every bite is guaranteed to have a gooey, melty chocolate hit.
The Bakery-Style Advantage: Texture, Height, and Crunch
The secret to bakery-style mini chocolate chip muffins lies in a few smart techniques. Starting the bake at a higher oven temperature causes the muffins to rise quickly, giving them those tall, golden domes. A touch of nutmeg and real vanilla boosts the flavor, while melted butter adds richness and depth.
The crisp exterior—created by a proper balance of sugar and fat—contrasts beautifully with the moist and tender inside. It’s this balance that makes them taste like they came fresh out of a professional bakery case.
Healthier Than Store-Bought: Know Exactly What Goes In
When you bake your own muffins, you control the ingredients. No preservatives, no unpronounceable additives—just real, wholesome pantry staples. You can even tailor them to your dietary needs: swap dairy milk for oat milk, use gluten-free flour, or add flaxseed for a fiber boost.
Plus, when made at home, these mini chocolate chip muffins are usually lower in sugar and fat than packaged ones. They’re a better-for-you option that doesn’t skimp on flavor or texture.
Ingredients & Substitutions for Perfect Mini Muffins
Pantry Staples You Probably Already Have
Here’s a list of what you’ll need:
| Ingredient | Role in Recipe | Notes |
|---|---|---|
| All-Purpose Flour | Structure | Can sub 1:1 gluten-free flour |
| Granulated Sugar | Sweetness + Crisp Top | Don’t reduce, it affects texture |
| Baking Powder | Leavening | Helps get that tall rise |
| Salt | Flavor enhancer | Balances sweetness |
| Nutmeg | Warmth & depth | Optional, but adds bakery flair |
| Milk | Moisture | Whole milk works best |
| Eggs | Structure | Room temp preferred |
| Vegetable Oil | Moisture | Canola oil also works |
| Butter (melted) | Rich flavor | Slightly cooled before mixing |
| Vanilla Extract | Flavor | Use real, not imitation |
| Mini Chocolate Chips | Star of the show | Standard chips are too big |
Using mini chips really matters—they stay suspended in the batter and don’t sink to the bottom like regular chips often do.
Best Substitutes for Dairy, Eggs, and Flour
Dietary restriction? No problem. You can make this recipe your own without compromising taste or texture. Try these options:
- Dairy-Free: Almond or oat milk + vegan butter
- Egg-Free: Use flax eggs or mashed banana
- Gluten-Free: Replace flour with 1:1 gluten-free baking blend
These swaps make it easy to turn this classic muffin into an inclusive, allergy-friendly treat.
Why Mini Chocolate Chips Matter for Texture
Mini chocolate chips distribute more evenly, delivering sweet, chocolatey bits in every bite. Unlike regular chips, which are too heavy for the mini format and sink during baking, the smaller size means you get better rise and consistency.
Want another cozy snack idea? Discover great ideas like Chocolate Chip Pumpkin Bread that balance sweetness with fall spices.
Equipment Essentials for Baking Mini Muffins at Home
Recommended Pans, Liners, and Optional Tools
To get consistent results every time, use a 24-cavity mini muffin tin. Nonstick versions are ideal, but if you don’t have one, you can line it with mini paper liners or grease it with baking spray.
A large piping bag makes portioning quick and clean. It also prevents overfilling and messy edges. Not essential, but it’ll save time if you’re making large batches.
Check out our Healthy Pumpkin Oatmeal Breakfast Cake for another make-ahead breakfast option that’s perfect for busy mornings.
Tips for Even Baking and Easy Cleanup
- Always grease your pan well if not using liners.
- Fill each cavity to the top for that bakery-style height.
- Place the muffin pan in the center of the oven for even heat circulation.
- Clean-up is easier if you soak the pan immediately after baking.
Using a cooling rack also helps prevent soggy bottoms. The air circulation keeps the muffins light and fluffy even after baking.
Piping vs. Scooping: Best Way to Fill Mini Muffin Tins
Scooping is fine, but a piping bag or zip-top bag with the corner snipped off offers precision. It helps you fill the cups evenly, avoids overflow, and minimizes waste.
Don’t miss our Pumpkin Oatmeal Chocolate Chip Cookies for another quick treat to satisfy your sweet tooth.
Step-by-Step Guide: How to Make Mini Chocolate Chip Muffins
Step 1: Mix Your Dry Ingredients the Right Way
Start by preheating your oven to 425°F (218°C) and positioning your rack in the center. In a medium bowl, whisk together all-purpose flour, granulated sugar, baking powder, salt, and nutmeg. Proper whisking ensures even distribution of leavening agents, which gives your muffins their perfect height.
Tip: Sifting isn’t required, but whisking thoroughly helps create a lighter crumb.
Step 2: Combine Wet Ingredients for Moisture and Flavor
In a separate bowl, beat the eggs lightly before adding milk, melted butter, oil, and vanilla extract. These liquid ingredients contribute to the muffin’s moisture and rich flavor. Always ensure your eggs and milk are at room temperature—cold liquids can shock the batter and affect rise.
Once combined, slowly fold the wet ingredients into the dry mix using a spatula. Stir just until no streaks of flour remain.
Step 3: Fold Gently to Avoid Dense Muffins
Now, add the mini chocolate chips and gently fold again. Overmixing at this stage can activate gluten, leading to dry or chewy muffins. The goal is a thick batter with chocolate chips evenly spread and no dry pockets.
Let the batter rest for 15 minutes—this allows the flour to hydrate and the baking powder to activate fully, resulting in taller, bakery-style muffins.
Step 4: Fill, Bake, and Cool Like a Pro
Fill your greased or lined mini muffin cups to the top. For best results, pipe the batter using a pastry or zip-top bag. Once filled:
- Bake at 425°F for 5 minutes
- Then reduce to 350°F (177°C) and bake for an additional 8–10 minutes
This dual-temp method gives muffins a tall rise with a golden, slightly crisp dome.
Let them cool for 5 minutes in the pan before transferring to a wire rack. Avoid letting them sit too long or they’ll steam and lose that beautiful crust.
Looking for inspiration? Try our Apple Cinnamon Oatmeal Cookies for a comforting and chewy treat.
Smart Storage & Freezing Tips to Keep Muffins Fresh
Best Containers and Techniques for Room Temp or Fridge
Once cooled, store muffins in an airtight container at room temperature for 3–4 days. To maintain crisp tops, line the container with a paper towel and keep it uncovered slightly for the first 12 hours.
In warmer climates or for longer freshness, refrigerate them for up to 7 days—but allow them to reach room temp before serving for the best texture.
Freezing Instructions for Long-Term Storage
Mini muffins freeze beautifully. Place them in a single layer on a baking sheet to flash freeze for one hour, then transfer to a zip-top freezer bag. Squeeze out excess air to avoid freezer burn.
They’ll last up to 3 months and can be thawed in the fridge overnight or microwaved for 10–15 seconds straight from frozen.
These are perfect for meal prepping! Add 2–3 to snack bags and freeze for a week’s worth of grab-and-go breakfast or snacks.
Troubleshooting Common Mini Muffin Problems
Why Are My Muffins Flat or Soggy?
Flat muffins typically result from expired baking powder or batter that was overmixed. Always check the date on your leavening agents and avoid vigorous stirring.
Soggy bottoms? It’s often due to underbaking or storing warm muffins in a sealed container. Make sure they cool completely on a wire rack before storage.
Avoiding Overmixing and Dry Muffins
Once the dry and wet ingredients meet, fold gently until just combined. Overmixing builds too much gluten, leading to a dense or rubbery texture. A good rule of thumb? Stop stirring when the batter still looks a little lumpy.
If you’re wondering what overmixed batter looks like, it’s glossy, sticky, and forms tough peaks. Don’t go there—less is more.
Adjusting for Altitude or Different Oven Types
If you’re baking at high altitudes, increase oven temp by 15–25°F and reduce baking time slightly. Also, cut back slightly on sugar and leavening agents to avoid overflow.
For convection ovens, reduce the temp by 25°F and check doneness 2–3 minutes early.
Don’t miss our Mini Keto Pumpkin Pie Recipe for another freezer-friendly, portion-controlled treat that’s perfect for fall.

Frequently Asked Questions (FAQ’s)
Can I use regular chocolate chips instead of mini ones?
You can, but mini chips are strongly recommended. Regular chocolate chips are heavier and may sink to the bottom during baking, affecting texture and distribution. If needed, chop regular chips into smaller bits.
How do I know when mini muffins are done baking?
Use the toothpick test—insert one into the center of a muffin. If it comes out with a few moist crumbs (not wet batter), they’re ready. Additionally, the tops should spring back when lightly pressed and appear golden brown.
Can I make this recipe into full-sized muffins?
Absolutely. This batter works beautifully in a standard muffin pan. You’ll get around 12 regular muffins. Bake at 425°F for 5 minutes, then reduce to 350°F for another 10–12 minutes, checking with a toothpick for doneness.
Are mini muffins healthier than regular muffins?
In general, yes—thanks to smaller portion sizes. They’re also easier to control for calories and sugar content. And when you make them at home, you can tweak ingredients to match your dietary needs.
Conclusion: Why You’ll Keep Coming Back to This Mini Muffin Recipe
There’s something truly satisfying about pulling a tray of warm, golden mini chocolate chip muffins from the oven. With their soft, tender crumb, crispy bakery-style tops, and perfectly portioned size, these little snacks check every box—flavor, convenience, and comfort.
Whether you’re baking them for Sunday brunch, weekday lunches, or freezing them for snack emergencies, this recipe is reliable, easy, and endlessly customizable. Once you try them, store-bought just won’t cut it anymore.
Don’t miss our Chewy Pumpkin Cookies Recipe if you love handheld baked treats packed with warm spice and texture.
Still curious about baking tips and food safety? Learn more at FDA’s Home Baking Guide to keep every batch safe and delicious.
PrintMini Chocolate Chip Muffins
These bakery-style Mini Chocolate Chip Muffins are soft, buttery, and perfectly portioned for on-the-go snacking or meal prep. With a tall rise, crisp top, and melty chocolate chips in every bite, they’re better than store-bought and ready in under 40 minutes.
- Prep Time: 10 minutes
- Cook Time: 15 minutes
- Total Time: 40 minutes
- Yield: 24 mini muffins
- Category: Breakfast, Snack
- Method: Baking
- Cuisine: American
- Diet: Vegetarian
Ingredients
- 2 cups all-purpose flour
- 3/4 cup granulated sugar
- 2 teaspoons baking powder
- 1/2 teaspoon salt
- 1/8 teaspoon ground nutmeg
- 1/2 cup whole milk (room temperature)
- 2 eggs (room temperature)
- 1/4 cup vegetable oil (or canola oil)
- 2 tablespoons unsalted butter (melted and slightly cooled)
- 2 teaspoons vanilla extract
- 1 cup mini semi-sweet chocolate chips (plus extra for topping)
Instructions
- Preheat oven to 425°F and center oven rack. Grease a 24-cavity mini muffin pan or line with paper liners.
- In a medium bowl, whisk together flour, sugar, baking powder, salt, and nutmeg.
- In a large bowl, beat together milk, eggs, oil, melted butter, and vanilla extract.
- Fold the dry ingredients into the wet ingredients until just combined.
- Fold in mini chocolate chips until evenly distributed. Let batter rest for 15 minutes.
- Fill muffin cavities to the top using a spoon or piping bag.
- Bake at 425°F for 5 minutes, then reduce to 350°F and bake an additional 8–10 minutes.
- Remove from oven and let cool for 5 minutes in pan, then transfer to wire rack to cool completely.
Notes
- Let batter rest 15 minutes before baking for taller muffins.
- Use room temperature eggs and milk for better texture.
- Don’t overmix the batter to avoid dense muffins.
- Mini chocolate chips are preferred to prevent sinking.
- Muffins freeze well up to 3 months in an airtight bag.
Nutrition
- Serving Size: 1 mini muffin
- Calories: 94
- Sugar: 7g
- Sodium: 65mg
- Fat: 4.5g
- Saturated Fat: 1.5g
- Unsaturated Fat: 2.5g
- Trans Fat: 0g
- Carbohydrates: 12g
- Fiber: 0.5g
- Protein: 1.5g
- Cholesterol: 12mg