If you’re hunting for the perfect no-bake treat that screams Halloween, look no further than Halloween Puppy Chow. This addicting snack mix—also known as muddy buddies—is a crunchy, sweet, and spooky party favorite loaded with chocolate, peanut butter, powdered sugar, and festive candies. Ideal for trick-or-treat gatherings, classroom parties, or a Halloween movie night, this easy recipe takes minimal effort and delivers maximum flavor.
With a few pantry staples and some Halloween flair, you can whip up a crowd-pleasing snack mix in just minutes. In this article, you’ll learn the history behind this popular treat, how to make the best Halloween puppy chow, flavor variations to try, and even tips on how to store it for later. Looking for inspiration? Try our easy Halloween snack mix recipe that pairs perfectly with this one!
JUMP TO
Table of Contents
What Is Halloween Puppy Chow and Why Everyone Loves It
The story behind the name “puppy chow”
Despite its name, Halloween puppy chow has nothing to do with pet food—but everything to do with nostalgia and fun. The treat gets its name because it resembles kibble, but rest assured, it’s made for humans and packed with addictive sweet-and-salty goodness. Also called muddy buddies or reindeer chow depending on the season, this classic Midwestern snack has taken on seasonal variations over the years—like this Halloween-inspired version filled with colorful candies.
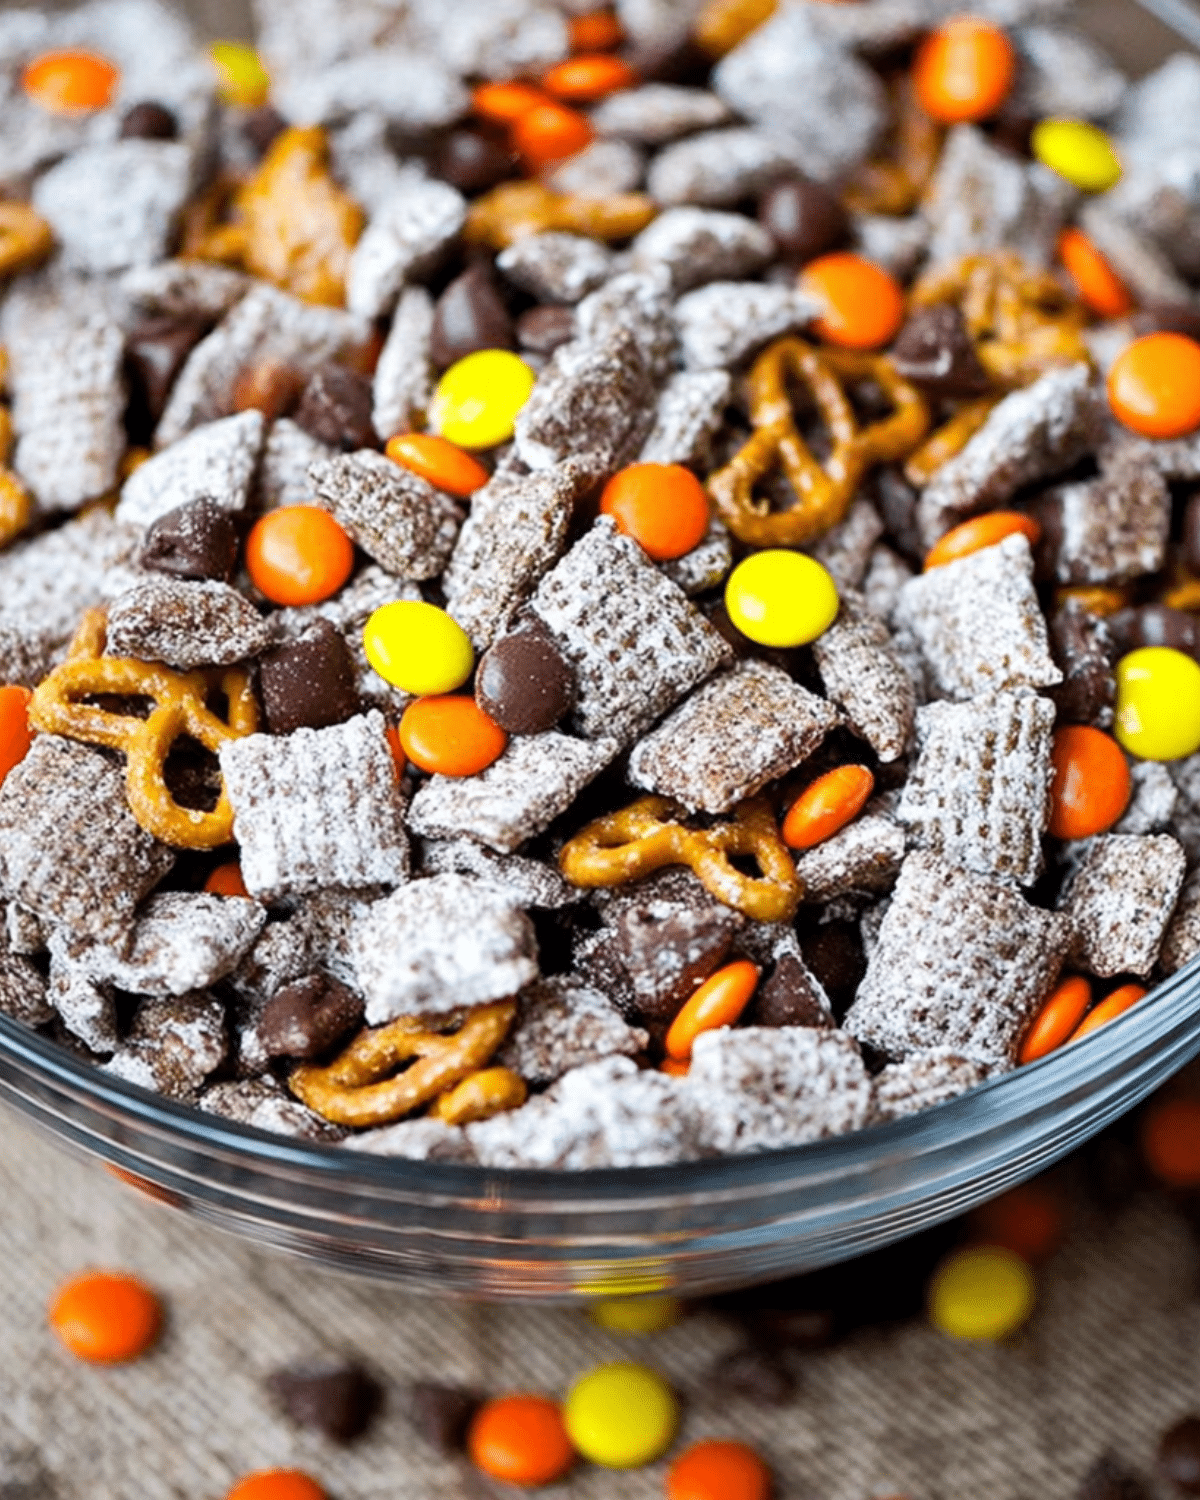
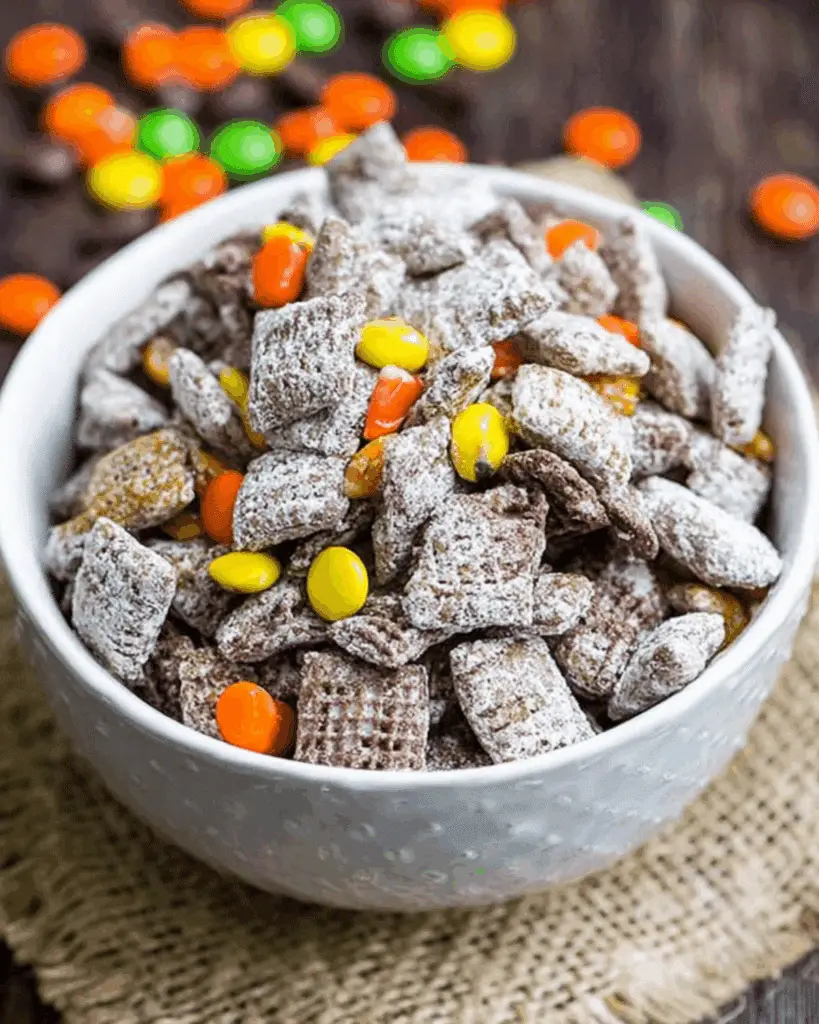
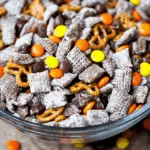
The Halloween twist typically includes festive orange and brown hues using Reese’s Pieces or candy corn, making it perfect for themed parties or spooky movie marathons.
How Halloween puppy chow became a party favorite
There’s a reason this snack is practically a staple at Halloween parties. It’s easy to prepare, highly customizable, and endlessly shareable. Kids love the vibrant candy mix-ins, and adults can’t resist the nostalgic flavors of chocolate, peanut butter, and powdered sugar coating crunchy cereal bites.
Over the years, the Halloween version of puppy chow has gained momentum thanks to social media, fall-themed potlucks, and the rising popularity of gluten-free snack ideas. Today, it’s one of the most pinned Halloween treats online.
Check out our fun Halloween pretzels recipe to add even more variety to your snack table!
Difference between classic muddy buddies and this seasonal twist
So, what sets Halloween puppy chow apart from your standard muddy buddies? While both recipes share a base of Chex cereal, chocolate, peanut butter, and powdered sugar, the Halloween version amps things up with themed candies like:
| Classic Muddy Buddies | Halloween Puppy Chow |
|---|---|
| No candy add-ins | Reese’s Pieces, candy corn, M&Ms |
| Neutral colors | Bright Halloween colors (orange, yellow, brown) |
| Year-round treat | Seasonal party snack |
| Standard sweet flavor | Optional salty or spicy add-ins |
The flexibility of this treat is what makes it truly magical. You can customize it with gluten-free ingredients, make it nut-free, or even spice it up with a pinch of cayenne or cinnamon.
Don’t miss our spooky fun mummy dogs recipe to serve alongside this creepy snack mix for a full Halloween-themed menu!
Essential Ingredients and Substitutions for Halloween Puppy Chow
Core ingredients you must have
The beauty of Halloween puppy chow lies in its simplicity. Most of the ingredients are pantry staples, and the process requires no baking. Here’s what you’ll need to make a big, shareable batch:
| Ingredient | Purpose |
|---|---|
| Rice Chex cereal (12 cups) | The crispy base that holds the coating |
| Semi-sweet chocolate chips (1½ cups) | Provides the rich chocolate flavor |
| Creamy peanut butter (¾ cup) | Adds smoothness and salty contrast |
| Unsalted butter (6 tbsp) | Helps blend the chocolate and peanut butter |
| Vanilla extract (1 tsp) | Boosts overall flavor depth |
| Powdered sugar (1¼ – 1½ cups) | Coats the mix for a sweet finish |
| Kosher salt (¼ tsp) | Balances the sweetness with a hint of salt |
| Reese’s Pieces (1 cup) | Adds color and a fun, Halloween vibe |
Each of these components brings a specific texture or flavor to the table. Be sure to use gluten-free certified Chex cereal and chocolate chips if you’re catering to allergies.
Discover great ideas like our eyeball brownies recipe to complement this creepy snack mix!
Gluten-free and allergy-friendly alternatives
Whether you’re making this for a classroom party or a gluten-sensitive crowd, there are plenty of ways to make this snack mix safe for everyone.
- Dairy-free version: Use plant-based butter and dairy-free chocolate chips.
- Nut-free option: Swap peanut butter for sunflower seed butter or Wowbutter.
- Gluten-free musts: Always check that your cereal, candies, and powdered sugar are labeled gluten-free.
Reese’s Pieces are usually gluten-free, but double-check the packaging or consider alternatives like Enjoy Life chocolate chips or candy-coated sunflower seeds for extra caution.
Looking for something both fun and allergy-friendly? Don’t miss our Halloween snack mix loaded with gluten-free goodies.
Creative mix-ins and candies for Halloween flair
What makes this recipe scream Halloween is the addition of colorful, themed ingredients. While Reese’s Pieces are the go-to for their orange, yellow, and brown hues, there are countless variations you can try:
| Add-In | Description |
|---|---|
| Candy Corn | Classic Halloween candy, adds sweet chewiness |
| Mini Peanut Butter Cups | For rich chocolatey bites |
| Pretzels or mini crackers | Adds salty crunch |
| Gummy worms | Kids love the creepy factor |
| M&Ms (Halloween colors) | Great for themed colors and crunch |
| Toffee bits or mini marshmallows | For a softer texture contrast |
Want more spooky snack ideas? Check out our fun mummy dogs recipe to complete your themed spread.
With so many possibilities, it’s easy to tailor Halloween puppy chow to your personal style or dietary needs. Make it extra spooky, extra sweet, or even a bit spicy—this mix adapts to your Halloween vision effortlessly.
How to Make Halloween Puppy Chow Step by Step
Making Halloween puppy chow is quick, satisfying, and perfect for when you’re short on prep time but want to wow the crowd. This step-by-step guide breaks it down so you get the perfect ratio of chocolatey goodness and spooky crunch every time.
Melting the chocolate and peanut butter the right way
Start by grabbing a double boiler (or a microwave-safe bowl if that’s what you’ve got). This step is key to getting a smooth, luscious coating that clings perfectly to your Chex cereal.
- Add water to the bottom of your double boiler and bring it to a gentle boil.
- In the top bowl, melt 6 tablespoons of unsalted butter.
- Add 1½ cups of semi-sweet chocolate chips and ¾ cup of creamy peanut butter.
- Stir constantly with a spatula or wooden spoon until fully melted and smooth.
- Remove from heat and mix in 1 teaspoon of vanilla extract for extra flavor depth.
If you’re using a microwave, heat in 30-second intervals, stirring between each until silky and blended.
This mix is the flavor bomb of the recipe—rich, nutty, sweet, and slightly salty. And yes, you’ll be tempted to lick the spoon.
Looking for another hauntingly easy treat? Don’t miss our eyeball brownies recipe—they pair eerily well with puppy chow.
Coating and mixing: Get the perfect crunch
Time to bring it all together.
- Pour one full 12 oz. box (about 12 cups) of Rice Chex cereal into a very large mixing bowl.
- Drizzle the warm chocolate-peanut butter mixture slowly over the cereal.
- Gently stir with a wooden spoon or spatula, being careful not to crush the cereal.
- Continue pouring and mixing until all cereal is evenly coated. Work in batches if needed.
Pro Tip: Don’t let the chocolate cool too much before mixing—it hardens quickly and won’t spread evenly.
Adding powdered sugar without the mess
Now comes the signature powdered sugar coating that makes this mix so irresistible. And yes, there’s a mess-free trick.
- Divide the coated cereal between two gallon-sized freezer bags.
- Add ½ cup of powdered sugar to each bag, seal, and shake it like you mean it.
- Once evenly coated, spread the mix on a baking sheet lined with parchment.
- For extra sweetness, dust with an additional ¼ to ½ cup of powdered sugar.
- Sprinkle with ¼ teaspoon of kosher salt to balance the flavor.
This coating is where the puppy chow gets that soft crunch and signature white, dusty finish.
Want more make-ahead Halloween fun? Check out our spider web Halloween brownies for another no-fail dessert.
Customizing it with festive candies
Here’s where your Halloween flair comes to life.
- Once the puppy chow has cooled and set, divide it back into two bowls.
- Mix ½ cup of Reese’s Pieces into each bowl for that signature orange-brown pop.
- Stir gently to combine without breaking the coated cereal.
Feel free to toss in other Halloween-colored candies like candy corn, M&Ms, or mini marshmallows to elevate the festive vibes.
For a complete Halloween-themed snack board, don’t miss our Halloween snack mix—it complements this recipe perfectly.
Tips for Serving and Storing Puppy Chow for Parties
You’ve made a huge batch of Halloween puppy chow, but now what? Whether you’re hosting a Halloween bash, filling treat bags, or saving some for later, these tips will help you serve it right and keep it fresh.
Best ways to serve at Halloween gatherings
When it comes to Halloween parties, presentation is half the fun. Puppy chow’s dusty coating and bold candy colors are perfect for themed displays.
Here are a few creative serving ideas:
| Serving Style | Why It Works |
|---|---|
| Black cauldron bowl | Adds a spooky centerpiece vibe |
| Mini treat cups or cones | Great for individual servings, mess-free |
| Cellophane bags tied with ribbon | Perfect for party favors or trick-or-treat giveaways |
| Mason jars with Halloween tags | Makes a great edible gift |
Kids especially love individual portions, and it saves on clean-up. For a party table, pair this sweet treat with something savory like our spooky fun mummy dogs for balance.
How long it lasts and storage options
One of the best things about Halloween puppy chow is how well it stores. If you don’t eat the whole batch in one night (good luck with that), here’s how to keep it fresh:
- At room temperature: Store in an airtight container for up to 1 week
- In the fridge: Keeps well in a sealed bag or container for up to 10 days
- In the freezer: Store in freezer-safe bags for up to 3 months
Let it come to room temperature for 15–20 minutes before serving if frozen.
Make-ahead tip: Puppy chow actually tastes better the next day as the flavors settle. So go ahead—prep a day early for less stress and more flavor.
Can you freeze Halloween puppy chow?
Absolutely, and it freezes beautifully.
To freeze, simply:
- Let the mix cool completely after adding powdered sugar and candies.
- Transfer to heavy-duty freezer bags and squeeze out excess air.
- Label with the date and store flat in your freezer for easy stacking.
Thaw for a few minutes at room temperature before serving. The texture and flavor will stay intact, especially if you’ve used gluten-free Chex and chocolate that hold up well in low temps.
For more spooky treats that store well, don’t miss our chilling witch hat crescent rolls.
Variations and Add-Ins You Should Try
One of the best parts about Halloween puppy chow is how flexible it is. With a few tweaks and creative additions, you can take this already delicious snack mix and make it even more fun, festive, or indulgent.
Halloween-themed mix-in ideas
Beyond the usual Reese’s Pieces, there are tons of candy and snack options you can mix in to match your spooky theme or satisfy a sweet tooth. Try adding:
| Add-In | Effect |
|---|---|
| Candy corn | Bright, seasonal look and chewy texture |
| Mini marshmallows | Softness and kid-friendly appeal |
| Halloween M&Ms | Colorful chocolate crunch |
| Gummy worms | Great for creepy-crawly vibes |
| Spooky sprinkles | Adds a festive, bakery-style look |
| White chocolate chips | Adds contrast and richness |
These add-ins turn your standard muddy buddies into a Halloween masterpiece. You can even customize batches by age—more candy for kids, subtle salty-sweet combos for adults.
Looking for more easy themed treats? Check out our Halloween pretzels recipe for a salty-sweet snack that’s also easy to customize.
Sweet & salty flavor combos to experiment with
Want a bolder, more complex taste? Mix up the flavor profile with these creative combos:
- Pretzel sticks + candy corn: salty and sweet crunch
- Mini peanut butter cups + crushed Oreos: a chocolate overload
- Toffee bits + sea salt flakes: crunchy, buttery goodness
- Roasted peanuts or almonds: protein boost and savory depth
These mix-ins don’t just boost the flavor—they also give your Halloween puppy chow an irresistible texture contrast that guests will love.
Don’t miss our creepy deviled eggs for Halloween to balance out the sweet side of your party spread.
Kid-friendly vs. adult-approved versions
Want to serve this snack at both a kids’ party and an adults-only Halloween bash? It’s easy to tailor the ingredients:
| Kid-Friendly | Adult-Approved |
|---|---|
| Classic cereal + candy + marshmallows | Dark chocolate chips + toffee + flaky salt |
| No-nut butter (like SunButter) | Nut-based butters or even Nutella |
| Gummy worms and M&Ms | Cayenne or cinnamon for subtle heat |
| Fun shapes and Halloween sprinkles | Sophisticated mix-ins like espresso beans |
By simply adjusting candies and flavors, you can create themed versions for every age group. It’s one of the reasons Halloween puppy chow is a go-to recipe for fall gatherings.
Common Mistakes to Avoid When Making Puppy Chow
Even though Halloween puppy chow is a simple no-bake recipe, a few missteps can lead to a clumpy, soggy, or flavorless result. Avoid these common mistakes to get the perfect balance of texture and taste every time.
Why your coating might be too thin or too thick
The most critical element in puppy chow is the chocolate and peanut butter coating. If it’s too thick, it overpowers the cereal and makes the mix heavy. Too thin, and it won’t hold the powdered sugar.
Here’s how to get it right:
- Use the correct ratios: Stick to 1½ cups chocolate chips, ¾ cup peanut butter, and 6 tbsp butter per 12 cups of cereal.
- Melt slowly: Overheating can cause chocolate to seize. Use a double boiler or microwave in 30-second bursts.
- Stir constantly: This ensures the mixture becomes smooth and fully blended before pouring.
If your mix seems overly rich or sticky, add more powdered sugar in the final coating step to restore balance.
Mistakes when mixing or storing the snack
Mixing may seem simple, but Chex cereal is delicate. Stirring too roughly can crush it, while waiting too long before coating can create clumps.
Avoid this by:
- Using a large bowl to prevent overflow while tossing
- Mixing gently with a wooden spoon or rubber spatula
- Coating while chocolate is still warm and fluid
When it comes to storage, air exposure is your enemy. Leaving your Halloween puppy chow uncovered can lead to soggy or stale cereal. Always use airtight containers or zip-top bags.
Looking for inspiration? Try our easy Halloween snack mix which is equally simple but with a different texture and twist.
Powdered sugar pitfalls
One of the most common issues is under- or over-coating with powdered sugar. You want that iconic snowy look without turning it into a sugar bomb.
Avoid these powdered sugar problems:
- Too little: The snack will be greasy or sticky and won’t have that signature finish.
- Too much: It can mask all the other flavors and make it overwhelmingly sweet.
- Uneven coating: Leads to clumps and bare spots.
The fix? Shake in small batches using heavy-duty freezer bags, and add more powdered sugar gradually based on your desired sweetness level.
For more make-ahead Halloween goodies that avoid common pitfalls, try our witch hat crescent rolls recipe.
FAQs About Halloween Puppy Chow
Is Halloween puppy chow safe for dogs?
No—Halloween puppy chow is not safe for dogs. Despite the name, this snack is strictly for humans. It contains chocolate, peanut butter, and possibly xylitol (in some sugar-free versions), all of which are toxic to pets. Always keep it out of reach from your furry friends.
Can I make Halloween puppy chow ahead of time?
Yes! In fact, puppy chow tastes better after resting. The coating sets, and the flavors meld beautifully overnight. Make it up to 2–3 days in advance and store it in an airtight container for the best results.
What cereal works best for puppy chow?
Rice Chex is the gold standard due to its neutral taste and excellent texture. You can also use Corn Chex or even Crispix, but avoid cereals with added sugars or coatings, as they can alter the taste and absorbency.
Can I make this with Nutella instead of peanut butter?
Absolutely. Nutella or any chocolate-hazelnut spread can replace peanut butter for a rich, decadent twist. Just note: Nutella adds more sugar and less salt, so adjust the powdered sugar and salt accordingly to balance flavors.
Conclusion: Why This Halloween Snack Will Be Your Favorite Tradition
Halloween puppy chow isn’t just a snack—it’s an experience. It’s the perfect balance of salty, sweet, crunchy, and creamy, all dressed up in Halloween colors. Whether you’re hosting a costume bash, packing party favors, or just indulging on a cozy movie night, this easy no-bake treat is always a hit.
From its flexible ingredient list to its make-ahead convenience, this snack mix is as adaptable as it is delicious. Try new mix-ins, create themed versions, and make it your own Halloween tradition.
Don’t miss our delicious creepy deviled eggs for the perfect savory contrast to this sugary delight.
PrintHalloween Puppy Chow
Halloween Puppy Chow is a no-bake, gluten-free snack mix made with Chex cereal, chocolate, peanut butter, powdered sugar, and festive Halloween candies like Reese’s Pieces. It’s the ultimate spooky treat for parties, gifts, or cozy nights in.
- Prep Time: 10 minutes
- Cook Time: 5 minutes
- Total Time: 15 minutes
- Yield: 24 servings
- Category: Dessert
- Method: No-Bake
- Cuisine: American
- Diet: Gluten Free
Ingredients
- 12 oz. box Rice Chex cereal (about 12 cups)
- 6 Tbsp. unsalted butter
- 1 ½ cups semi-sweet chocolate chips
- ¾ cup creamy peanut butter
- 1 tsp. vanilla extract
- 1 ¼ – 1 ½ cups powdered sugar (adjust to taste)
- ¼ tsp. kosher salt
- 1 cup Reese’s Pieces candies (½ cup per bowl)
Instructions
- Pour the Rice Chex cereal into a large bowl and set aside.
- In a double boiler or microwave-safe bowl, melt the butter over low heat.
- Add chocolate chips and peanut butter to the melted butter, stirring until smooth and fully combined.
- Remove from heat and stir in the vanilla extract.
- Drizzle the warm mixture over the Chex cereal gradually, stirring gently to coat evenly without crushing the cereal.
- Divide the coated cereal into two gallon-size freezer bags.
- Add ½ cup powdered sugar to each bag, seal, and shake until cereal is well coated.
- Spread the cereal mix on baking sheets and sprinkle with remaining powdered sugar and kosher salt to taste.
- Once cooled, transfer half of the mix to a serving bowl and stir in ½ cup Reese’s Pieces. Repeat with the second half.
- Store in an airtight container or freezer bag until ready to serve.
Notes
- Customize with other candies like candy corn, mini peanut butter cups, or Halloween M&Ms.
- Use sunflower seed butter for a nut-free version.
- Store in fridge for up to 1 week or freeze for up to 3 months.
- Make ahead for better flavor the next day.
- Not safe for pets despite the name.
Nutrition
- Serving Size: 0.5 cup
- Calories: 232
- Sugar: 23g
- Sodium: 100mg
- Fat: 13g
- Saturated Fat: 7g
- Unsaturated Fat: 5g
- Trans Fat: 0g
- Carbohydrates: 26g
- Fiber: 2g
- Protein: 4g
- Cholesterol: 9mg