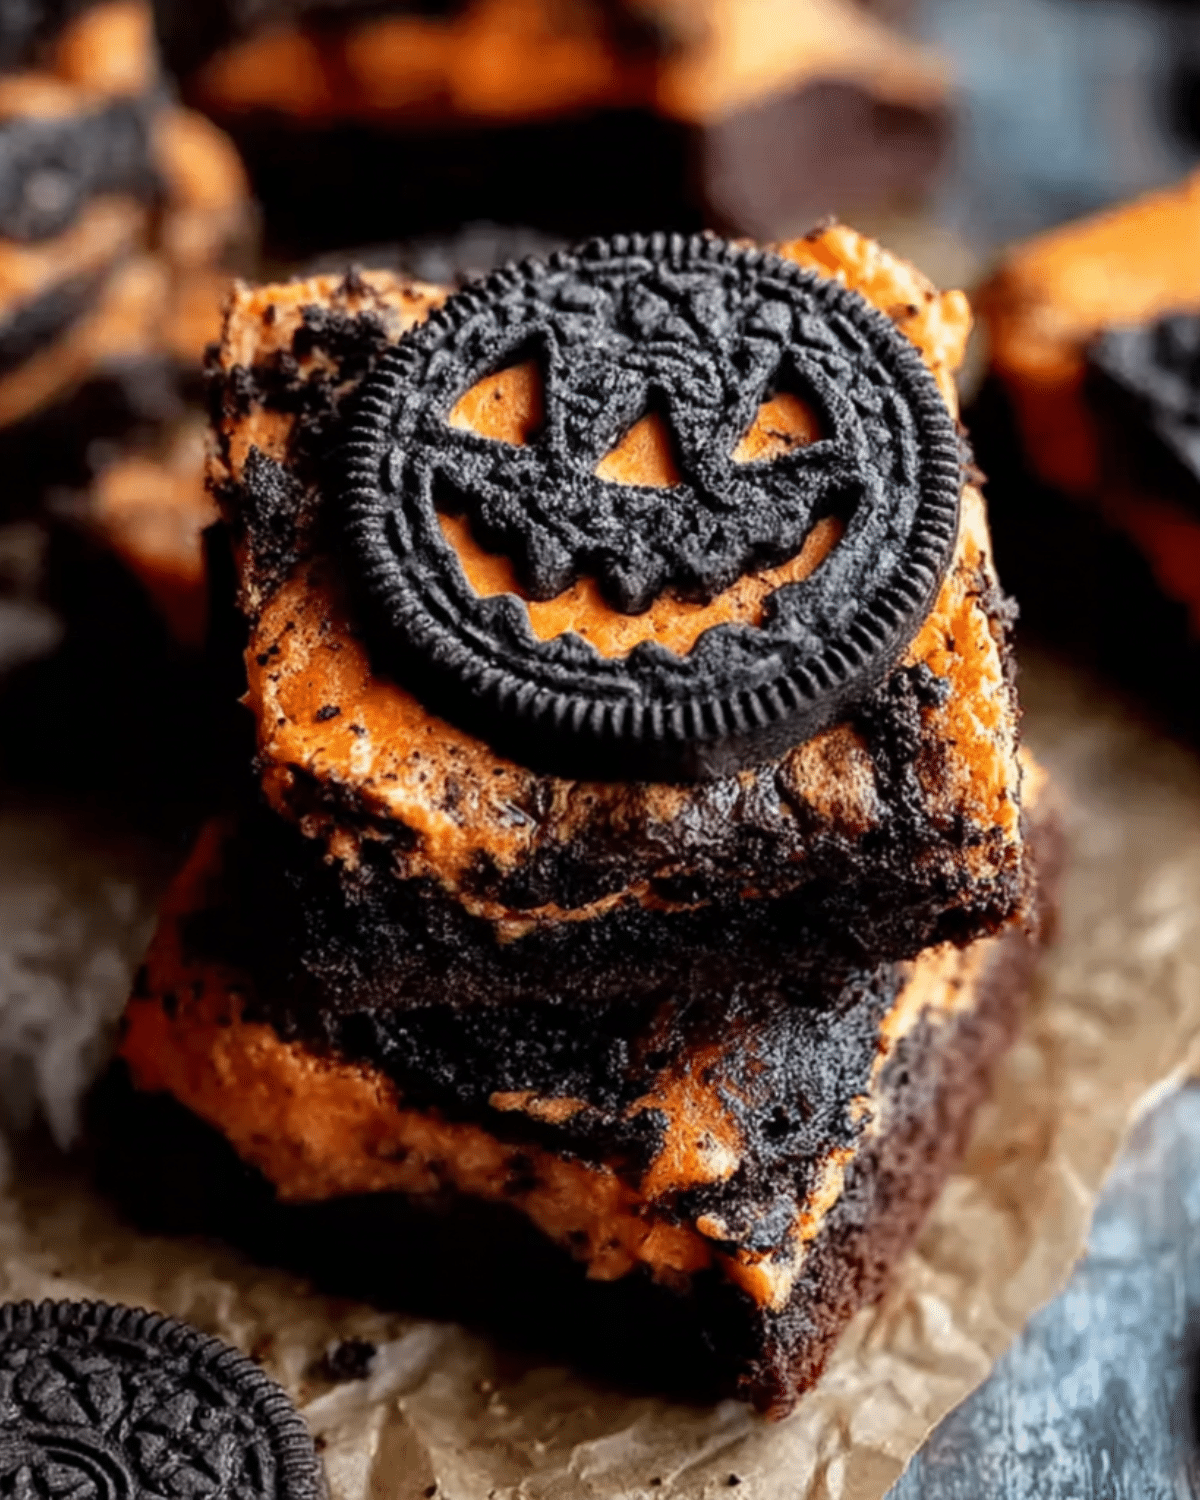
Halloween Oreo Brownies are the ultimate seasonal treat—rich, chewy, and packed with spooky charm. Whether you’re baking for a classroom party, a haunted house gathering, or just a cozy October night at home, these brownies bring the fun and flavor. With chunks of festive Halloween Oreos and melty chocolate chips in every bite, they deliver a perfect balance of crunchy and gooey textures. The best part? You don’t need to be a pro baker to make them look incredible. In this article, you’ll learn everything from ingredients to decorating tips, and get insider tricks for slicing, storing, and serving. Looking for inspiration? Try our Eyeball Brownies recipe for even more Halloween dessert ideas.
JUMP TO
Table of Contents
Why Halloween Oreo Brownies Are the Ultimate Festive Treat
A Seasonal Twist on a Classic Dessert
Halloween Oreo Brownies take a beloved classic—fudgy brownies—and give it a spirited makeover. Swapping in Halloween-themed Oreos with bright orange crème and spooky designs adds more than color; it infuses flavor and crunch that set them apart from your everyday brownie.
This seasonal twist isn’t just for show. The slight tang from the crème filling complements the sweetness of the chocolate base, making every bite feel indulgent and exciting. It’s that balance of fun visuals and unbeatable flavor that earns these brownies a spot at every Halloween table.
What Makes Halloween Oreos Perfect for Baking
Not all cookies are made for baking, but Halloween Oreos are built for it. Their bold colors don’t bleed or fade during baking, and their firm texture holds up beautifully even when folded into batter. Plus, each cookie comes with creepy-cute designs—ghosts, pumpkins, bats—that look stunning peeking through brownie tops.
When placed carefully on the surface of your batter before baking, they bake right in, creating an Instagram-worthy dessert without the hassle of decorating. Don’t miss our Spider Web Halloween Brownies for more creative Halloween baking ideas.
Why Brownies Are the Go-To Halloween Dessert for Parties
Brownies are one of the easiest desserts to serve at gatherings. They’re sturdy, sliceable, and easy to eat without utensils. Add Halloween Oreos to the mix, and you’ve got a spooky, sweet, mess-free option perfect for party trays or trick-or-treat bags.
You can make a big batch ahead of time, chill them for a firmer texture, or freeze them in advance. They’re also endlessly customizable—top with candy eyeballs, drizzle with white chocolate, or sandwich them between marshmallows for brownie s’mores. Discover great ideas like our Halloween Pretzels recipe to build the perfect spooky snack board.
Ingredients and Tools You’ll Need
Main Ingredients List (Boxed vs. Homemade Options)
For the ultimate Halloween Oreo Brownies, you can go two routes: from-scratch batter or your favorite boxed mix. Here’s a quick comparison of both:
| Ingredient | Homemade | Boxed |
|---|---|---|
| Unsweetened Cocoa Powder | ✅ | ❌ |
| All-Purpose Flour | ✅ | Optional |
| Chocolate Chips | ✅ | ✅ |
| Butter | ✅ | Sometimes |
| Eggs | ✅ | ✅ |
| Halloween Oreos | ✅ | ✅ |
Whether you’re using a box or starting from scratch, the star of the show is definitely the Halloween Oreos. Choose the version with orange crème filling for the best spooky color contrast. Some bakers also add a splash of espresso powder to intensify the chocolate flavor.
Kitchen Tools and Prep Essentials
To nail the perfect batch, make sure you’ve got these tools handy:
- 8×8 or 9×9-inch metal baking pan
- Parchment paper (decorative optional!)
- Rubber spatula for even batter spreading
- Sharp chef’s knife for clean cuts
- Wire rack for cooling
- Large mixing bowls (if baking from scratch)
A metal pan yields crisp edges, while parchment makes removing and slicing clean and stress-free. Want to take it further? Use Halloween-themed parchment like spiderwebs or pumpkins for added flair.
Customization Options for Dietary Needs or Flavor Twists
Need a gluten-free version? Swap in a 1:1 gluten-free flour blend and use gluten-free sandwich cookies. For a dairy-free version, opt for vegan butter and chocolate chips.
Flavor tweaks are easy too. Add a teaspoon of peppermint extract for a minty spin or swirl in peanut butter for a Reese’s-inspired treat. For more fall favorites, check out our Pumpkin S’mores Cookies that are just as cozy and crave-worthy.
Step-by-Step Halloween Oreo Brownies Recipe
Prepping the Brownie Base from Scratch
Start by melting butter and whisking it with sugar, eggs, and vanilla. Sift in your dry ingredients—flour, cocoa powder, and salt. Stir until smooth. Then fold in chocolate chips and about two-thirds of your crushed Halloween Oreos.
Line your baking pan with parchment, then pour in the batter and smooth the top with a spatula. Gently press remaining Oreos on top, design side up.
Folding in Oreos and Chocolate Chips
It’s key to fold these in last so they don’t sink too deep. Use chopped Oreos in the batter and save whole ones for topping. Gently mix the crushed cookies so the crème doesn’t melt too early. Add semi-sweet or milk chocolate chips for extra richness.
Want more spooky mix-ins? Mini marshmallows or orange-colored sprinkles work great too. Check out our Easy Halloween Snack Mix for more festive ingredients.
Baking Tips for the Perfect Fudgy Center
Bake at 350°F (175°C) for 30–35 minutes. Insert a toothpick in the center—it should come out with a few moist crumbs (not wet batter). Overbaking will lead to dryness, so stay close to the oven timer.
For extra fudgy results, chill your brownies before cutting. Refrigeration enhances the texture and makes slicing neater. Plus, chilled Oreo brownies are incredibly chewy with a satisfying crunch.
Decorating Your Brownies for a Spooky Halloween Look
Oreo Placement Tips for Best Spooky Visuals
Presentation matters—especially on Halloween. Once your brownie batter is in the pan, gently press whole Halloween Oreos on top with the design side facing up. This ensures ghosts, pumpkins, and spider webs stay visible after baking. Leave a little space between them to make cutting easier later.
Want a wow factor? Rotate cookie angles, mix in crushed Oreos, or alternate between full and halved cookies for that broken tombstone effect. A few sprinkles of edible glitter or orange sanding sugar can also boost the spooky vibe without going over the top.
Fun Add-Ons: Candy Eyes, Sprinkles, and Themed Liners
You don’t have to stop at just Oreos. Want to turn your brownies into graveyard treats or mummy snacks? Add candy eyes, Halloween sprinkles, or pipe zigzags of white chocolate to mimic a wrapped mummy.
Try themed cupcake liners or pumpkin-print parchment paper for an extra festive display. It’s those little touches that make these brownies ideal for a Halloween dessert board. Don’t miss our Pumpkin Cheesecake Dip—it’s another spooky favorite for party spreads.
Kid-Friendly Decorating Ideas
If kids are helping, let them get creative. Set up a mini decorating station with:
- Candy eyeballs
- Mini M&Ms
- Marshmallows
- Halloween gummies
- Black gel icing
Let little hands personalize each brownie square. It’s fun, engaging, and a great way to get the whole family involved in Halloween prep.
Tips for Cutting and Storing Halloween Oreo Brownies
How to Cut Clean Slices Without Ruining the Design
Brownies can be tricky to slice cleanly—especially when toppings are involved. Here’s the trick: let your brownies cool completely before cutting. Even better, pop them in the fridge for 30 minutes.
Use a large chef’s knife, and don’t saw through. Instead, press down, lift, and wipe clean between each cut. This keeps the Halloween Oreo designs intact and avoids dragging chocolate chips or crumbs across the top. Looking for inspiration? Try our Spooky Mummy Dogs for more Halloween party treats that are easy to serve.
Storing for Freshness and Make-Ahead Guidance
Halloween Oreo Brownies store well at room temperature for up to 3 days in an airtight container. For best texture, keep a layer of parchment between each row to prevent sticking.
Need to bake in advance? Chill them in the fridge for up to 5 days. They’re still fudgy, with even more chew from the Oreos. This is perfect if you’re prepping for a party and want to get ahead without compromising taste or appearance.
Freezing for Longer Shelf Life
To freeze, wrap individual brownie squares tightly in plastic wrap, then place them in a zip-top freezer bag. Label with the date and freeze for up to 2 months. When you’re ready to enjoy, thaw at room temperature or pop in the fridge overnight.
Frozen brownies retain their shape beautifully and are actually easier to slice clean. Try this method when batch baking for school events, Halloween swaps, or gifting.
How to Serve and Present for Halloween Parties
Add to Dessert Boards or Party Trays
Halloween dessert charcuterie boards are all the rage—and these brownies are the perfect fit. Pair with ghost meringues, gummy worms, and candy corn. Their eye-catching look makes them the centerpiece of any spooky spread. For more tray ideas, check out our Pumpkin Pie Cookie Sandwiches that also pack a festive punch.
Use cupcake liners to hold individual brownie squares for easy grabbing. Or stack them in a pyramid on a black platter for a haunted tower effect.
Packaging Brownies for Gifting
These brownies make adorable edible gifts. Wrap each square in wax paper or Halloween-themed parchment, then slide into clear treat bags. Add a tag with a clever phrase like “Boo-tiful Brownies” or “Monster Bites.”
You can also place them in small metal tins or bakery boxes with tissue paper. A cute ribbon seals the deal, making them ready-to-give for teachers, neighbors, or party guests.
Making Brownie “Boo Bags” or DIY Treat Boxes
Looking to add a little DIY fun to your Halloween prep? Create Brownie Boo Bags by mixing in other treats—mini chocolate bars, candy corn, or marshmallows—and sealing them in resealable pouches.
Use printable Halloween labels or themed stickers to add some personality. This also works great as a take-home party favor or class snack.

FAQs About Halloween Oreo Brownies
Can I Use Regular Oreos Instead of Halloween Oreos?
Yes, you absolutely can! Regular Oreos will still give you that delicious crunch and creamy contrast. However, you’ll miss out on the fun seasonal colors and spooky designs that make these brownies extra festive. If Halloween Oreos aren’t available, consider adding orange candy melts or spooky sprinkles to mimic the holiday vibe.
Should I Use a Boxed Brownie Mix or Homemade Recipe?
Both options work! If you’re short on time, a boxed brownie mix delivers solid results. But if you’re after the richest, fudgiest texture, homemade is the way to go. The extra steps are minimal, and the payoff is major. We used a homemade version for this recipe because it enhances the cookie crunch and chocolate depth.
How Do I Keep the Oreos from Sinking into the Batter?
To keep your Halloween Oreos on top (and photo-ready), place them gently after the batter has been poured into the pan. Don’t press them down too hard—just a light tap will do. You can also reserve a few Oreos and press them on midway through baking for the best visibility.
Can These Brownies Be Made Gluten-Free?
Definitely. Simply swap the all-purpose flour with a 1:1 gluten-free blend and use gluten-free chocolate sandwich cookies. Most gluten-free options bake well and hold their shape just like traditional Oreos. Want more allergy-friendly ideas? Don’t miss our 3-Ingredient Keto Pumpkin Cookies for a healthy seasonal treat.
Final Thoughts on These Spooktacular Brownies
Why This Recipe Is a Must-Try for Halloween Lovers
These Halloween Oreo Brownies aren’t just a dessert—they’re a party starter. They’re easy to make, crowd-pleasing, and full of seasonal charm. From kid-friendly decorating to decadent, fudgy bites, this recipe ticks every box for a Halloween baking win.
They’re also incredibly flexible. Whether you’re baking a tray for a school party or adding them to a haunted dessert board, you’ll find they never fail to impress. And because they freeze beautifully, you can make them ahead and still enjoy spooky goodness right on time.
Fun Ways to Make It Your Own
The best part? This recipe is endlessly customizable. Want to make it spooky cute? Add candy bones. Going for scary glam? Try edible glitter or black cocoa powder.
For a festive baking day, pair it with our Soft Pumpkin Cookies with Cream Cheese Frosting to round out your Halloween dessert lineup.
Halloween Oreo Brownies

These Halloween Oreo Brownies are fudgy, chewy, and loaded with Halloween-themed Oreo cookies and chocolate chips. Perfect for parties, gifting, or festive dessert boards, they’re easy to decorate and packed with spooky fun.
- Prep Time: 15 minutes
- Cook Time: 35 minutes
- Total Time: 50 minutes
- Yield: 16 brownies
- Category: Dessert
- Method: Baking
- Cuisine: American
- Diet: Vegetarian
Ingredients
- 1 cup unsalted butter, melted
- 1 1/4 cups granulated sugar
- 3/4 cup brown sugar
- 3 large eggs
- 1 tbsp vanilla extract
- 3/4 cup unsweetened cocoa powder
- 1 cup all-purpose flour
- 1/2 tsp salt
- 1 cup semi-sweet chocolate chips
- 20 Halloween Oreo cookies (crushed and whole)
Instructions
- Preheat the oven to 350°F (175°C). Line an 8×8-inch metal baking pan with parchment paper.
- In a large bowl, whisk together melted butter, granulated sugar, brown sugar, eggs, and vanilla until well combined.
- Sift in cocoa powder, flour, and salt. Stir until a smooth batter forms.
- Fold in chocolate chips and two-thirds of the crushed Halloween Oreos.
- Pour the batter into the prepared pan and smooth the top with a spatula.
- Gently press whole Halloween Oreos onto the surface, design-side up.
- Bake for 30–35 minutes, or until a toothpick inserted in the center comes out with moist crumbs.
- Allow the brownies to cool completely in the pan. Refrigerate for cleaner slicing if desired.
- Use a large chef’s knife to cut the brownies into squares. Wipe the knife clean between each cut.
Notes
- Do not overbake—check multiple spots with a toothpick for accuracy.
- Use themed parchment paper for a festive touch.
- Chill brownies before slicing for neat, sharp edges.
- Store in an airtight container for up to 3 days, or freeze for up to 2 months.
- Swap with gluten-free ingredients if needed.
Nutrition
- Serving Size: 1 brownie
- Calories: 280
- Sugar: 24g
- Sodium: 160mg
- Fat: 14g
- Saturated Fat: 8g
- Unsaturated Fat: 5g
- Trans Fat: 0g
- Carbohydrates: 35g
- Fiber: 2g
- Protein: 3g
- Cholesterol: 45mg