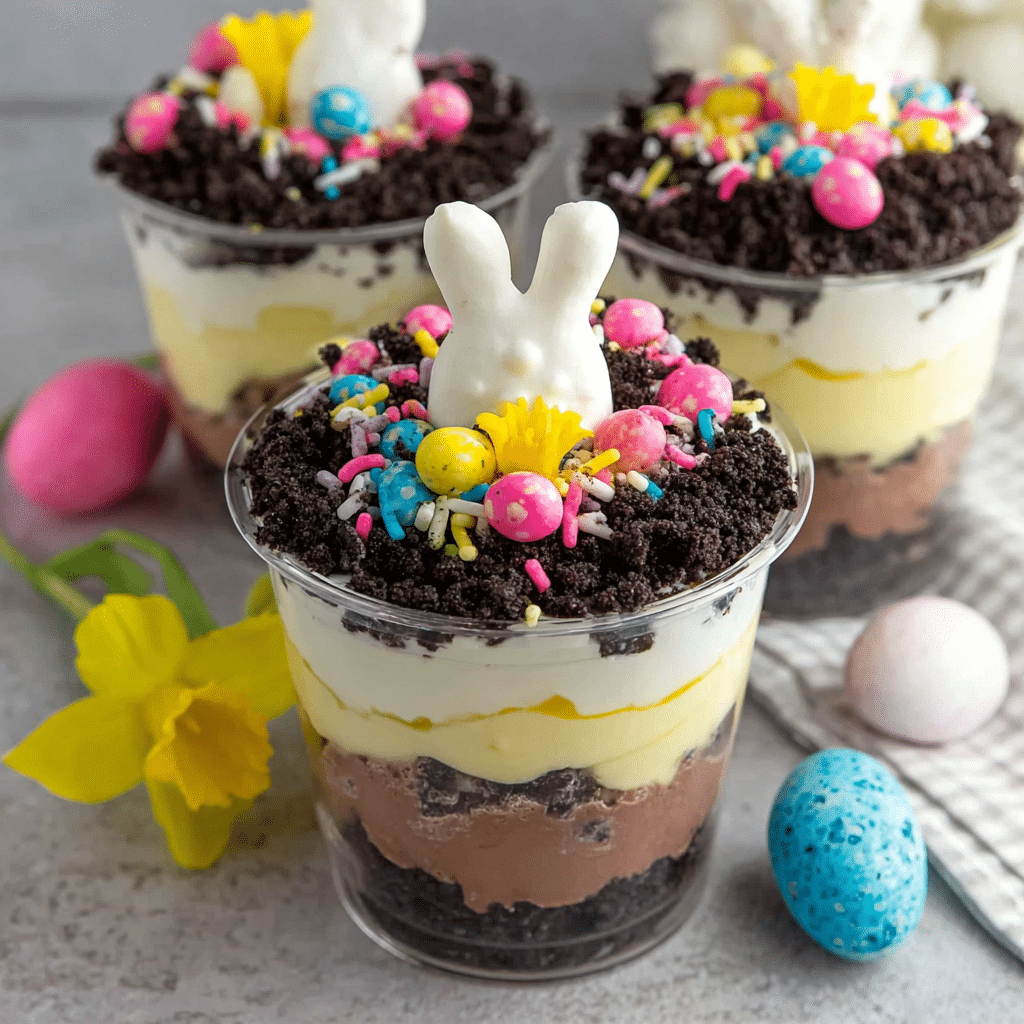
Easter pudding dirt cups are a fun, colorful, and incredibly easy dessert that brings both creativity and flavor to your holiday table. Not only are these treats rich, creamy, and chocolatey, but they also have a playful presentation that makes them perfect for kids and adults alike. Because they are served in individual cups and decorated with festive toppings like crushed cookies, candy eggs, and gummy worms, they instantly stand out at any gathering.
Even better, Easter pudding dirt cups require no baking, which makes them ideal for beginners or anyone short on time. With simple ingredients and quick preparation, you can create a dessert that looks impressive without much effort. Throughout this complete guide, you will learn how to make the best Easter pudding dirt cups, along with expert tips, variations, serving ideas, and answers to common questions so you can achieve perfect results every time.
JUMP TO
Table of Contents
Why Easter Pudding Dirt Cups Are So Popular
A Perfect Easter-Themed Dessert
Easter pudding dirt cups are designed to match the fun and colorful spirit of Easter. Because they resemble little cups of “dirt” topped with bright candies and decorations, they fit perfectly into any Easter celebration. Whether you are hosting a brunch or a party, these cups add a festive touch to your dessert table.
Loved by Kids and Adults
One of the biggest reasons for their popularity is how much kids love them. The combination of chocolate pudding, cookie crumbs, and candy toppings creates a dessert that is both delicious and exciting to look at. At the same time, adults enjoy the creamy texture and nostalgic flavor.
Easy and No-Bake Convenience
Another major advantage of Easter pudding dirt cups is how simple they are to prepare. Since there is no baking involved, you can make them quickly without worrying about complicated steps. Additionally, they can be prepared ahead of time, which makes hosting much easier.
Ingredients for the Best Easter Pudding Dirt Cups
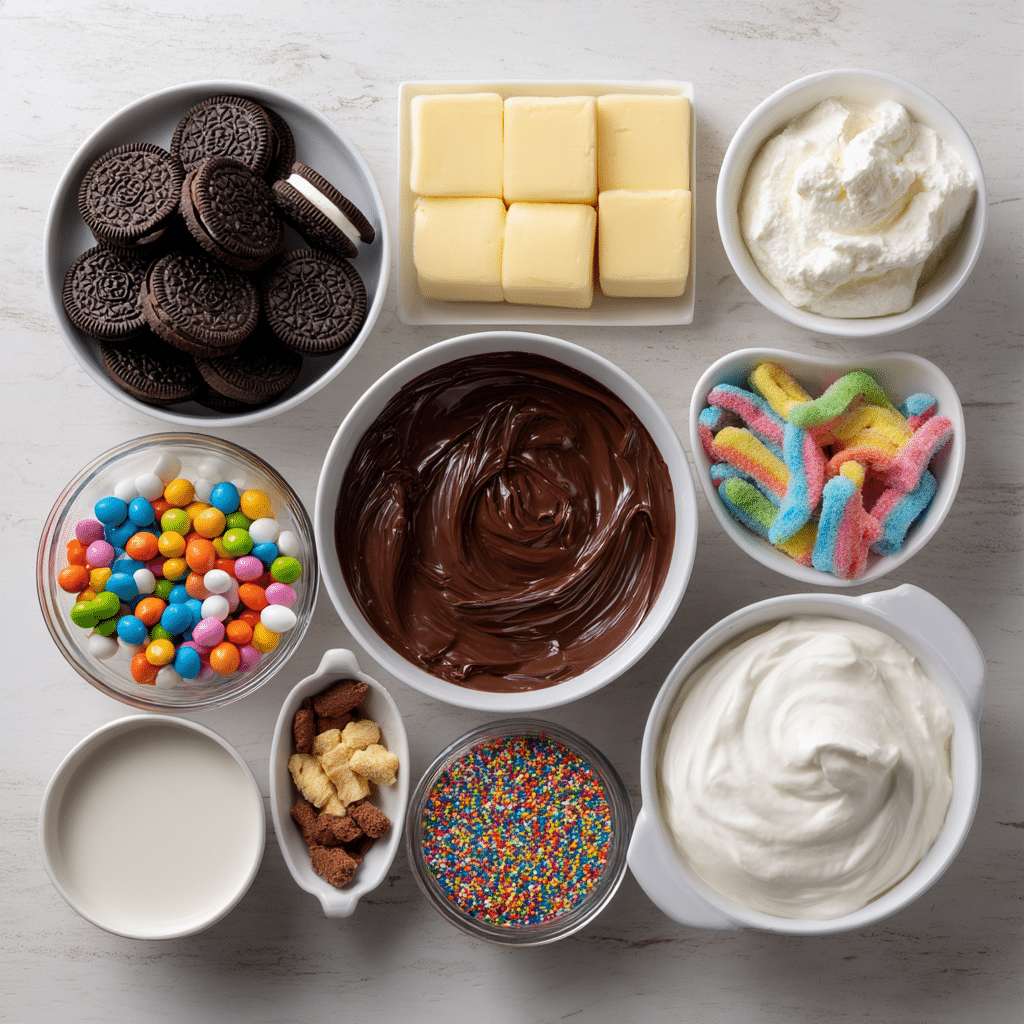
Essential Ingredients List
To make Easter pudding dirt cups, you will need the following ingredients
| Ingredient | Purpose |
|---|---|
| 1 package chocolate sandwich cookies | Creates the “dirt” layer |
| 2 cups cold milk | Base for pudding |
| 1 package instant chocolate pudding mix | Main flavor |
| 8 oz whipped topping | Adds lightness |
| 8 oz cream cheese | Adds richness |
| 1/2 cup powdered sugar | Sweetens mixture |
| Gummy worms | Fun decoration |
| Mini candy eggs | Easter-themed topping |
Choosing the Right Cookies
Chocolate sandwich cookies, such as Oreos, work best because they create a dark and crumbly texture that looks like soil. Crushing them finely ensures the best appearance and consistency.
Optional Decorations
You can customize your Easter pudding dirt cups with additional toppings such as shredded coconut dyed green to resemble grass, sprinkles, or marshmallow shapes. These small details make the dessert even more festive.
Step-by-Step Easter Pudding Dirt Cups Instructions
Preparing the Cookie Crumbs
Start by crushing the chocolate sandwich cookies into fine crumbs. You can use a food processor or place them in a sealed bag and crush them with a rolling pin. The goal is to create a texture that resembles dirt.
Making the Creamy Pudding Mixture
In a bowl, whisk together the milk and chocolate pudding mix until it thickens. In another bowl, beat the cream cheese and powdered sugar until smooth. Then combine both mixtures and mix well. Finally, fold in the whipped topping to create a light and fluffy texture.
Assembling the Dirt Cups
Take clear cups and start layering your ingredients. Begin with a layer of cookie crumbs, followed by a layer of the pudding mixture. Continue layering until the cups are full, finishing with cookie crumbs on top.
Decorating the Easter Pudding Dirt Cups
Once the cups are assembled, decorate them with gummy worms and mini candy eggs. You can also add green-colored coconut on top to resemble grass. This step is where you can get creative and personalize your dessert.
Chilling Before Serving
Place the cups in the refrigerator for at least 1 to 2 hours before serving. This allows the layers to set and enhances the flavor.
Tips for Perfect Easter Pudding Dirt Cups Every Time
Use Softened Cream Cheese
Softened cream cheese blends more easily and prevents lumps in the mixture. This helps create a smooth and creamy filling.
Don’t Overmix the Whipped Topping
When folding in the whipped topping, mix gently to maintain its light texture. Overmixing can make the mixture dense.
Chill for Best Results
Chilling is essential because it helps the dessert set properly and improves the overall taste.
Use Clear Cups for Presentation
Clear cups allow the layers to be visible, making the dessert more visually appealing.
Creative Variations of Easter Pudding Dirt Cups
Vanilla Easter Dirt Cups
Use vanilla pudding and golden sandwich cookies for a lighter version. This creates a different flavor while keeping the same concept.
Peanut Butter Dirt Cups
Add peanut butter to the pudding mixture for a rich and nutty twist. This variation is especially popular with chocolate lovers.
Healthy Version
For a lighter option, use low-fat cream cheese, reduced-sugar pudding, and light whipped topping. You can also reduce the amount of cookies.
Fruit Dirt Cups
Add layers of fresh fruit such as strawberries or bananas to create a refreshing twist. This balances the richness of the pudding.
Serving Ideas for Easter Pudding Dirt Cups
Easter Dessert Table Display
Arrange the cups on a decorative tray with Easter decorations such as pastel napkins or artificial grass. This enhances the festive theme.
Individual Party Treats
Since the dessert is already portioned, it is perfect for parties. Guests can simply grab a cup and enjoy without needing utensils beyond a spoon.
Kid-Friendly Activity
Let kids help assemble and decorate the cups. This turns dessert preparation into a fun and interactive activity.
FAQs About Easter Pudding Dirt Cups
How far in advance can I make Easter pudding dirt cups
You can make them up to 24 hours in advance and store them in the refrigerator
Can I freeze Easter pudding dirt cups
Freezing is not recommended because it can affect the texture of the pudding
What can I use instead of cream cheese
Mascarpone or a thick whipped cream can be used as a substitute
How do I keep the cookies crunchy
Add the top layer of cookie crumbs just before serving to maintain their texture
Conclusion
Easter pudding dirt cups are the perfect combination of fun, flavor, and simplicity. Because they are easy to make, require no baking, and can be customized in many ways, they are an ideal dessert for Easter celebrations. Their playful design and rich taste make them a favorite among both kids and adults. Once you try making Easter pudding dirt cups, they are sure to become a regular part of your holiday traditions.
PrintEaster Pudding Dirt Cups Easy Fun Dessert

Easter pudding dirt cups are a fun no-bake dessert made with layers of chocolate pudding, crushed cookies, and festive candy toppings served in individual cups.
- Prep Time: 20 minutes
- Cook Time: 0 minutes
- Total Time: 1 hour 20 minutes
- Yield: 8 cups
Ingredients
- 1 package chocolate sandwich cookies (14 oz)
- 2 cups cold milk
- 1 package instant chocolate pudding mix (3.9 oz)
- 8 oz cream cheese, softened
- 1/2 cup powdered sugar
- 8 oz whipped topping
- 1 cup gummy worms
- 1 cup mini candy eggs
Instructions
- Crush chocolate sandwich cookies into fine crumbs.
- Whisk milk and pudding mix until thickened.
- Beat cream cheese and powdered sugar until smooth.
- Combine pudding mixture with cream cheese mixture.
- Fold in whipped topping gently.
- Layer cookie crumbs and pudding mixture in cups.
- Repeat layers, ending with cookie crumbs.
- Decorate with gummy worms and candy eggs.
- Chill for 1 to 2 hours before serving.
Notes
- Use softened cream cheese for smooth texture.
- Do not overmix whipped topping.
- Chill before serving for best flavor.
- Add top cookie layer just before serving for crunch.
- Store in refrigerator up to 24 hours.
Nutrition
- Serving Size: 1 cup
- Calories: 280
- Sugar: 22 g
- Sodium: 250 mg
- Fat: 15 g
- Saturated Fat: 9 g
- Unsaturated Fat: 5 g
- Trans Fat: 0 g
- Carbohydrates: 34 g
- Fiber: 1 g
- Protein: 3 g
- Cholesterol: 30 mg