When it comes to side dishes that steal the show, Crispy Hasselback Potatoes easily top the list. With their irresistible golden edges, buttery-soft interiors, and show-stopping fan-like appearance, they bring more than just flavor—they bring flair. This guide walks you through everything you need to know to make restaurant-quality hasselbacks at home, even if you’ve never tried them before. We’ll cover the best potato types, slicing secrets, baking techniques, and ways to serve them so they stay crispy until the last bite.
Looking for inspiration? Try our easy cheesy scalloped potatoes for another delicious spud option.
JUMP TO
Table of Contents
Why Crispy Hasselback Potatoes Deserve a Spot at Every Table
Whether you’re planning a Sunday roast or a festive holiday meal, Hasselback potatoes aren’t just another side—they’re a centerpiece in their own right.
A flavorful twist on traditional roast potatoes
What makes Hasselback potatoes different? It’s all about the slice. Each cut allows the oil, herbs, and seasoning to seep deep into the potato, creating layers of flavor you just don’t get with basic roasted spuds. Every slice becomes a crispy edge waiting to be devoured, and the soft, seasoned interior is nothing short of potato heaven.
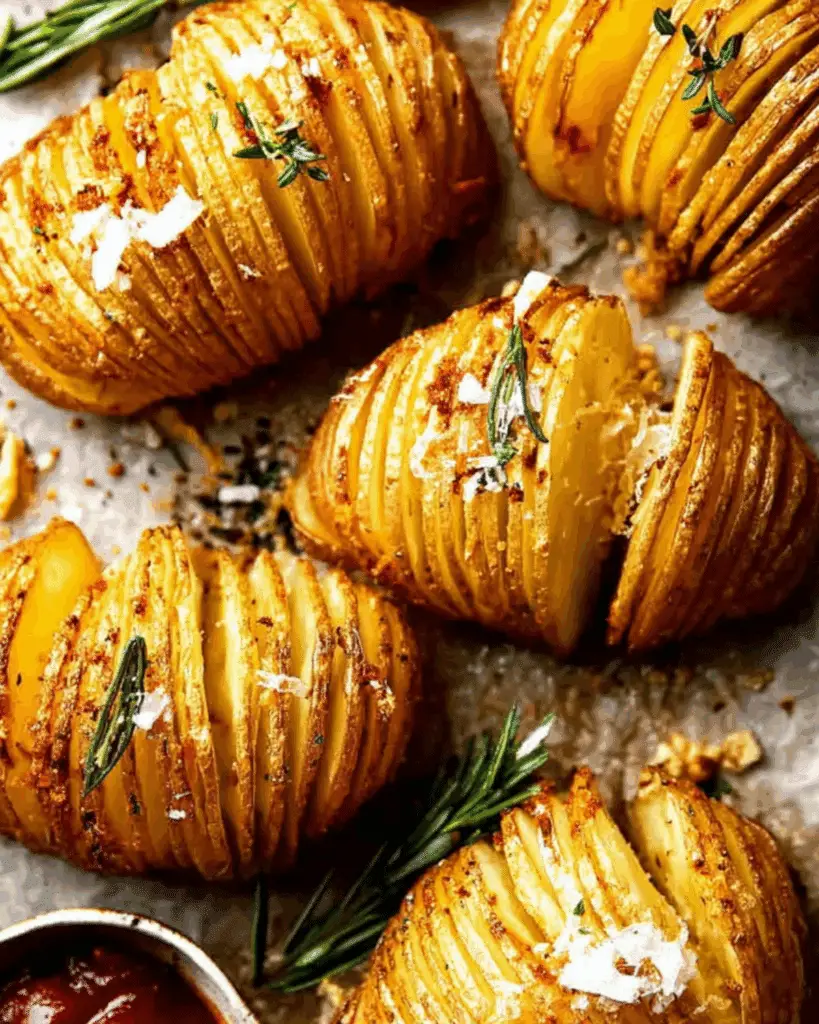
The visual appeal that impresses guests
Crispy Hasselbacks don’t just taste amazing—they look like they took hours to prepare. Their unique accordion-like shape adds instant elegance to any plate. They’re Instagram-worthy and holiday-table-ready. And here’s the best part: they’re far easier to make than they look. Once you learn the simple slicing technique, they’ll be your new signature dish.
Perfect side for holiday dinners or weeknight meals
From Thanksgiving spreads to weeknight dinners, these potatoes play well with just about anything. Serve them alongside steak, roast chicken, or even as a standalone snack with a dipping sauce. If you’re tired of plain mashed potatoes or French fries, Hasselbacks are a great way to shake things up.
Don’t miss our twice baked potato casserole recipe if you’re in the mood for another crowd-pleasing potato dish.
Choosing the Best Potatoes for Crispier Hasselbacks
Making perfect Hasselback potatoes starts at the store—with the right kind of spud. Not all potatoes are created equal when it comes to achieving the iconic fan and crisp factor.
Ideal potato types: Starchy vs. waxy explained
Starchy or all-purpose potatoes are your best bet. They have the right structure to get fluffy inside and crispy outside. In the U.S., Yukon Gold and Russet potatoes are great choices. They soak up the oils and seasonings beautifully without becoming too greasy or soggy. Waxy potatoes, like red or new potatoes, can work—but they won’t crisp up as nicely.
Importance of shape and size for better fanning
Oval-shaped potatoes fan out better than round ones. Go for medium-sized spuds—around 8 oz each. Too small, and you risk burning the edges before the inside cooks. Too large, and they take forever to bake through. Uniformity also matters: when potatoes are similar in size, they cook evenly.
Check out our baked acorn squash recipe for another fall favorite that pairs well with crispy potatoes.
Avoiding common potato selection mistakes
Avoid baby potatoes for Hasselbacks. They’re hard to slice and don’t fan well. Skip overly round potatoes—they tend to hold their shape and won’t open up properly. And don’t use waxy potatoes unless you’re okay sacrificing crispness for shape.
Want a flavorful twist? Discover great ideas like our cheesy garlic bombs recipe, perfect for pairing with any potato side.
Mastering the Hasselback Cut Without Breaking the Potato
The signature look of Hasselback potatoes depends on one thing: perfect slicing. The goal is to create deep, even cuts without slicing all the way through. Here’s how to do it.
Chopsticks trick: The foolproof slicing method
Place the potato between two wooden chopsticks or wooden spoons. They’ll stop your knife from going all the way through the potato. This trick is a lifesaver, especially if you’re just starting out.
How thin is thin enough? (2mm is the sweet spot)
The magic happens when you slice thinly—about 2mm apart. Thin slices allow the potatoes to fan out beautifully in the oven and give you those crispy edges. Thick slices stay clumped together and lose that wow factor.
Prepping your potato for the perfect base stability
Before you even start slicing, cut a small slice off the bottom of each potato. This creates a flat base, keeping the potato stable while you cut. It’s a small step that makes a big difference in both safety and accuracy.
Looking for something hearty to pair with potatoes? Don’t miss our crockpot garlic butter beef bites and potatoes—a match made in comfort food heaven.
Flavor Boosters: Oils, Herbs, and Seasonings That Matter
While Hasselback potatoes look impressive on their own, what sets them apart in taste is the strategic use of oils, aromatics, and just the right amount of salt. The crispiness isn’t only about technique—it’s also about flavor absorption in each fan-like layer.
Olive oil vs butter: Which crisps better?
If you want ultimate crispiness, olive oil is your best friend. Its low water content helps the potato slices roast instead of steam. While butter brings a rich depth of flavor, it has around 20% water, which can soften the edges. For the best of both worlds, brush with olive oil during the first part of baking and switch to melted butter for the final golden finish.
Want to try another rich, indulgent recipe? Don’t miss our creamy cheesy buffalo chicken dip that makes a perfect game day pairing with crispy potatoes.
Infusing garlic and rosemary for extra aroma
Garlic cloves and rosemary sprigs aren’t just for show—they infuse the oil and waft their aroma through every slice. Smash garlic cloves (skin on) and toss them onto the baking tray halfway through cooking. They’ll flavor the oil without burning. As for rosemary, fresh sprigs are essential—dried herbs tend to scorch under high heat.
No rosemary on hand? Sage or thyme are great alternatives, as long as they’re fresh.
Salt: How and when to apply it for maximum flavor
Salt is a critical element here, but timing matters. Lightly sprinkle salt before the first bake to begin flavoring. Then, after the slices begin to fan, generously season again and baste with the infused oil. The salt will seep into every crevice, creating those addictive crispy, salty edges.
Discover great ideas like our crockpot marry me chicken recipe, another dinner table favorite packed with flavor.
Baking to Golden Perfection: The Crispiest Hasselback Technique
This is where the magic happens. The baking process isn’t just about time—it’s about technique. If you want the crispiest Hasselbacks, you’ll need a two-stage approach with strategic basting.
Two-stage baking method for best texture
Start by baking the potatoes at 400°F (200°C) for 30 minutes. This softens the slices just enough to begin fanning out. After this stage, remove them, drizzle over the garlic-infused oil, and sprinkle on salt. This lets the flavor penetrate every slice, rather than just coating the surface.
After that, return them to the oven for another 40 minutes. The internal texture should become tender while the edges start to turn golden.
The art of basting: When and how often
Basting is not optional. Every 10 minutes during the second bake, use a brush to drag the oil across the potato tops with pressure. This coaxes the slices apart and ensures oil gets deep inside. The more you baste, the better the fan and crunch.
Don’t shortcut this—proper basting makes the difference between regular roast potatoes and crispy Hasselback excellence.
Cranking up heat for final golden crunch
When the centers are soft and you’ve basted like a pro, crank the oven up to 425°F (220°C). Give the potatoes a final brush and bake another 10–15 minutes. This step intensifies the crispiness and caramelizes the edges into that irresistible golden color.
Looking for more cozy dinner options? Try our slow cooker Mississippi chicken to round out your meal.
How to Serve and Store Hasselback Potatoes
So you’ve nailed the perfect bake—now it’s time to present and preserve them properly for maximum wow (and crunch) factor.
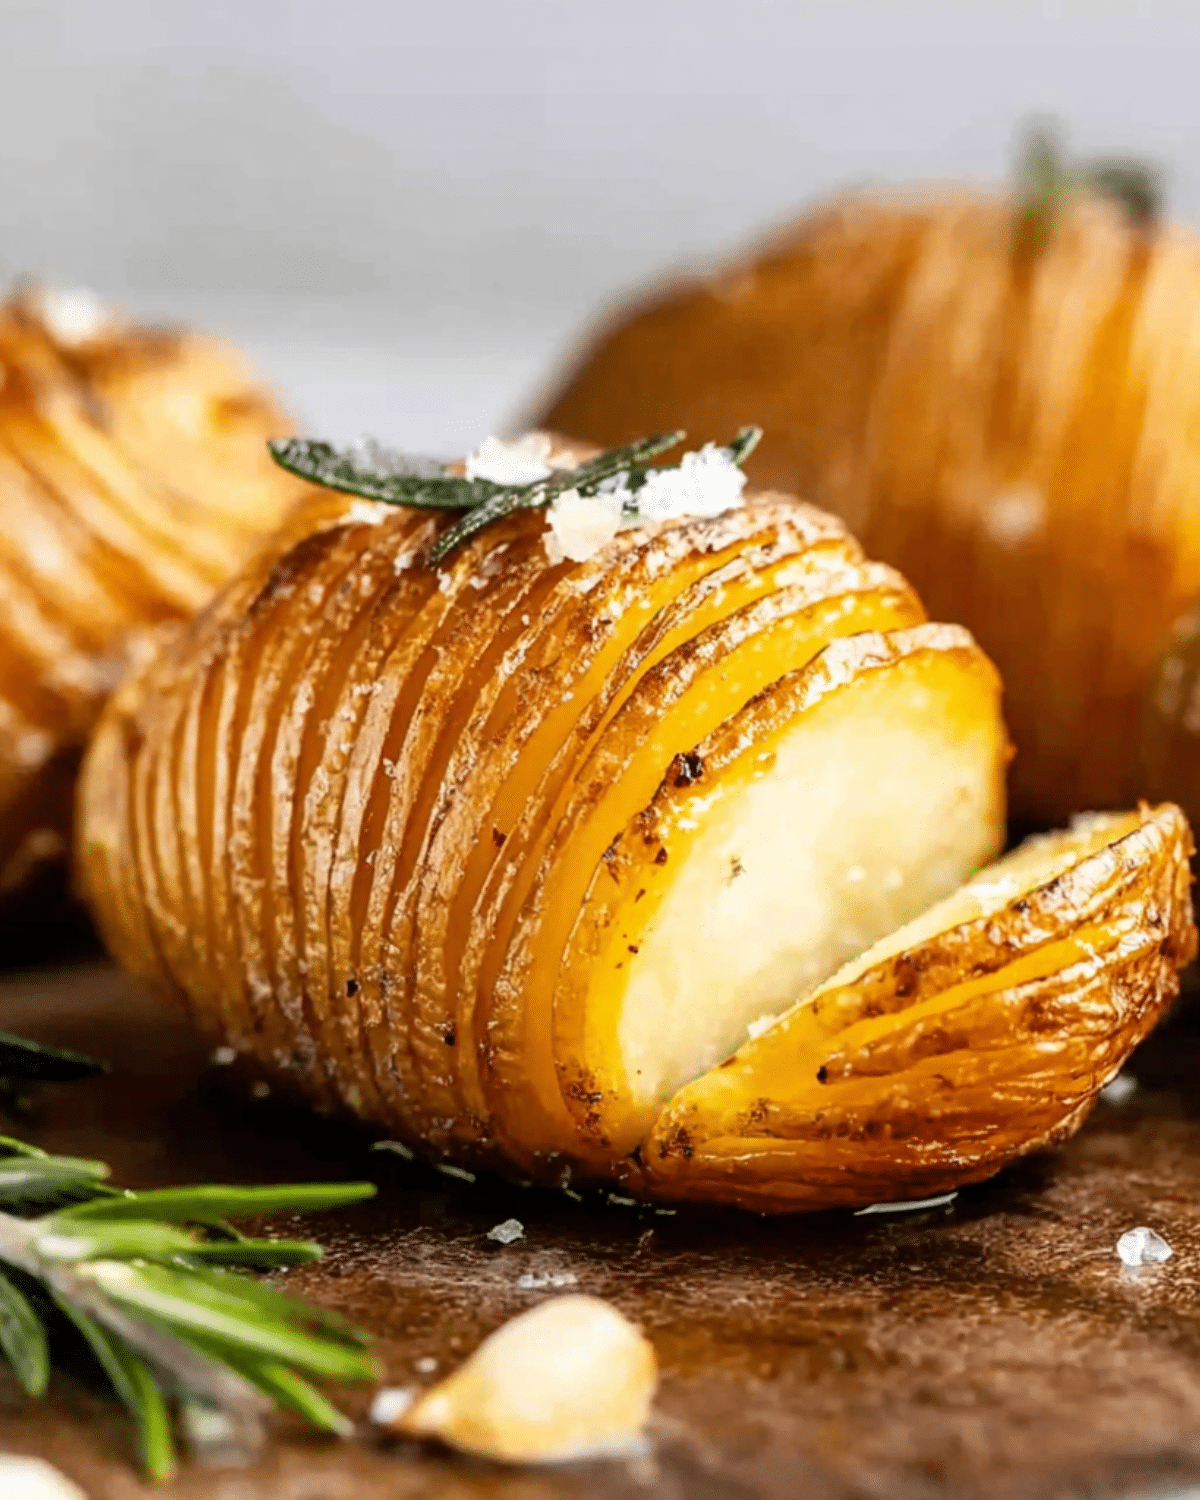
Serving suggestions and garnishes
Serve Hasselbacks straight from the oven while the edges are at their crispest. A sprinkle of flaky sea salt, a drizzle of garlic butter, and a few fresh rosemary sprigs make the dish pop. Want extra indulgence? Add a dollop of sour cream, a crumble of feta, or a sprinkle of parmesan.
These pair beautifully with roasts, grilled meats, or even a simple salad for balance.
Keeping leftovers crispy (or close to it)
Truth be told, nothing beats a Hasselback fresh out of the oven. But leftovers can still shine. Store in an airtight container for up to 3 days. To reheat, skip the microwave and go for a toaster oven or air fryer. A quick 5–10 minutes at 400°F will bring back some of that original crunch.
Reheating tips that preserve texture
Always reheat uncovered and avoid steam. If you’re using a regular oven, place the potatoes directly on the rack or a baking tray lined with parchment paper. Brush with a touch of oil before reheating to revive the golden edges.
Don’t miss our slow cooker ravioli lasagna recipe for another easy comfort food win.
Common Mistakes to Avoid When Making Hasselback Potatoes
Even simple recipes can go sideways without the right know-how. Avoid these common missteps to ensure your Hasselbacks come out crispy and perfect every time.
Cutting too shallow or too thick
If your slices don’t go deep enough, the potato won’t fan out—and that defeats the whole point of a Hasselback. On the flip side, thick slices don’t get crispy or absorb flavor well. Use the chopsticks trick and slice every 2mm for ideal results.
Skipping the basting process
This is where many go wrong. Basting with oil throughout the bake helps separate the slices and adds flavor between each layer. It also promotes crispiness on the edges. Skipping this step results in a dry, underwhelming potato.
Using the wrong oven temperature
If the oven is too low, your potatoes will cook but never crisp. Too high too soon, and they’ll burn before the centers are done. Stick with a two-stage baking method and finish with a high-heat blast for the golden crunch.
Looking for more satisfying potato recipes? Try our slow cooker cheesy potatoes for a creamy, hands-off alternative.
FAQs about Crispy Hasselback Potatoes
What kind of potato is best for Hasselbacks?
Starchy or all-purpose potatoes like Russets and Yukon Golds are ideal. They bake up fluffy on the inside and crisp beautifully on the outside. Oval-shaped potatoes work best for the signature fan effect.
Why aren’t my potatoes fanning out?
There are two likely reasons: your slices are too thick, or you didn’t cut deep enough. Aim for 2mm spacing and slice down to about ¼ inch from the base. Basting while baking also helps force the slices open.
Can I make Hasselback potatoes ahead of time?
You can prep and slice them in advance, even par-bake for 30 minutes. But for peak crispiness, do the final bake and serve fresh. Leftovers are still tasty, but they lose some of the signature crunch.
What’s the best tool to cut them evenly?
Chopsticks or wooden spoons placed on either side of the potato act as guards, helping you slice evenly without cutting through completely. A sharp chef’s knife is essential for clean cuts.
Conclusion: Why This Hasselback Recipe Will Be Your New Go-To
Crispy Hasselback potatoes strike the perfect balance between presentation and flavor. They’re crispy, buttery, and infused with garlic-rosemary goodness. Whether you’re cooking for a crowd or just need an elevated side dish, this recipe delivers every time.
With a few simple tricks—like using the right potato, mastering the cut, and committing to the basting process—you’ll have a go-to recipe that turns any meal into a celebration.
Don’t miss our homemade chocolate orange sticks if you want to end dinner on a sweet, citrusy note.
PrintCrispy Hasselback Potatoes

Crispy Hasselback Potatoes are a golden, buttery side dish with thin, fan-like slices baked to perfection and basted with garlic rosemary olive oil for incredible flavor and texture.
- Prep Time: 15 minutes
- Cook Time: 85 minutes
- Total Time: 1 hour 40 minutes
- Yield: 5–6 servings
- Category: Side Dish
- Method: Baked
- Cuisine: Western
- Diet: Vegetarian
Ingredients
- 5–6 potatoes (250g / 8oz each, oval-shaped, Yukon Gold or Russet)
- 1 1/2 tsp extra virgin olive oil
- 1/4 tsp cooking salt / kosher salt
- 1/4 cup extra virgin olive oil (for basting)
- 1 1/4 tsp cooking salt / kosher salt (for basting)
- 4 garlic cloves, smashed (optional)
- 3 rosemary sprigs (optional)
Instructions
- Preheat oven to 200°C/400°F (180°C fan-forced).
- Cut a small slice off the base of each potato to make it sit flat.
- Place each potato between two chopsticks or wooden spatulas to prevent cutting through, then slice thinly (2mm apart).
- Drizzle each potato with 1 1/2 tsp olive oil and sprinkle lightly with 1/4 tsp salt.
- Place on a baking tray and bake for 30 minutes.
- Remove from oven, pour 1/4 cup olive oil over potatoes, and sprinkle with 1 1/4 tsp salt. Add garlic and rosemary to the tray.
- Return to oven and bake for another 40 minutes, basting every 10 minutes with the oil in the tray. Apply pressure when brushing to help slices fan out.
- Increase oven to 220°C/425°F (200°C fan). Baste again and bake an additional 10–15 minutes until crispy and golden.
- Serve immediately with optional salt flakes and fresh rosemary.
Notes
- Use starchy potatoes like Yukon Gold or Russet for best crispiness.
- Chopsticks or wooden spatulas help prevent slicing through the potato.
- Thin slices and deep cuts help the potato fan out and crisp up.
- Fresh herbs are preferred as dried ones may burn.
- Leftovers can be stored for up to 3 days but lose some crispiness.
Nutrition
- Serving Size: 1 potato
- Calories: 220
- Sugar: 1g
- Sodium: 420mg
- Fat: 14g
- Saturated Fat: 2g
- Unsaturated Fat: 11g
- Trans Fat: 0g
- Carbohydrates: 22g
- Fiber: 2g
- Protein: 3g
- Cholesterol: 0mg