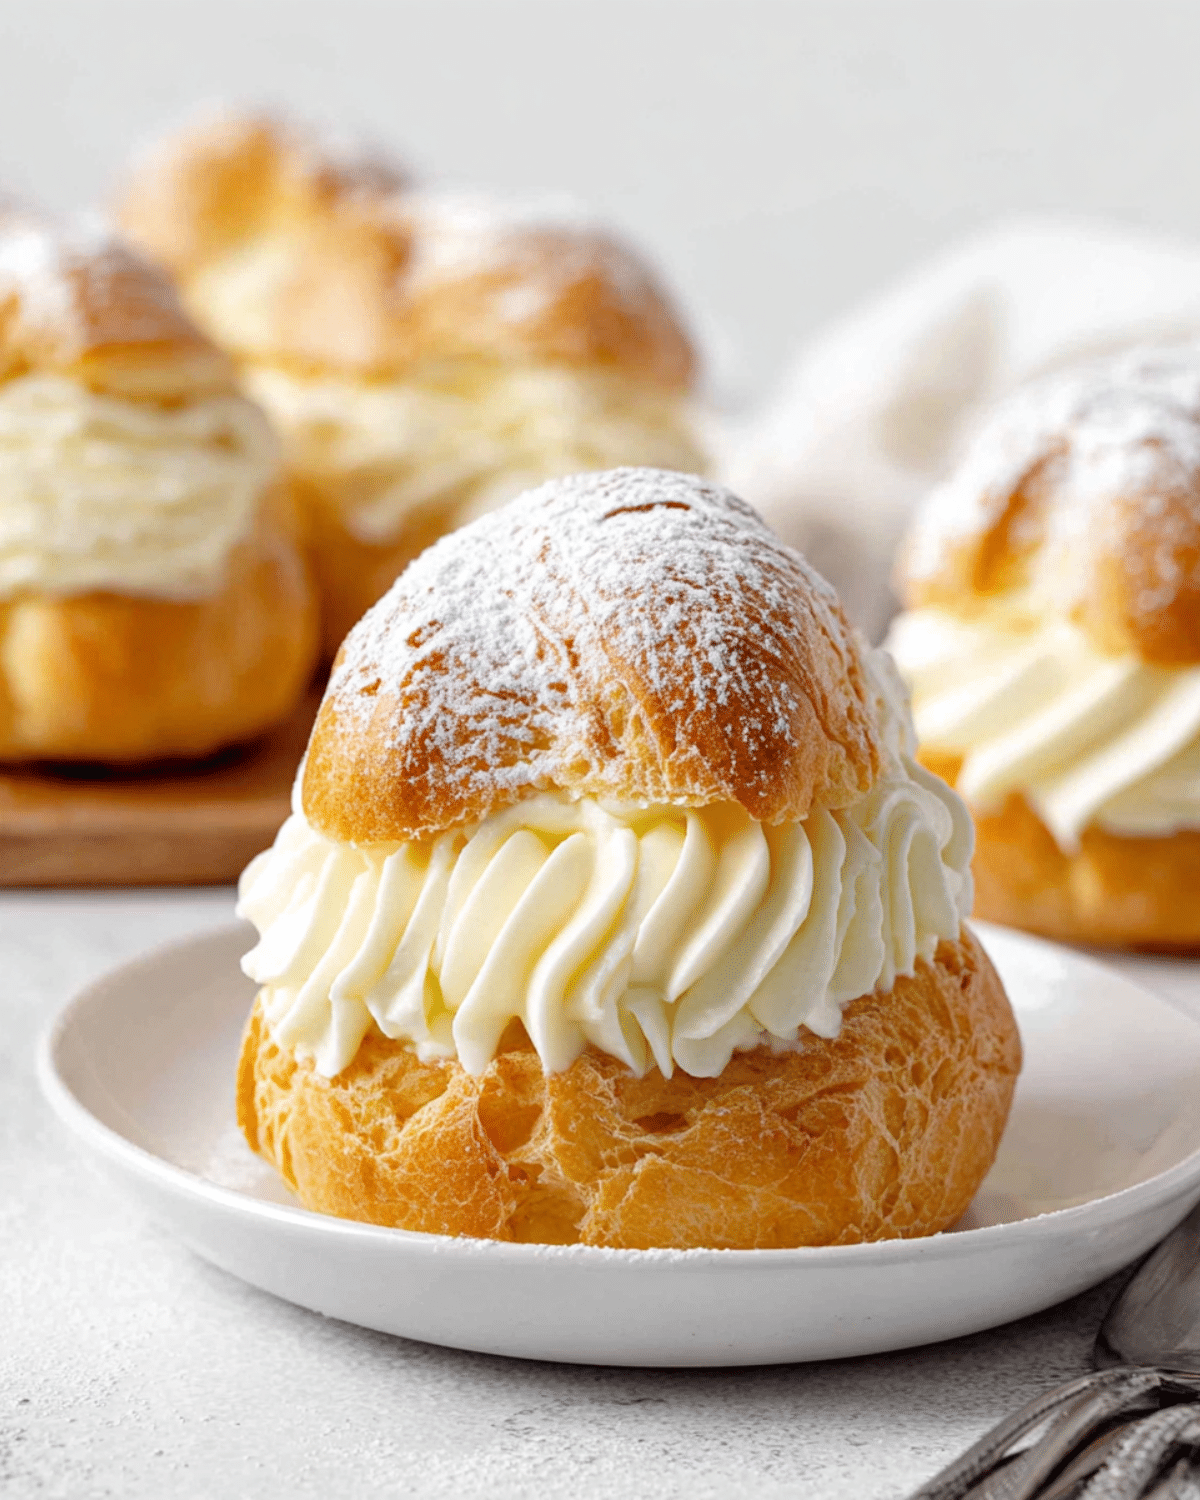
Cream puffs are the kind of dessert that feels like a little bite of Paris—crispy, hollow shells filled with soft, sweet cream that melt in your mouth. Whether you’re baking for a celebration, impressing guests, or just craving something light and luscious, this cream puffs recipe is your foolproof guide. We’ll explore everything you need to know to make them from scratch: ingredients, techniques, common mistakes to avoid, filling options, and storage tips. You’ll also learn how cream puffs differ from other choux pastries like profiteroles, and we’ll answer your most frequently asked questions.
Don’t miss our Raspberry Cake with Lemon Buttercream if you love light desserts with a fruit twist!
JUMP TO
Table of Contents
The Secret Behind Perfect Homemade Cream Puffs
What Are Cream Puffs?
Cream puffs are a classic French dessert made using choux pastry (pâte à choux), a light dough that puffs up in the oven to form crisp, hollow shells. Once cooled, they’re filled with whipped cream—most commonly chantilly cream—and dusted with powdered sugar. What makes them so irresistible is their contrast: crisp outside, cloud-like inside.
These pastries are surprisingly versatile. Serve them at weddings, birthdays, or a cozy brunch. They’re elegant yet easy enough for beginner bakers with the right technique.
Cream Puff vs Profiterole: What’s the Difference?
Many people use the terms interchangeably, but they’re not the same. While both are made with choux pastry, cream puffs are usually:
- Larger than profiteroles
- Cut in half to fill (not injected from the bottom)
- Filled with chantilly cream, not ice cream or pastry cream
- Topped with powdered sugar, not chocolate ganache
Profiteroles are often served cold with a drizzle of warm chocolate, while cream puffs are typically served fresh and simple. Understanding this difference can help you set your dessert apart.
Essential Ingredients for the Best Cream Puffs
Quality ingredients matter. For successful cream puffs, use the following:
| Ingredient | Purpose |
|---|---|
| European-style butter | Adds richness and structure |
| Whole milk + water | Balance of flavor and steam for puffing |
| Bread flour (13% protein) | Helps create hollow center and crispy shell |
| Eggs (room temperature) | Essential for lift and structure |
| Salt + sugar | Enhances flavor and browning |
| Heavy cream (36% fat) | For a stable whipped filling |
| Mascarpone (41% fat) | Adds stability and smoothness to chantilly cream |
| Vanilla extract | Flavor enhancer for the filling |
Avoid substituting these ingredients, especially the flour and eggs. Their balance is critical to achieving proper rise, structure, and a hollow interior.
Looking for inspiration? Try our Greek Yogurt Cake Recipe for another light and fluffy dessert option.
Must-Have Tools and Equipment for Choux Pastry
Cream puffs rely as much on tools as technique. Before starting, gather these:
- Digital scale – Accuracy matters in baking
- Stand mixer with paddle attachment – For perfect dough consistency
- Perforated baking mat or parchment paper – Promotes even baking
- Piping bag + French star nozzle (0.5″) – For neat shaping
- Oven thermometer – Ensures correct, stable temperature
- Wilton 1M tip – Ideal for beautiful whipped cream piping
- Rubber spatula – Helps mix without overworking dough
Check out our Crusty Batard Bread Recipe if you’re into precision baking techniques!
Every one of these tools plays a role in achieving bakery-style results at home. Skipping or substituting equipment often leads to deflation, cracking, or soggy results.
Don’t miss our Homemade Pumpkin Chai Cinnamon Rolls for another cozy treat with impressive results.
Step-by-Step Guide to Making Classic Cream Puffs
How to Make the Choux Pastry (Pâte à Choux)
Choux pastry is the heart of every cream puff, and getting it right is easier than you think—if you follow this process precisely.
- Sift the Flour First – This prevents lumps and ensures a smooth dough.
- Heat Wet Ingredients – In a saucepan, combine water, whole milk, unsalted butter, salt, and sugar. Bring to a gentle simmer.
- Add Flour All at Once – Remove the pan from heat, then immediately stir in sifted flour using a rubber spatula until fully incorporated.
- Cook the Dough – Return the pan to heat. Stir continuously for 3–5 minutes until a thin film forms on the bottom. This step evaporates excess moisture.
Your dough should pull away from the sides and form a tight ball.
- Cool, Then Add Eggs – Transfer the dough to a stand mixer. Mix on low speed for 1 minute. Gradually add lightly beaten room-temp eggs until the dough forms a smooth, glossy texture that falls from the paddle in a “V” shape.
Pro Tip: Add eggs slowly—too much egg will make the dough too loose to puff properly.
Check out our Pumpkin Spice Coffee Cake for another perfect fall bake using warming spices and a soft, fluffy crumb.
Piping Like a Pro: Tips for Shape & Size
Once your dough is perfect, transfer it into a piping bag fitted with a 0.5-inch French star tip. Pipe 12 equal-sized mounds onto a perforated mat or parchment-lined sheet.
Best practices for perfect piping:
- Hold your piping bag vertically (90°) to create tall mounds
- Space them out to allow expansion
- Tap the tips with a wet finger to smooth any peaks
- Lightly dust with powdered sugar to prevent cracking
Consistency here ensures even rise and uniform results.
The Importance of Chilling and Freezing the Dough
This is a game-changing step many skip. Chill the piped dough in the fridge for at least 1 hour, then freeze for another 1 hour before baking.
Why? Because:
- Chilling helps firm the dough, preventing spreading
- Freezing sets the shape, resulting in sharp, bakery-style puffs
- Cold dough leads to a crisp exterior and hollow center
Don’t miss our Creaminess Baked Mashed Potatoes if you’re looking for a comfort dish with the same silky interior that makes cream puffs addictive.
Baking the Cream Puffs Without Cracks or Collapse
Temperature is everything. Here’s the baking sequence that guarantees success:
- Preheat oven to 392°F (200°C)—without the fan
- Place frozen dough in oven, immediately lower temp to 338°F (170°C)
- Bake for 40 minutes—do not open the oven for the first 30 minutes
Use a digital oven thermometer. The cream puffs should be golden, fully risen, and hollow when tapped.
Mistake to avoid: Opening the oven early causes collapse. Underbaking leads to soggy, flat puffs. Use visual cues—don’t rely on time alone.
Looking for inspiration? Try our Easy Pumpkin Spice Poke Cake for another fall-forward dessert that surprises with every bite.
How to Fill Cream Puffs with Chantilly Cream
The filling is just as important as the shell. For this recipe, we’re using Chantilly cream—a whipped mixture of heavy cream, mascarpone, powdered sugar, and vanilla extract.
Steps:
- Combine cold heavy cream and mascarpone in a chilled bowl
- Add sifted powdered sugar, whip for 1 minute
- Add vanilla extract, continue whipping until soft peaks form (about 2–3 minutes)
- Stop as soon as stiff peaks form to avoid over-whipping (it’ll turn into butter)
Slice the top third off each cooled puff. Pipe the cream inside using a Wilton 1M tip, replace the tops, and dust with powdered sugar.
Serving Tip: Cream puffs are best enjoyed immediately. The shell begins absorbing moisture the moment it’s filled.
Variations, Fixes & Serving Tips
Common Cream Puff Mistakes and How to Fix Them
Even experienced bakers encounter issues with choux pastry. Here’s how to troubleshoot the most common cream puff fails:
| Problem | Likely Cause | Fix |
|---|---|---|
| Puffs collapse after baking | Underbaked or oven door opened too early | Bake longer, never open oven during the first 30 mins |
| Dough too runny | Too many eggs added | Start over—can’t fix runny dough |
| Puffs didn’t rise | Oven wasn’t preheated or dough was too wet | Preheat fully, add eggs gradually |
| Cracked tops | Oven fan was on, or dough too dry | Turn off fan, cover dough while cooling |
| No hollow center | Low protein flour or underbaked | Use bread flour (13%+ protein), bake fully |
Being precise with measurements and temperature makes a huge difference. Want something less technical but still impressive? Discover great ideas like our Jello Divinity Recipe for a no-fail sweet treat.
Flavor Variations and Alternative Fillings
Once you’ve nailed the classic chantilly cream puff, it’s time to get creative.
Filling Ideas:
- Pastry Cream – Rich and thick, ideal for a custard feel
- Chocolate Crèmeux – Smooth, decadent, and luxurious
- Lemon or Mango Curd – For bright, citrusy twists
- Strawberry Compote – Adds natural sweetness and texture
- Ice Cream or Sorbet – Great for summer, transform them into profiteroles
Topping Variations:
- Dip the tops in chocolate ganache
- Sprinkle with crushed nuts or freeze-dried fruit
- Drizzle with caramel or fruit syrup
- Dust with cocoa powder or cinnamon sugar for depth
Looking for another bright flavor twist? Don’t miss our Moist Lemon Bread with Glaze for zesty inspiration.
How to Store and Reheat Cream Puffs
Cream puffs are best fresh, but here’s how to keep them tasting their best:
| Storage Method | Duration | Instructions |
|---|---|---|
| Filled puffs (refrigerated) | 1 day max | Store in airtight container to prevent sogginess |
| Unfilled puffs (room temp) | 2–3 days | Keep in sealed container, re-crisp in oven before filling |
| Unfilled puffs (frozen) | 1–2 months | Freeze in airtight bag, thaw then crisp in oven before use |
| Chantilly cream | 1 day (refrigerated) | Whip just before filling; over time it may deflate |
Do not freeze filled puffs—the texture will degrade significantly upon thawing.
Serving Suggestions and Presentation Ideas
Cream puffs can be dressed up or down depending on the occasion. Here are a few stylish ideas:
- Serve stacked as a croquembouche for weddings or holidays
- Dust with powdered sugar and pair with fresh berries
- Serve with hot espresso or dark chocolate sauce on the side
- Place in mini cupcake liners for elegant buffet-style presentations
- Top with edible flowers for an Instagram-worthy dessert spread
For more charming presentation ideas, check out our Strawberry Bread Loaf with Strawberry Glaze, which is a hit for brunch tables and spring parties.

FAQ: Your Cream Puff Questions Answered
Why Didn’t My Cream Puffs Rise?
The main causes are an oven that wasn’t hot enough, or too much moisture in the dough. Preheat your oven fully and reduce egg quantity if the dough feels too loose.
Can I Make Cream Puffs Ahead of Time?
Yes. You can prepare and freeze piped dough, or bake unfilled puffs in advance. Fill them the day you plan to serve them for best texture.
Are Cream Puffs Supposed to Be Hollow?
Yes. A properly baked choux pastry will rise and form a hollow interior, perfect for filling. Using high-protein bread flour and ensuring a long enough bake time helps achieve this.
Can You Freeze Cream Puffs with Filling?
It’s not recommended. The cream will separate, and the shell becomes soggy. Only freeze unfilled puffs or raw piped dough.
Conclusion
Cream puffs may seem intimidating, but with precise technique, quality ingredients, and a few chill-and-bake secrets, you’ll be making elegant French pastries right in your own kitchen. Whether you’re sticking with chantilly cream or trying a fruity curd or ganache, the options are endless once you master the base.
Looking for more simple desserts with big impact? Don’t miss our No-Bake Lemon Blueberry Delight—it’s just as satisfying without turning on your oven.
PrintCream Puffs
Light and airy French cream puffs made with crisp choux pastry and filled with rich chantilly cream. A classic dessert that’s perfect for any occasion and surprisingly simple to make at home.
- Prep Time: 2 hours (includes chilling and freezing time)
- Cook Time: 40 minutes
- Total Time: 2 hours 40 minutes
- Yield: 12 cream puffs
- Category: Dessert
- Method: Baking
- Cuisine: French
- Diet: Vegetarian
Ingredients
- 120g (½ cup) unsalted European-style butter (82% fat), in chunks
- 120g (½ cup) water
- 120g (½ cup) whole milk
- ½ tsp salt
- 2 tsp granulated sugar
- 140g (1 cup) bread flour (13% protein)
- 220g (approx. 4) eggs, room temperature
- 250g (1 cup) heavy cream (36% fat), cold
- 125g (½ cup) mascarpone cheese (41% fat), cold
- 50g (¼ cup) powdered sugar, sifted
- 1 tsp pure vanilla extract
Instructions
- Sift flour and set aside.
- In a saucepan, combine butter, water, milk, salt, and sugar. Heat over medium until it simmers.
- Remove from heat and stir in flour all at once. Mix vigorously with a spatula until dough is smooth.
- Return to heat and stir for 3–5 minutes until a film forms on the bottom of the pan.
- Transfer dough to a stand mixer and mix on low speed for 1 minute to cool slightly.
- Gradually add beaten eggs until the dough is glossy and falls in a “V” shape from the paddle.
- Pipe dough onto a lined tray using a 0.5″ French star tip. Chill for 1 hour, then freeze for another hour.
- Preheat oven to 392°F (200°C). Place tray in oven and reduce temperature to 338°F (170°C). Bake for 40 minutes without opening the oven.
- Cool puffs completely before slicing the tops.
- To make chantilly cream, beat cold cream, mascarpone, and powdered sugar for 1 minute. Add vanilla and whip until stiff peaks form.
- Pipe cream into each puff and replace the tops. Dust with powdered sugar and serve.
Notes
- Use a digital scale for accurate measurements.
- Do not overmix or overbeat the chantilly cream.
- Do not open the oven door during baking.
- Freeze piped dough for best shape and crispiness.
- Best served fresh after filling to avoid sogginess.
Nutrition
- Serving Size: 1 cream puff
- Calories: 289
- Sugar: 2g
- Sodium: 141mg
- Fat: 25g
- Saturated Fat: 15g
- Unsaturated Fat: 6g
- Trans Fat: 0.3g
- Carbohydrates: 15g
- Fiber: 0.3g
- Protein: 6g
- Cholesterol: 133mg