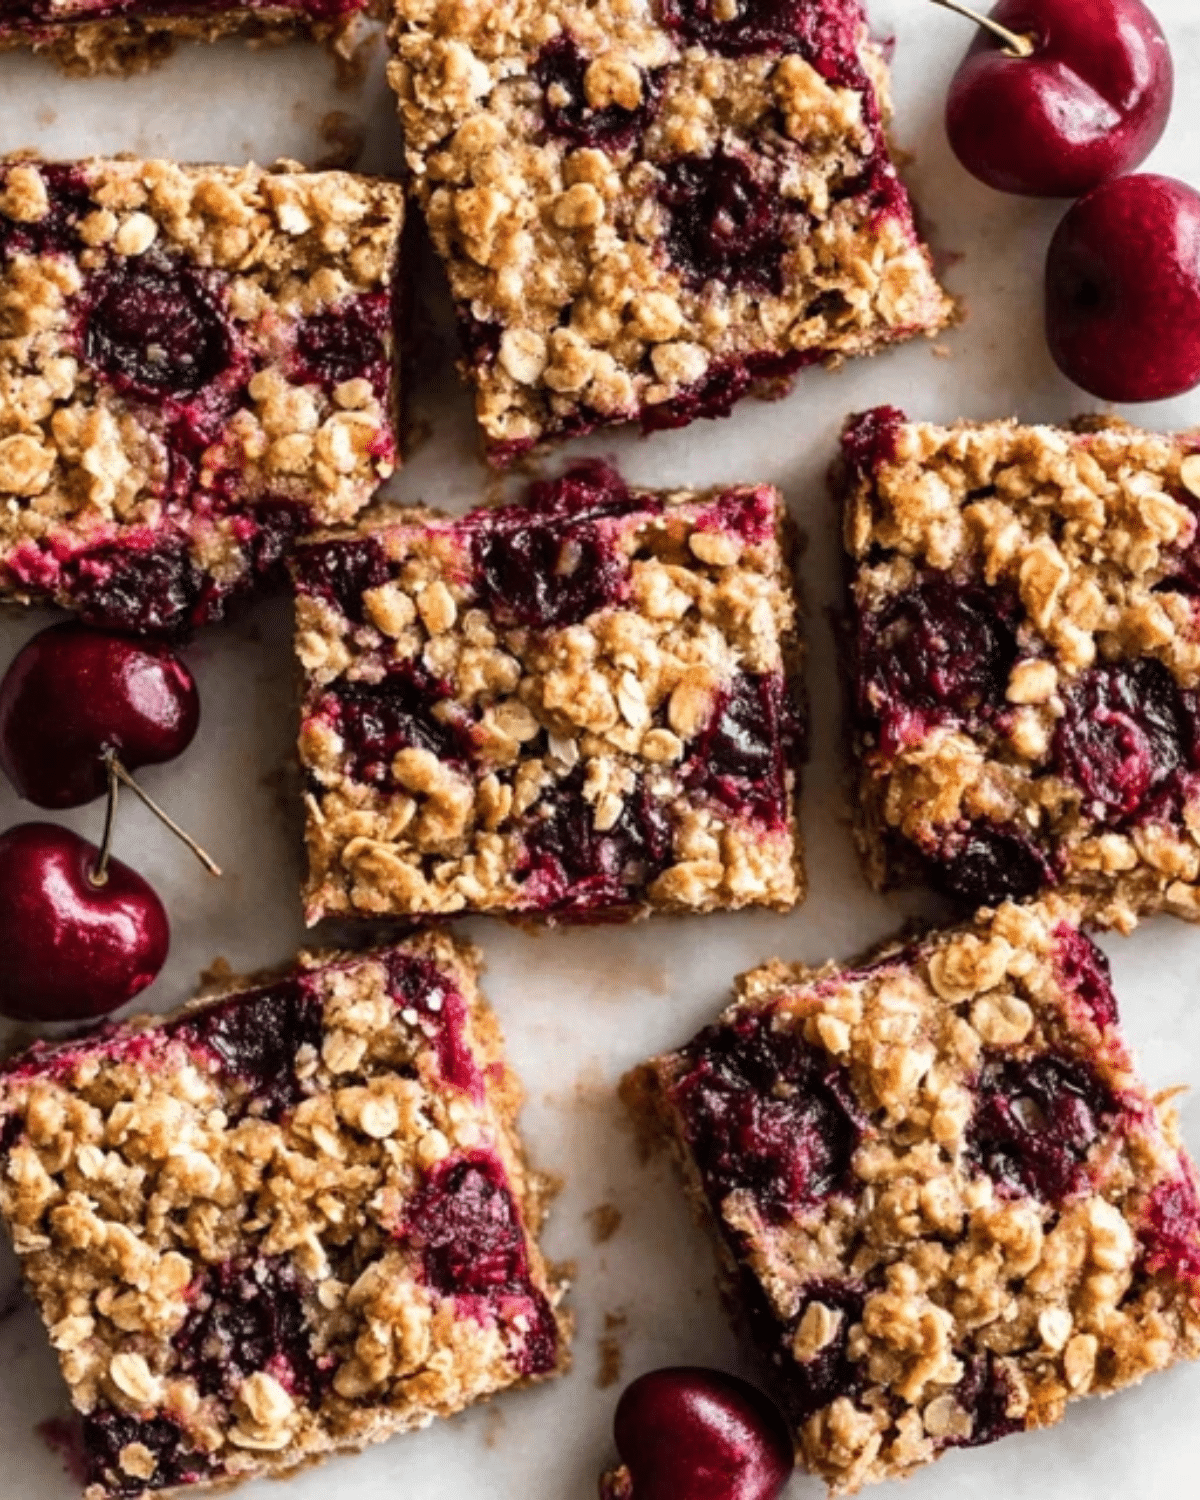
Cherry breakfast bars are a convenient, satisfying option for mornings when time is short but you still want something homemade and nourishing. Made with a soft base, a fruity cherry layer, and a lightly crisp topping, these cherry breakfast bars strike a balance between wholesome and comforting. They are easy to prepare ahead of time, store well, and taste just as good the next day.
Unlike packaged breakfast bars that often rely on preservatives and added sugars, homemade cherry breakfast bars allow you to control ingredients while enjoying real fruit flavor. Cherries add natural sweetness and a slight tartness that keeps the bars from tasting heavy. This article explains why cherry breakfast bars are ideal for busy mornings, how to prepare them properly, and how to bake them for the best texture and flavor.
JUMP TO
Table of Contents
Why Cherry Breakfast Bars Are Perfect for Busy Mornings
Cherry breakfast bars have become a popular choice for home cooks because they combine convenience with real ingredients. They can be baked once and enjoyed over several days, which makes them practical for hectic schedules.
What Makes Breakfast Bars a Smart Choice
Breakfast bars are designed to be portable, filling, and easy to eat. Because they are baked in a single pan and sliced into portions, they require very little effort during busy mornings. Cherry breakfast bars can be grabbed on the way out the door, packed into lunchboxes, or enjoyed with coffee.
Unlike traditional breakfasts that require cooking each morning, breakfast bars save time while still offering substance. Their combination of grains and fruit provides steady energy, making them a reliable option when mornings feel rushed.
Why Cherries Work So Well in Breakfast Bars
Cherries are especially well suited for breakfast bars because they bake beautifully and provide balanced flavor. Their natural sweetness pairs well with oats and baked bases, while their slight tartness prevents the bars from becoming overly sweet.
As cherries cook, they soften and release juice, creating a jam-like layer that binds the bars together. This texture adds moisture and contrast, making cherry breakfast bars feel satisfying without being heavy.
Cherry Breakfast Bars vs Store-Bought Bars
Store-bought breakfast bars often contain added sugars, artificial flavors, and preservatives. In contrast, homemade cherry breakfast bars rely on simple ingredients and real fruit. This results in fresher flavor and better texture.
Homemade bars also allow flexibility. You can adjust sweetness, portion size, and texture based on preference. For many people, this makes cherry breakfast bars a more appealing and dependable choice for everyday mornings.
Ingredients and Preparation for Cherry Breakfast Bars
Cherry breakfast bars come together with a short list of familiar ingredients, yet how those ingredients are prepared plays a major role in texture and flavor. When balanced correctly, the bars turn out soft, slightly chewy, and sturdy enough to hold their shape while still feeling moist and satisfying.
Essential Ingredients for Cherry Breakfast Bars
Oats form the backbone of most cherry breakfast bars. Rolled oats work best because they soften during baking while still providing structure. They create a hearty base that feels filling without being dense. Flour is often used alongside oats to bind the mixture and give the bars clean edges once sliced.
Butter or oil adds richness and moisture, helping the bars stay tender. Sweeteners such as sugar or natural alternatives provide balance and help the bars brown lightly in the oven. Eggs are sometimes included to improve structure, although some versions rely solely on oats and flour for binding.
Cherries are the highlight of the recipe. Fresh cherries offer bright flavor and soft texture once baked, while frozen cherries work well when fresh fruit is out of season. A small amount of thickener, such as flour or starch, is often mixed with the cherries to help absorb excess juice and prevent sogginess.
Choosing the Best Cherries for Breakfast Bars
Sweet cherries are ideal for cherry breakfast bars because they soften into a jam-like consistency without becoming overly tart. When selecting fresh cherries, look for firm fruit with deep color and smooth skin. These signs indicate ripeness and good flavor.
Frozen cherries can also be used successfully. They should be thawed and drained well before baking. Removing excess liquid is important, as too much moisture can make the bars overly soft or cause the layers to separate.
Whether using fresh or frozen cherries, chopping them slightly helps distribute fruit evenly across the bars. Smaller pieces bake more consistently and prevent large pockets of moisture.
Preparing the Base and Filling Properly
Preparation usually begins with the base layer. Oats, flour, and sweetener are combined, then mixed with melted butter or oil until the mixture holds together when pressed. This mixture is pressed firmly into the bottom of a lined baking pan. Pressing evenly ensures a stable foundation that does not crumble when sliced.
The cherry filling is prepared separately by mixing cherries with sweetener and a small amount of thickener. This step helps control moisture as the bars bake. Spreading the cherry layer evenly over the base ensures consistent flavor in every bite.
A portion of the oat mixture is often reserved for the topping. Sprinkling it lightly over the cherry layer creates a textured finish that bakes into a lightly crisp top while still allowing the fruit layer to shine.
Baking Tips, Variations, FAQs, and Final Thoughts on Cherry Breakfast Bars
The final stage of making cherry breakfast bars is where texture, flavor, and structure all come together. Baking them correctly ensures the bars hold their shape, slice cleanly, and taste balanced rather than overly sweet or dry. This section covers practical baking tips, easy variations, common questions, and a clear conclusion to help you get consistent results every time.
How to Bake Cherry Breakfast Bars Perfectly
Cherry breakfast bars bake best at a moderate oven temperature, usually around 350°F. This allows the base to cook through without browning too quickly while giving the cherry filling enough time to thicken and set. Placing the pan on the center rack helps ensure even heat distribution.
Lining the baking pan with parchment paper is highly recommended. It prevents sticking and makes it easier to lift the bars out of the pan once cooled. After pressing the base firmly into the pan and adding the cherry layer and topping, gently level the surface so the bars bake evenly.
During baking, the bars will appear soft in the center and slightly golden around the edges. This is expected. Overbaking can dry out the base and cause the cherry layer to become too firm. The bars should be removed from the oven when the top is lightly golden and the center looks just set.
Cooling time is just as important as baking time. Allow the bars to cool completely in the pan before slicing. This resting period allows the layers to firm up, resulting in cleaner cuts and better texture. Cutting too early often leads to crumbly edges or a loose fruit layer.

Flavor Variations and Simple Substitutions
Cherry breakfast bars are easy to adapt without losing their appeal. For added texture, chopped nuts such as almonds or walnuts can be mixed into the topping. These add crunch and pair well with the sweetness of cherries.
If you prefer a slightly less sweet bar, reducing the sweetener in the base or filling allows the natural cherry flavor to stand out more. This adjustment works well for those who enjoy a more balanced, breakfast-style bar rather than a dessert-like one.
Different grains can also be used. While rolled oats are classic, a portion can be replaced with quick oats for a softer texture. Flour substitutions, such as whole wheat flour, can add heartiness while still producing good structure.
For variety, cherries can be paired with complementary flavors like vanilla or a hint of citrus zest. These additions enhance flavor without overpowering the fruit.
Common Mistakes and Frequently Asked Questions
Why are my cherry breakfast bars too soft?
Bars that are too soft are often the result of excess moisture in the cherries or insufficient cooling time. Draining cherries well and allowing the bars to cool fully before slicing usually solves this issue.
Can cherry breakfast bars be made ahead of time?
Yes, they are ideal for make-ahead baking. Once cooled and sliced, they can be stored for several days and still taste fresh.
Do cherry breakfast bars need to be refrigerated?
They can be kept at room temperature for a short period, but refrigeration extends freshness, especially in warmer environments.
Can these bars be frozen?
Yes, cherry breakfast bars freeze well. Wrapping individual portions makes them easy to thaw and enjoy later.
Conclusion: Why Cherry Breakfast Bars Belong in Your Routine
Cherry breakfast bars offer a practical, flavorful solution for busy mornings and planned snacks. With a hearty base, a naturally sweet cherry layer, and a lightly crisp topping, they strike a balance between wholesome and comforting. Their make-ahead convenience and dependable texture make them a reliable option for everyday routines.
By using simple ingredients and following a straightforward baking process, cherry breakfast bars deliver consistent results without unnecessary effort. Whether enjoyed at breakfast, packed for later, or served as a light snack, they prove that homemade options can be both easy and satisfying.
PrintCherry Breakfast Bars – Easy Make-Ahead Breakfast Recipe

Cherry breakfast bars are soft, hearty make-ahead bars made with oats and real cherries, perfect for busy mornings, snacks, or light breakfasts with balanced sweetness and texture.
- Prep Time: 15 minutes
- Cook Time: 40 minutes
- Total Time: 55 minutes
- Yield: 12 bars
Ingredients
- 2 cups rolled oats
- 1 cup all-purpose flour
- 3/4 cup brown sugar
- 3/4 cup unsalted butter, melted
- 1 teaspoon vanilla extract
- 1/2 teaspoon salt
- 2 cups fresh or frozen cherries, pitted and chopped
- 2 tablespoons granulated sugar
- 1 tablespoon cornstarch or flour (for thickening cherries)
Instructions
- Preheat the oven to 350°F (175°C) and line a baking pan with parchment paper.
- In a bowl, mix oats, flour, brown sugar, and salt.
- Stir in melted butter and vanilla extract until the mixture holds together.
- Press about two-thirds of the mixture firmly into the bottom of the prepared pan.
- In another bowl, combine cherries, granulated sugar, and cornstarch.
- Spread the cherry mixture evenly over the base layer.
- Sprinkle the remaining oat mixture evenly over the cherry layer.
- Bake for 35 to 40 minutes, until the top is lightly golden.
- Remove from the oven and let cool completely before slicing into bars.
Notes
- Drain cherries well to avoid excess moisture.
- Allow bars to cool fully for clean slices.
- Bars store well for several days in an airtight container.
- These bars can be frozen for longer storage.
Nutrition
- Serving Size: 1 bar
- Calories: 280 kcal
- Sugar: 18 g
- Sodium: 140 mg
- Fat: 13 g
- Saturated Fat: 7 g
- Unsaturated Fat: 5 g
- Trans Fat: 0 g
- Carbohydrates: 36 g
- Fiber: 4 g
- Protein: 5 g
- Cholesterol: 30 mg